Photoshop Image Adjustments vs Adjustment Layers
Still using Photoshop's image adjustments and damaging your photos? Here's why adjustment layers are a better, more flexible and non-destructive way to edit your images.
Download PDF: Image Adjustments vs Adjustment Layers
Photoshop includes lots of great image adjustments that make it easy to improve, or just change, the look of an image. And most of these adjustments come in two flavors. We have standard image adjustment commands, and we have adjustment layers. Both can achieve the exact same results.
But in this tutorial, we’ll compare image adjustments with adjustment layers to see why you should avoid using the image adjustment commands and why adjustment layers are the better, more flexible and non-destructive way to edit your photos.
Which version of Photoshop do I need?
I'm using Photoshop 2023 but this applies to older version as well.
The document setup
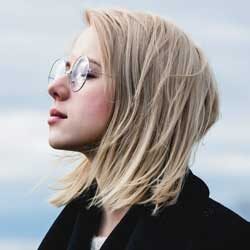
I’ll use this image from Adobe Stock, but you can follow along with your own image.

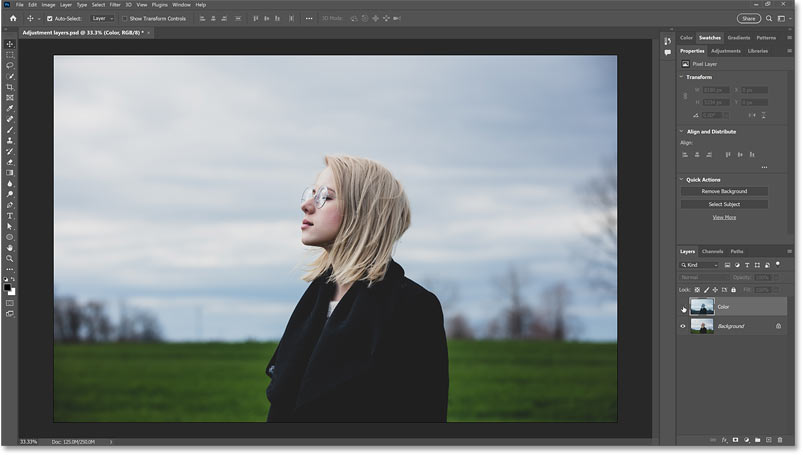
In the Layers panel, the image appears on the Background layer which is currently the only layer in the document.

Let's get started!
Related tutorials:
Photoshop’s image adjustment commands
We’ll start with a quick look at Photoshop’s standard image adjustments and how they work so we can then compare them to adjustment layers.
Where to find the image adjustments
All of Photoshop’s image adjustments are found under the Image menu in the Menu Bar and then under Adjustments.
Here we find adjustments like Levels and Curves which are mostly used for correcting the tone of an image. We have color adjustments like Vibrance, Hue/Saturation and Color Balance. And there are special effects-type of adjustments like Posterize, Threshold and Gradient Map. Plus lots more.
I’m not going to explain how every image adjustment works because that’s not the focus of this tutorial. Instead, my goal is to show you that there’s a better way to apply these adjustments.

Applying an image adjustment
To see how the image adjustments work, I’ll keep things simple and choose Hue/Saturation which is one of Photoshop’s color adjustments.

Let’s say I want to apply a single color to the image. I’ll click the Colorize option in the dialog box. Then I’ll choose a color by dragging the Hue slider. I’ll set it 200 for a shade of blue.

I’ll click OK to close the dialog box. And now the image is colored in blue. That was easy enough.

Related tutorial: Create monochromatic color effects in Photoshop
The problem with using Photoshop’s image adjustments
But in the Layers panel, there’s a problem. The adjustment was applied directly to my image on the Background layer. Which means that the original colors in the image are now gone.
This is what’s called a destructive edit because it made a permanent change to the image. If I was to save my document at this point and then close it, I would have no way of getting the original colors back.

Also, there's no way to edit the adjustment. What if I don’t like that blue color and want to try a different color? I could go up to the Edit menu and choose Undo Hue/Saturation, but that’s only because I haven’t done anything else to the image. As soon as I start making more edits or adding other adjustments, the option to undo this adjustment is going to get buried in a long list of steps that I would need to undo to get back to this point.

So image adjustments make permanent and destructive changes to the image with no way to edit the results. I’ll press Ctrl+Z or Command+Z on a Mac to undo the adjustment to return to my original image.
How to apply an image adjustment non-destructively
There is a way to apply Photoshop’s standard image adjustments non-destructively, and that’s by applying them to a copy of the image.
Making a copy of the original image
I’ll make a copy of my Background layer by pressing Ctrl+J on a Windows PC or Command+J on a Mac.

Then I’ll double-click on the copy’s name and rename it Color
.

Applying the image adjustment to the copy
With my copy layer active, I’ll go back to the Image menu, back to Adjustments and choose Hue/Saturation.

I’ll apply the exact same color adjustment as before by clicking the Colorize option, setting the Hue to 200 for blue, and then clicking OK to close the dialog box.

The adjustment is separate from the original image
But this time, because the adjustment was applied to a copy of my image, if I turn the copy layer off by clicking its visibility icon:

The original image is still there on the Background layer with all of its original colors. The adjustment was applied only to the layer above it.
The blend mode and opacity of the image adjustment
Along with keeping the original image safe, another advantage of applying image adjustments to separate layers is that we now have access to the blend mode and opacity of the adjustment.
So for example, if I want my Hue/Saturation adjustment to affect the colors in the original image but not the brightness, I can change the blend mode of the copy layer from Normal to Color.

Get my Complete Guide to Layer Blend Modes PDF exclusive!
And if I want to fade the adjustment so the new color is mixing with the original colors instead of replacing them completely, I can lower the copy layer’s opacity. I’ll lower it to 50 percent.

Here’s the result with the color adjustment now blending with the original image.

The adjustment is still not editable
But what if we want to edit the adjustment? What if I decide I don’t like this blue color and I want to try a different color? We may be working non-destructively, which is great, but we’re still stuck with the problem that the adjustment made a permanent change to the layer.
To try a different color, I would need to either undo the Hue/Saturation adjustment (if that was still an option), or I would need to delete the layer, make another copy, then go back to Image menu, back to Adjustments, choose Hue/Saturation again, and this time reapply it with a different setting. I would also need to change the blend mode and lower the opacity again.
So while applying image adjustments to separate layers is better than applying them to the original image, it’s still not the best way to work because there’s no way to edit the adjustment after we apply it.

The document file size
One more issue we need to look at before moving on to adjustment layers is the document’s file size. In the lower left of the document window is a status area showing information about your document. Click the arrow to see all the different types of information you can display. Then choose Document Sizes at the top to view the current file size.

Why are there two different sizes? The smaller number on the left is what the file size would be if we flattened all of our layers. And the larger number on the right is the current size with our layers still intact.
Notice that by making a copy of my image so I could apply my adjustment non-destructively, the file size doubled from 125 MB to 250 MB.

If I make several copies of my image, each for a different adjustment:

My file size increases quickly, jumping from 125 MB to roughly 750 MB. Depending on your computer, too many layers can slow Photoshop down. So that’s one more drawback to applying adjustments to copies of a layer. We’ll come back to the file size once we’ve learned how to use adjustment layers, which we’ll do next.

Photoshop’s Adjustment Layers
So how can we apply Photoshop’s image adjustments in a way that is non-destructive, makes no permanent changes, gives us access to the adjustment’s blend mode and opacity, and lets us edit the adjustment after we apply it? It’s easy! All we need to do is stop using image adjustments and switch to using adjustment layers. Here’s how they work.
Where do we find the adjustment layers?
Unlike standard image adjustments, Photoshop’s adjustment layers are not found under the Image menu. Instead, one place to find them is under the Layer menu and then under New Adjustment Layer.

Not every image adjustment is available as an adjustment layer. If we look at the list of image adjustments again, the ones from Brightness/Contrast down to Selective Color are available as an adjustment layer. But below that, the ones from Shadows/Highlights down to Equalize are not. That’s okay, though, because the ones that are available as adjustment layers are the ones we use the most.

Along with finding them under the Layer menu, you’ll also find the adjustment layers in the Adjustments panel. You can hover your cursor over the icons to see the name of the adjustment at the top.

Or you can click the panel’s menu icon and choose an adjustment from the list.

And a third place to find the adjustment layers, and the one I use the most, is in the Layers panel by clicking the New Fill or Adjustment Layer icon at the bottom.
Adding an adjustment layer
The first three options at the top (Solid Color, Gradient and Pattern) are not adjustment layers. They are what’s called Fill layers because they fill the document with either a solid color, a gradient or a pattern. The adjustment layers are found below them. I’ll choose the same adjustment as before which was Hue/Saturation.

Photoshop adds a Hue/Saturation adjustment layer above the image. Unlike standard pixel layers which display a preview thumbnail showing the layer’s contents, adjustment layers display an icon depending on the type of adjustment. In this case, it’s a Hue/Saturation icon.

The adjustment layer settings in the Properties panel
Instead of a dialog box popping up, the settings for an adjustment layer appear in Photoshop’s Properties panel. So I can apply the same color effect as before by choosing Colorize and then choosing a color by dragging the Hue slider.

Turning an adjustment layer on and off
Back in the Layers panel, I can turn the adjustment layer off to see the original image below it, which means the adjustment was applied non-destructively.
The adjustment layer’s blend mode and opacity
With the adjustment layer back on, we have access to the layer’s blend mode and opacity. So I can change the blend mode to Color just like I did before. And I can fade the adjustment by lowering the opacity.

I now have the exact same color effect, but this time using an adjustment layer.

How to edit the adjustment layer settings
The one thing we could not do earlier was edit the adjustment after we applied it. But with adjustment layers, we can. Just make sure the adjustment layer is selected in the Layers panel.

Then go back to the Properties panel and make whatever changes you need.

The adjustment layer mask
Notice that adjustment layers also include a built-in layer mask, indicated by the mask thumbnail.

If you select your adjustment layer in the Layers panel and the Properties panel is showing options for the mask, not the adjustment, it’s because you have the layer mask selected.

To switch from the mask options to the adjustment settings, either click on the adjustment icon on the adjustment layer itself in the Layers panel.
Or in the Properties panel, you can switch between the adjustment settings and the mask options using the two icons at the top.
How to use the adjustment layer’s mask
The adjustment layer’s mask can be used to control which areas of the image below the adjustment layer are affected by the adjustment. So if I want the background behind the woman to be colorized but not the woman herself, I just need to select her.
Making a selection with Select Subject
In Photoshop 2023 (which is what I’m using), one of the best ways to select the main subject in your image is with the Select Subject command.
So in the toolbar, I’ll choose either the Object Selection Tool, the Quick Selection Tool or the Magic Wand Tool. These are the only tools that give us access to the Select Subject button in the Options Bar.

Then in the Options Bar, I’ll click the arrow next to the Select Subject button and I’ll choose the new Cloud option which runs Select Subject on the cloud for better results. This option was first added in the August release of Photoshop 2022 and has been carried over into Photoshop 2023.

Then I’ll click Select Subject.

Running Select Subject on the cloud takes a bit longer, but we now have the woman selected.

Filling the selection with black
With the selection created, I’ll switch to the layer mask on the adjustment layer.

Then I’ll go up to the Edit menu and choose Fill.

In the dialog box, I'll set the Contents to Black and click OK.

Then I’ll remove the selection outline by going up to the Select menu and choosing Deselect.

And now the adjustment layer is bring applied only to the background.

Looking at the layer mask thumbnail, the white part of the mask is where the adjustment is affecting the image below it and the black area is where the adjustment is hidden. Of course you can always add a layer mask to a copy of the image, but adjustment layers include them automatically.

Related tutorial: How to fade an image to any color background.
Adding multiple adjustment layers to the image
Another advantage with adjustment layers is that you can add multiple adjustments to your image and each one remains separate.
In the Layers panel, I’ll click the New Fill or Adjustment Layer icon again and this time I’ll add a Levels adjustment.

The Levels adjustment layer appears above the Hue/Saturation adjustment, which means I now have two adjustments applied to the image and each one is separate from the other.

With the Levels adjustment selected, I’ll go up to the Properties panel and I’ll drag the black point and white point sliders in towards the histogram to increase the contrast in the image.

And here’s the result with the Levels adjustment.

Turning individual adjustment layers on and off
Since each adjustment is on a separate layer, I can turn the Levels adjustment layer on and off to compare the result without affecting the Hue/Saturation adjustment. And I can do the same thing with Hue/Saturation, turning it on and off without affecting the Levels adjustment above it.
Adjustment layers and the document file size
Finally, let’s go back to that file size issue we looked at earlier. Remember how, with each copy of the image layer we added, we saw a big jump in the document’s file size? Well notice that even with two adjustment layers added, the size of my document with the layers (on the right) is only slightly larger than the size it would be if we flattened the layers (left).

In fact, I’ll add a few more random adjustment layers just to see what happens with the file size.

And notice that even with three more adjustment layers added above the original two, the file size with the adjustments has not increased at all. So unlike standard pixel layers, adjustment layers will not slow Photoshop down no matter how many we add.

And there we have it! If you’re still using image adjustments, hopefully I’ve convinced you that adjustment layers are the better and more flexible way to work.
Related tutorials:
- How to color grade images with a Gradient Map adjustment
- Create high contrast black and white images with a Gradient Map adjustment
- How to posterize an image with a Posterize adjustment
Don't forget, all of these tutorials and more are now available to download as PDFs!