How to Posterize A Photo in Photoshop
Add a fast and easy posterize effect to your image with Photoshop to recreate the classic look of posters printed with limited colors of ink. A step-by-step tutorial.
In this tutorial, I show you how to posterize an image in Photoshop. The term posterize means that we limit or reduce the number of colors in the photo to recreate the look of posters that were printed with limited colors of ink.
So instead of a continuous tone image with smooth gradations, posterizing creates abrupt changes from one color, or one brightness level, to the next. This greatly reduces the amount of detail in the image and gives it more of a painted or airbrushed look.
And while the effect may look complicated, once you know the steps, you can go from start to finish in a couple of minutes!
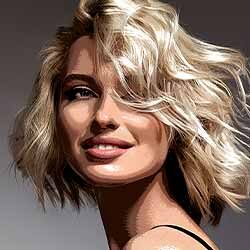
I'll use this image (model photo from Adobe Stock).

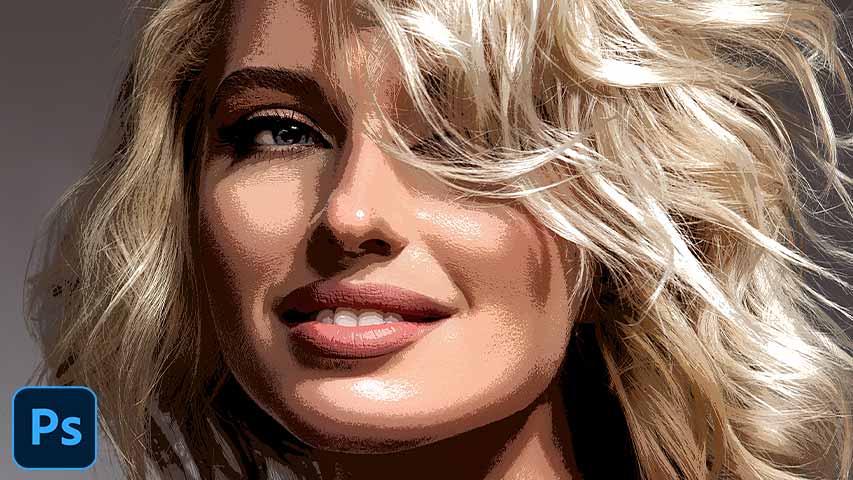
And here's what the final posterize effect will look like. You'll learn how to customize the effect, including how to adjust the colors and how to limit the effect to just your main subject, as we go along.

Which Photoshop version do I need?
To add the posterize effect to your entire image, any Photoshop version will work. But for the second part of this tutorial where we select the main subject, you'll want to be using Photoshop 2020 or later for best results. I'm using Photoshop 2022. You can get the latest version of Photoshop here.
Let's get started!
Step 1: Add a Posterize adjustment layer
We'll start by creating the initial posterize effect. And for that, all we need to do is apply a Posterize image adjustment. But to keep the effect separate from the image itself, we'll apply Posterize as an adjustment layer.
In the Layers panel, the image appears on the Background layer.

Click the New Fill or Adjustment Layer icon at the bottom of the Layers panel.
Then choose Posterize from the list.

Photoshop adds the Posterize adjustment layer above the image.

And right away, we see the initial posterize effect. We’ll learn why the colors look the way they do, and how to adjust them, next.

How the Posterize image adjustment works
Let's quickly look at what's happening with the Posterize adjustment. The controls for the adjustment appear in the Properties panel. And here we have a single slider named Levels set to a default value of 4.

Photoshop's color channels
Levels controls the number of brightness levels in each of Photoshop's three color channels (Red, Green and Blue). If I switch from the Layers panel to the Channels panel, we see the Red, Green and Blue channels, all mixing together to create the colors we see in the image.
With Levels set to 4, we're limiting the image to just 4 shades of red, 4 shades of green and 4 shades of blue, for a total of 64 possible colors (4x4x4).

The lowest setting you can choose for Levels is 2, which gives you just 2 shades each of red, green and blue.

This results in the least amount of detail in the image and the strongest posterize effect.

And if we drag the Levels slider all the way to the right to its maximum value of 255:

We're essentially turning the Posterize adjustment off and viewing the full color image.

I'll switch from the Channels panel back to the Layers panel.

Finding the value that works best
So lower values produce a much stronger posterize effect. And with most images, a value of between 4 and 10 works well.
The easiest way to find the best value for your image is to click on the current Levels value to highlight it. Then use the Up and Down arrow keys on your keyboard to cycle through the values.
For this image, I think a Levels value of 5 looks best.

And here's the result.

Step 2: Change the blend mode to Luminosity (optional)
Notice that we're seeing some weird colors in the image, especially in the skin tones. That's because we're giving Photoshop so few colors to work with. Depending on your image, these colors may be the effect you want since they give us a more authentic posterized look.
But if you would rather bring back the photo's original colors, simply change the blend mode of the Posterize adjustment layer from Normal to Luminosity.

The Luminosity blend mode limits the effect to just the brightness values, leaving the original colors alone. It's really a personal preference, but with this image, I think the original colors look better.
If you prefer the more authentic posterize effect, change the blend mode back to Normal.

Step 3: Add a Levels adjustment layer
To gain a bit more control over the effect, add a Levels adjustment layer between the image and the Posterize layer.
In the Layers panel, click on the Background layer to select it.

Then click the New Fill or Adjustment Layer icon at the bottom:
And this time choose Levels.

Photoshop adds the Levels adjustment layer above the image and below the Posterize adjustment.

Step 4: Drag the midtone slider
In the Properties panel, look for the midtone slider below the middle of the histogram.

Then drag the slider left or right. Dragging to the left will push more of the effect into the lighter tones.

And dragging the slider to the right brings out more of the darker tones. You don’t want to drag too far in either direction. The default midtone value is 1. I'll lower it to 0.96 just to add a bit more contrast.

Click the Levels adjustment layer's visibility icon to toggle it on and off and compare the effect with and without the midtone adjustment.
Step 5: Group the two adjustment layers
At this point, if you're happy with the posterize effect being applied to the entire image, you can stop here and you're done. But if you want to limit the effect to just your subject, here's how to do it.
First, we need to place our two adjustment layers into a layer group. So in the Layers panel, click on one of the adjustment layers to select it. Then hold the Shift key on your keyboard and click on the other adjustment layer to select them both.

With both layers selected, click the Layers panel menu icon:
And choose New Group from Layers.

Name the group Posterize
and click OK.

Back in the Layers panel, the adjustment layers appear inside the new Posterize group. You can twirl the group open or closed by clicking the arrow next to the folder icon.

Step 6: Turn off the group and select the image layer
Turn the effect off for the moment, just so we can see our original image, by clicking the group's visibility icon.

Then click on the image layer to make it active.

Step 7: Choose Select Subject
We need to select our main subject. And the fastest way is to use Photoshop's Select Subject command.
Go up to the Select menu in the Menu Bar and choose Subject.

Photoshop analyzes the image, and after a few moments, the selection outline appears. Normally we would want to refine the selection, especially around the hair, using Photoshop's Select and Mask workspace. But we don't need a perfect selection for our posterize effect. We just need one that's good enough. And these days, Select Subject does an amazing job.
I'll quickly show you how to clean up any problem areas after we turn our selection into a layer mask, which we'll do next.

Step 8: Select and turn on the Posterize group
With the selection outline in place, click on the Posterize group in the Layers panel to select it. Then click its visibility icon to turn the effect back on.

Step 9: Add a layer mask to the group
Click the Add Layer Mask icon at the bottom of the Layers panel.
And Photoshop instantly converts the selection outline into a layer mask, limiting the posterize effect to just our subject.
Step 10: Clean up the layer mask if needed
In the Layers panel, we see the layer mask thumbnail that was added to the group. The white area on the mask was the area we selected and where the effect is visible. The black area was everything outside the selection and where the effect is hidden.
If you hold the Alt key on a PC or the Option key on a Mac and click on the layer mask thumbnail:

You'll see the layer mask itself in the document. And notice just how great of a job Select Subject was able to do, especially with the woman's hair. Hold Alt (Win) / Option (Mac) and click the layer mask thumbnail again to hide the mask and return to the image.

Paint on the layer mask to add or subtract areas
But if there were any parts of your subject that the Select Subject command missed, or if there are any parts of the background that need to be removed from the effect, just grab the Brush Tool from the toolbar.
Then paint with white on the layer mask to add an area to the effect, or paint with black to remove an area from the effect. Use the left and right bracket keys ( [ and ] ) on your keyboard to adjust the size of your brush as needed.

And there we have it! Check out my Photo Effects section for more tutorials. And don't forget, all of my tutorials are now available to download as PDFs!