Generative Fill in Photoshop: How to Add Water Reflections
Here's how to use Photoshop's Generative Fill, powered by generative AI, to add realistic water reflections to your photo in seconds. This step-by-step tutorial shows you how to get the best results.
Download PDF: Add Water Reflections With Generative Fill
In this tutorial, I show you how easy it is to add realistic water reflections to your images using Generative Fill in Photoshop.
Creating a water reflection effect with Photoshop was once a time-consuming process that required skills. Or you could use a water reflection plugin and mess around with confusing options.
But with Generative Fill, powered by Adobe’s generative AI named Firefly, anyone can add a realistic water reflection to an image just by drawing a selection, typing a few words and clicking a button. So let’s see how it works.
Which version of Photoshop do I need to use Generative Fill?
As of Photoshop 2024, Generative Fill is out of beta and now available in the official Photoshop release.
If you have an active Creative Cloud subscription, use the Creative Cloud Desktop app to make sure that your copy of Photoshop is up to date.
Let's get started!
How to add water reflections with Generative Fill
Here’s how to use Photoshop’s Generative Fill to add a water reflection to your photo.
For best results, use images where everything from the foreground to the background is in focus. Landscape photos work great.
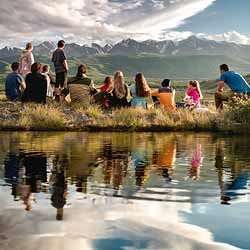
I’ll start with this photo from Adobe Stock. Once we’ve covered the main steps, we’ll look at a couple more images to see how Generative Fill creates very different kinds of water reflections depending on the image you’re using.

Step 1: Add space below the image for the water reflection
First we need to add space below the photo to make room for the water reflection, which means we need to extend the canvas.
So select the Crop Tool from Photoshop's toolbar.

In the Options Bar, make sure the aspect ratio is set to Ratio and that the Width and Height boxes next to it are empty.

To give myself more room to work, I’ll zoom out from my image by going up to the View menu in the Menu Bar and choosing Zoom Out.

Then extend the canvas below the image by clicking and dragging the bottom crop handle downward.

Photoshop fills the new canvas area with white when you release your mouse button.
Press Enter (or Return on a Mac) on your keyboard to accept it.

Related tutorial: How to use Generative Fill to extend an image
Step 2: Select the area below the photo
Next we need to select the new canvas.
So switch to the Rectangular Marquee Tool in the toolbar.

Then drag a selection outline around the canvas at the bottom.
But don’t select only the white canvas. Make sure to include some of the image above it as well so Generative Fill has room to transition between the original photo on the top and the water reflection below it.
You don’t need to include much of the image. But in my case, because I want the water reflection to begin closer to the people, I’m including more of the image here than I normally would.

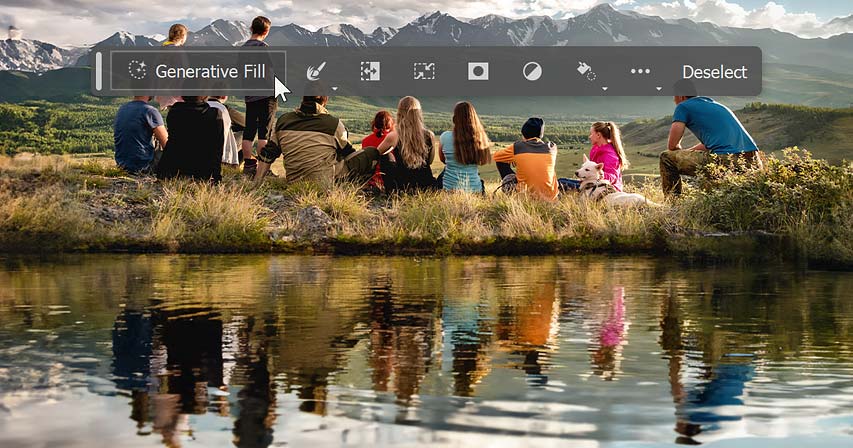
Step 3: Click Generative Fill in the Contextual Task Bar
Photoshop's Generative Fill option is found in the new Contextual Task Bar, a small horizontal bar that displays various options depending on what you’re doing. The Contextual Task Bar usually appears directly below your selection outline.

If you don't see it, go up to the Window menu in the Menu Bar and choose Contextual Task Bar near the bottom.

In the Task Bar, click the Generative Fill button.

Step 4: Enter your water reflection prompt
A prompt box appears where you can type a description of what you want Photoshop to add to the photo. In this case we want to add a water reflection.
With Generative Fill, short and simple prompts tend to work best. Stick to using nouns (people, places, things) and adjectives (words that describe the people, places or things). Also, avoid using words like add
, remove
or create
because Photoshop figures that out on its own.
So in the prompt box, I’ll simply type “calm water reflection”. You can also try calm water reflection with ripples
, lake water reflection
or something similar. All three prompts gave me great results.

calm water reflectioninto the prompt box.
Step 5: Click the Generate button
Then next to the prompt box, click the Generate button.

Photoshop sends the file over the internet to Adobe’s servers where the AI content is generated, and a progress bar appears while you wait. Typically it takes 10-15 seconds.

The initial water reflection appears
When it’s done, your AI-generated water reflection appears. And the result can look spectacular.
With my image, notice how the water is reflecting the clouds, the people, the grass and pretty much everything in the original photo above it, and how the reflections are being distorted by the ripples on the water’s surface (even though I made no mention of the ripples in my prompt).
Generative Fill even added a bit of shoreline where the water and the original photo meet. Imagine how long it would take to create something like this manually. But with Generative Fill, all it took was a simple text prompt.

Photoshop’s new Generative layer
In the Layers panel, a new kind of layer called a Generative layer appears above the image. Generative layers hold the AI-generated content and keep it separate from your original photo so the effect is added non-destructively.

Step 6: Choose from three variations of the water reflection
Generative Fill creates three variations of the water reflection that you can choose from, and you’ll find them in the Properties panel. Click on the thumbnails to try them out.
Some variations will look better than others. For example, I’ll select on one of the other two variations.

But this result is missing the ripples in the water, and the reflections of the people just look weird. The initial result was better.

Step 7: Generate more variations (optional)
If you don’t like any of the initial water reflections, click the Generate button in the Properties panel to generate three more variations. You can click Generate as many times as needed and you won’t lose the variations you already had.

The new variations appear above the previous ones. I’ll select the first one.

This one is interesting. Generative Fill added a creek behind the people that curves off to the right.
Again how long would it take to create this manually? Hours, days or maybe never? Yet for Generative Fill it took only seconds.

But this final variation we’ll look at is my favorite. I love how the water ripples are expanding outward from the shore.
There are some minor distractions in the water, but these can easily be removed using Photoshop’s new Remove Tool which is also powered by AI (like everything else these days).
Overall these water reflections created by Generative Fill are almost unbelievable, both in how incredible they look and how ridiculously easy they are to create.

Summary: Adding water reflections with Generative Fill
And that’s really all there is to using Photoshop’s Generative Fill to add a water reflection to your image.
- Use the Crop Tool to extend the bottom of the photo.
- Select the area with the Rectangular Marquee Tool.
- Click Generative Fill in the Contextual Task Bar.
- Enter your water reflection prompt, then click Generate.
- Watch the progress bar while Generative Fill does all the work.
- Choose the variation you like best, and you’re done.
Generative Fill matches the water reflection with your image
While the water reflections are impressive, what’s really amazing with Generative Fill is that you’ll get very different results depending on the content of your photo. That’s because Generative Fill analyzes the image to find a logical reason for why the water would be there.
For example, the only text I entered for my prompt with the previous image was calm water reflection
. Generative Fill analyzed the photo and decided on its own that the source of the water would most likely be a river or creek. It even added a shoreline to blend the photo and the water together.
Example 1
But watch what happens when I add a water reflection to this second image, a close-up of a small bird.

Using the same steps and the same calm water reflection
prompt, Generative Fill created a smoother, more glassy
water reflection that works better with this image.

Example 2
But the best example I’ve found so far of Generative Fill matching the water source to the image is with this photo of a woman walking towards us on a rainy day.

Obviously it would make no sense for her to be walking from a street into a lake. But somehow Generative Fill knew this.
So when I entered the same calm water reflection
prompt and clicked Generate, Generative Fill figured out that the most likely source of the water reflection would be a puddle on the street in front of her. How amazing is that? You can even see the bricks through the water.

And there we have it! That’s how to add water reflections to your images using Generative Fill, powered by Adobe’s generative AI and available now in Photoshop 2024.
More Photoshop AI tutorials:
- Extend an image with Generative Fill
- Remove people and objects from photos with the Remove Tool
- Upscale photos to 4x with Super Resolution in Camera Raw
- Remove noise from photos with Denoise in Camera Raw
Don't forget, all of my Photoshop tutorials are now available to download as PDFs!