Upscale Images with Super Resolution in Adobe Camera Raw
Here's how to upscale an image to 4x its original size using Super Resolution in Adobe Camera Raw, which uses AI to double the width and height of your photo with no loss in detail or sharpness.
Download PDF: Super Resolution in Camera Raw
Want to instantly resize an image to 4x its original size without losing sharpness or detail? Then you want to use Super Resolution in Adobe Camera Raw.
Super Resolution uses AI and machine learning to intelligently double the width and height of your image, resulting in a new file that’s four times larger than the original photo.
And while Photoshop’s upscaling methods can make images too soft, Super Resolution in Camera Raw uses machine learning to fill the added space with new detail so the upscaled version looks as good as, or even better than, the original.
When to use Super Resolution
Super Resolution is a great way to double the width and height of your photo and is perfect for when you need to:
- Upscale an image to print at a larger size
- Enlarge a photo that was heavily cropped
- Or upscale an older photo taken with a lower resolution camera
Probably the most common use for Super Resolution, and what I personally use it for the most, is to upscale a photo that was cropped to a much smaller size. So that’s what I’ll do in this tutorial.
Which file types does Super Resolution support?
Super Resolution works best with raw files because Camera Raw can use the extra information in the raw file to further enhance the detail. But it also works with JPEG and TIFF files and you’ll still get great results.
Any drawbacks or limitations with Super Resolution?
As impressive as Super Resolution is at upscaling images, there are some limitations to be aware of:
- It won’t magically fix an image that’s out of focus. All you’ll get is a larger version of an out-of-focus image.
- Upscaling an image by 4x can dramatically increase its file size, especially when working with raw files. You’ll see what I mean at the end of this tutorial.
- Super Resolution cannot be applied to the same image more than once.
- Finally, the width or height of an image in Camera Raw cannot exceed 65,000 pixels or 500 megapixels (MP). But most photos fall well below this limit even at 4x their original size, so it’s usually not something to worry about.
Let's get started!
Opening the image in Camera Raw
The best way to open images into Camera Raw is from Adobe Bridge because Bridge makes it easy to open not just raw files into Camera Raw but also JPEG and TIFF files. Bridge is included with Photoshop and can be installed using the Creative Cloud Desktop app.
In Bridge, navigate to the folder that holds your image. Again it can be a raw, JPEG or TIFF file. I’m using a DNG (which is a raw file). Click on the image thumbnail to select it.

Then click the Open in Camera Raw icon in the Options Bar.
The image opens in Camera Raw. This is an older photo I shot years ago in my backyard with a Canon 6D, and I’ve gone ahead and made some edits.
So let’s see how easy it is to upscale the image with Super Resolution.

Related: Extend an image like magic with Photoshop's Generative Fill
Opening the Camera Raw filmstrip
Even with only one image open, you’ll want to show Camera Raw’s filmstrip. That’s because Super Resolution creates a new DNG file, and having the filmstrip open will make it easy to switch between the original and upscaled versions of the image to compare the results.
To show the filmstrip, click the Show Filmstrip icon below the lower left of the image.

The filmstrip opens along the left of Camera Raw’s interface, or it may appear along the bottom depending on your settings.

Viewing the current image size
Camera Raw displays the current width and height of the image along the bottom.
Here we see that my image is very small at just 2260 pixels wide and 1507 pixels high, or 3.4 megapixels (MP).

Related: Learn more about image size and resolution
Yet I shot this image with a Canon 6D which is a 20 megapixel camera. So why is my photo only 3.4 megapixels?
The reason is that the image is cropped. If I reset the crop for a moment, we see the entire photo in all its crooked glory.

And at the bottom, Camera Raw shows that sure enough, this is a 20 megapixel image (5472 px wide by 3648 px high).

I’ll press Ctrl+Z on a Windows PC or Command+Z on a Mac to restore the crop.

Where to find Super Resolution in Camera Raw
There are a couple of ways to access Super Resolution. One is to right-click anywhere on the image and choose Enhance from the menu.

Or you can click the More icon (the three dots) at the bottom of the toolbar along the right.
Then choose Enhance.

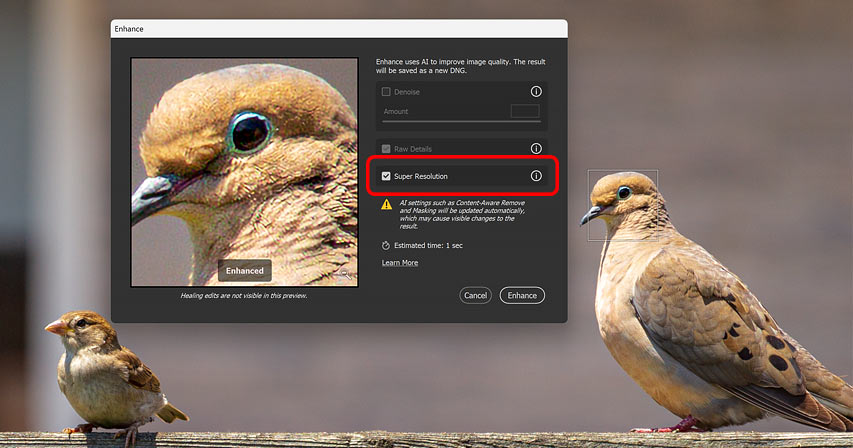
The Enhance dialog box
Either way opens the Enhance dialog box, with Super Resolution selected.
As it says at the top, Enhance uses AI to improve image quality, and the result will be saved as a new DNG file.

Super Resolution and Denoise are not compatible
In the April 2023 Camera Raw update, Adobe added another new AI feature called Denoise which is also found in the Enhance dialog box. Denoise uses AI to remove noise in photos captured at high ISO settings. It does a remarkable job, and I cover Denoise in a separate tutorial.
But Denoise and Super Resolution cannot be used on the same image. You need to pick one or the other.
So if Denoise is selected, you’ll need to uncheck it and then select Super Resolution.

Previewing the upscaled image
The Preview window in the Enhance dialog box shows a close-up of what the upscaled image will look like with Super Resolution enabled. Click and drag inside the Preview window to scroll the image around and inspect different areas.
Click and hold in the window to preview the result with Super Resolution turned off. Then release your mouse button to turn it back on.
On the left, the bird’s eye and feathers look very soft when upscaled without Super Resolution. But on the right, Super Resolution adds enough new detail to keep the upscaled image looking sharp.

You can click the magnifying glass in the lower right corner to fit the entire image within the Preview window.
Then click on a different part of the image. I’ll click on the smaller bird on the left.

And the preview zooms in on that spot.

Again if I click and hold in the Preview window, the bird looks very soft without Super Resolution (left). But when I release my mouse button, Super Resolution adds much more detail (right).

How to apply Super Resolution to the image
Running Super Resolution is easy. Since AI does all the work, there are no confusing options to worry about.
The Enhance dialog box shows the estimated time it will take to upscale the image. In my case it’s around 1 second but this will depend on your image and your computer. It may also take a bit longer if you’ve made edits using Camera Raw’s other AI tools such as Content-Aware Remove or the AI-powered masks.

To upscale the image, just click the Enhance button.

A progress bar appears in the lower left of the Camera Raw interface.

And after a few moments, the upscaled version appears.

The upscaled image is saved as a new DNG file
Super Resolution creates a new DNG file which is automatically opened in Camera Raw. Edits made to the original image are carried over to the new one.
Camera Raw adds “Enhanced-SR” (for Super Resolution) to the new file’s name, as we see at the top.

And with the filmstrip open, a thumbnail for the new file appears below the original image. You can click on the thumbnails to compare the two versions.

The Super Resolution image is 4x the original size
Looking again at the image size along the bottom of Camera Raw’s interface, the new file is double the width and double the height of the original photo, making it four times larger.
If you remember, my original image was 2260 pixels by 1507 pixels, or 3.4 megapixels. But the Super Resolution version is 4520 pixels by 3013 pixels, or 13.6 megapixels.

The upscaled image is sharp and detailed
To really see the difference between the original and upscaled versions of the image, we need to zoom in.
On the left is the original photo zoomed to 200%. And on the right is the upscaled version at 100%. This allows both versions to appear the same size on my screen.
If you look at the bird’s eye in both versions, the Super Resolution image on the right is noticeably sharper. And the feathers in the upscaled image are more detailed and textured.

The same is true with the smaller bird. Again the original image on the left is zoomed in to 200% and the upscaled image on the right is at 100% so they appear the same size.
The original is soft and blurry. But the version upscaled with Super Resolution’s AI looks great.

Saving the image after running Super Resolution
To save your image after upscaling it with Super Resolution, just click Done to close Camera Raw. Or click Open to close Camera Raw and send the image over to Photoshop for further editing.
I’ll click Done to simply close Camera Raw.

Back in Adobe Bridge, the upscaled version appears next to the original photo.

Super Resolution’s supersized file size
The main drawback to using Super Resolution is the file size of the upscaled image. The image itself may be four times larger than the original, but the file size is way beyond that.
We can see the file sizes in Adobe Bridge. My original photo (left) is 18.69 MB, but the Super Resolution version (right) is a whopping 240.5 MB, making it over twelve times larger. So while it may be tempting to upscale every image, unless you have unlimited storage space, you may want to limit Super Resolution to just the photos that really need it.

Summary
And there we have it! Super Resolution in Adobe Camera Raw instantly upscales your image to 4x the original size, using AI and machine learning to double the photo’s width and height while preserving sharpness and detail. If you have the storage space, Super Resolution is the ideal way to upscale images for larger prints (or for making a 4K desktop background), or to enlarge photos where much of the original size was cropped away.
Related tutorials:
- Use AI Denoise in Camera Raw to remove noise from photos
- Remove objects from photos with the new AI Remove Tool
- Extend an image like magic with Generative Fill
Don't forget, all of my Photoshop tutorials are now available to download as PDFs!