
Generative Fill in Photoshop: Remove People and Objects from Photos
Use Generative Fill in Photoshop to remove people and objects from photos and watch them disappear like they were never there. Learn how with this step-by-step tutorial.
Download PDF: Remove People and Objects with Generative Fill
In this tutorial, I show you how incredibly easy it is to remove people, objects or really anything from a photo using Generative Fill in Photoshop.
While Generative Fill can add entirely new elements to a photo, its real strength is in removing existing elements like people, animals or objects. All we need to do is select the person or object we want to remove and then let Generative Fill work its magic as it replaces them with AI-generated content that blends perfectly with the rest of your image.
Unlike Content-Aware Fill where we need to tell Photoshop where in the image to look for replacement content, Generative Fill uses Adobe’s generative AI named Firefly to create new and original content from scratch. The result is often so good, you’ll wonder if the person or object you removed was ever really there. So let’s see how it works.
Which version of Photoshop do I need to use Generative Fill?
As of Photoshop 2024, Generative Fill is out of beta and now available in the official Photoshop release.
If you have an active Creative Cloud subscription, use the Creative Cloud Desktop app to make sure that your copy of Photoshop is up to date.
Let's get started!
Remove people or objects from photos with Generative Fill
Here's how to use Photoshop's Generative Fill to remove people or objects from your photo. I’ll focus mostly on people but the steps are the same no matter what you need to remove.
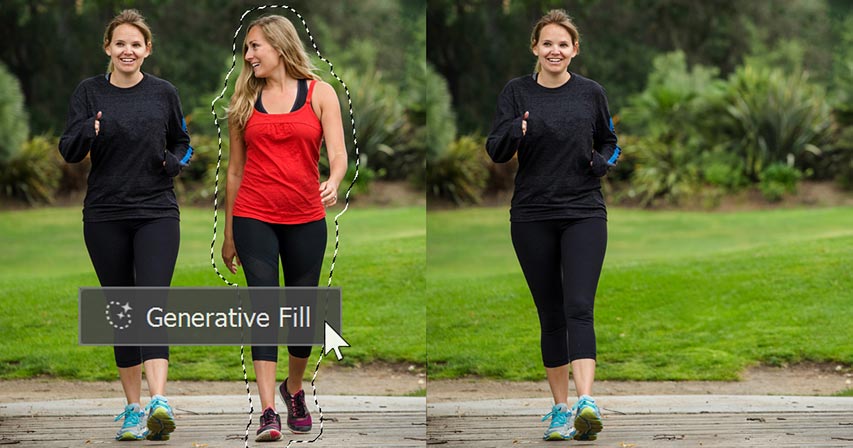
I’ll start with this photo from Adobe Stock. This is the same photo I used in my Content-Aware Fill tutorial, but time I’ll use Generative Fill to remove two of the three people from the image.

See Also:
- Use the Remove Tool to Remove People from Photos
- Extend Images Faster with Generative Expand
- Add Water Reflections with Generative Fill
Step 1: Select the Lasso Tool
First we need to draw a selection outline around the person or object we want to remove.
So select the Lasso Tool from the toolbar. If you use Photoshop’s Select Subject command or the Object Selection Tool, you’ll need to add an extra step to get good results. I’ll show you why and what that extra step is in a moment.

Step 2: Draw a selection around the person or object
Then draw a selection outline around the person or object. I’ll select the woman on the right.
Make sure to include some of the area around your subject in the selection. Generative Fill needs that extra space so it can figure out what the AI-generated content should look like and how to blend it with the surrounding area.
So as I draw my selection, notice that I’m purposely including some of the background.

Here’s my completed selection. I also included the shadow under her left foot, since it won’t look right if we remove the person but not their shadow.

Step 3: Click Generative Fill in the Contextual Task Bar
Photoshop’s Generative Fill option is found in the new Contextual Task Bar which should appear directly below your selection outline.

If you’re not seeing it, go up to the Window menu in the Menu Bar and make sure that Contextual Task Bar has a checkmark next to it.

Then in the Task Bar, click the Generative Fill button.

Step 4: Click the Generate button
A prompt box appears where you can type a description of what you want Generative Fill to add to the selected area.
But when removing a person or object from the photo, leave the prompt box empty so Photoshop knows to fill the area with new content that matches the surrounding content.
Then click the Generate button.

Photoshop sends the image over the internet to Adobe’s servers where the new AI content is generated.
A progress bar appears while you wait. Depending on your internet speed, it typically takes 10-15 seconds.

When the progress bar disappears, the person or object is removed from the photo and replaced with new AI-generated content. The result is usually so good, it’s like they were never there to begin with.
Notice with my image that Photoshop filled the area with new grass, new plants in the background and new detail in the bridge where the woman was walking. The new content even matches the depth of field of the original photo, with everything in the background nicely blurred.

Photoshop’s new Generative layer
In the Layers panel, a new kind of layer called a Generative layer appears above the image.
Generative layers hold the AI content and keep it separate from the original photo. You can toggle the Generative layer on and off to see a before and after
of the result.

Step 5: Try the other variations
Generative Fill gives us three variations of the replacement content to choose from, and you’ll find them in the Properties panel. Click on each thumbnail to see which variation you like best.
Here I’m clicking on the second variation.

Sometimes the variations are very different from each other. But in my case, all three are fairly similar, although I do like the plant in the background a bit better with this second variation.

Step 6: Click Generate to create more variations (optional)
If you’re not happy with any of the initial three variations, just click the Generate button in the Properties panel to generate three more.
The new variations will appear above the previous ones so you don’t lose the ones you had, and you can click Generate as many times as needed until you get something you like. But in my case I’m happy with the result.

Summary: Removing people or objects with Generative Fill
Up next I’ll show you the extra step you need when making your selection using Photoshop’s Select Subject command or the Object Selection Tool. But here’s a quick summary of the basic steps for removing a person or object from your photo using Generative Fill.
- Choose the Lasso Tool from the toolbar.
- Draw a selection outline around your subject, including some of the background.
- Click Generative Fill in the Contextual Task Bar.
- Leave the prompt box empty and click Generate.
- Try the three variations in the Properties panel, or click Generate to create three more.
Tip: Using Select Subject or the Object Selection Tool
The best selection tool to use with Generative Fill when removing people or objects from photos is the Lasso Tool. That’s because the Lasso Tool makes it easy to include some of the area around your subject in the selection, which is very important.
In fact, if you use one of Photoshop’s automated selection tools like Select Subject or the Object Selection Tool, you need to add an extra step before running Generative Fill, otherwise you can get very unexpected results. Let me show you what I mean.
With two people remaining in my photo, I’ll remove the woman in the red top.

Making the selection using the Object Selection Tool
Since there are two main subjects in the photo and I only want to select one of them, the Object Selection Tool would be the better choice. But this issue applies to the Select Subject command as well.
I’ll choose the Object Selection Tool from the toolbar.

In the Options Bar, I’ll turn the Object Finder off so I don’t have to wait for Photoshop to analyze the image looking for objects. I already know what I want to select.

Also in the Options Bar, I’ll turn on Sample All Layers so that the Object Selection Tool looks at the composite image.

Then I’ll simply drag out a rectangular selection outline around the next person I want to remove.

When I release my mouse button, Photoshop detects the person within the selection and shrink wraps the outline around her. So far so good.

Generative Fill gets it wrong
But watch what happens when I click the Generative Fill button in the Contextual Task Bar and then click Generate.

The woman is removed from the photo, but what exactly did Generative Fill replace her with?
Is that a different person? Who’s much shorter? And also semi-transparent? Whatever it’s supposed to be, it’s not what we needed and nothing like the result we got earlier.

None of the other variations in the Properties panel are any better, like this one that gives me a strange ghost-like image. So what’s going on?

The selection was the problem
The problem is that the selection we made with the Object Selection Tool did not include any of the area surrounding the person. So Generative Fill had no room to figure out what the replacement content should look like. Instead it got confused and created a bunch of nonsense.

How to expand the selection
Thankfully there’s an easy fix. All we need to do is expand the selection.
After making your initial selection using either Select Subject or the Object Selection Tool, but before clicking the Generative Fill button, click the Modify Selection button next to it.

Choose Expand Selection from the menu.

Then expand the selection by 20 pixels and click OK.
By expanding the selection, we’ve included some of the area surrounding the person.

And now when we click Generative Fill and then Generate, we get a much better result, one that’s just as impressive as when we made the selection using the Lasso Tool.

More examples using Generative Fill
Let’s quickly look at a few more examples showing how amazing Generative Fill really is at removing people or objects from photos.
Example 1: Shallow depth of field
In this cute photo, let’s see how Generative Fill handles the very shallow depth of field.
With apologies in advance to cat lovers, I’ll draw a loose selection around the cat using the Lasso Tool, and I’ll make sure to include the long shadow extending out in front of him.

In the Contextual Task Bar, I’ll click Generative Fill and then Generate.
The result looks amazing. The replacement content blends seamlessly with the rest of the image and it keeps the same depth of field.

Just to be fair, here’s the same photo but this time with the dog removed. Again the depth of field in the replacement content matches purr-fectly
.

Example 2: Removing a group of people at once
Generative Fill can remove an entire group of people from a photo at once, like in this photo from Adobe Stock.
This is the same image I used in my tutorial on how to add water reflections with Generative Fill.
I’ll use the Lasso Tool to draw a quick selection outline around the entire group.

Then I’ll click Generative Fill in the Task Bar and then Generate.
Once again the result looks fantastic. All of the people are removed at the same time, replaced with AI-generated content that looks like it was there all along.

Example 3: Restoring missing content
Finally, here’s the biggest challenge for Generative Fill. Can it restore a missing part of your subject?
With this photo, I’ll remove the guy on the left. But notice that he’s blocking part of the arm of the guy standing next to him, which means that Generative Fill needs to create that missing part of the arm.

I’ll draw a loose selection outline around the guy on the left using the Lasso Tool.

Then in the Contextual Task Bar, I’ll click the Generative Fill button and then Generate.
Turns out this was no challenge at all. Like magic, Generative Fill created the missing part of his arm and even added the rest of his backpack. It also filled in the building in the background, the grass and the sidewalk.
You would never guess that someone was standing there when the photo was taken, except that the composition is now off-center. But I could easily use Generative Fill to extend the image and fix it.

And there we have it! That’s how easy it is to remove people or objects from photos using Generative Fill, powered by generative AI and available now in Photoshop 2024.
More Photoshop AI tutorials:
- Use the Remove Tool to remove people and objects from photos
- Using Generative Fill to extend an image
- Add water reflections with Generative Fill
- Upscale photos to 4x with Super Resolution in Camera Raw
Don't forget, all of my Photoshop tutorials are now available to download as PDFs!