
Using Layer Effects and Layer Styles in Photoshop CC 2020 – Complete Guide
Learn everything you need to know to start using layer effects and layer styles in Photoshop CC 2020, including a look at CC 2020's new layer style presets, gradients, patterns and more!
In this first tutorial in my series on Photoshop layer effects, I cover everything you need to know to add layer effects and layer styles in Photoshop CC 2020! We'll start by learning the difference between a layer effect and a layer style, and how to use Photoshop's layer style presets to add instant one-click effects to your images. We'll look at the brand new layer styles included with Photoshop 2020, and I'll show you where to find the missing styles from earlier versions of Photoshop.
From there, you'll learn how to add and edit your own layer effects, and how to take full advantage of Photoshop 2020's amazing new gradients and patterns. I'll even show you how to add multiple copies of an effect to the same layer, how to scale layer effects to fit your image, how to save your effects as custom layer style presets, and more!
This tutorial is exclusively for Photoshop 2020 and newer. So before you begin, you'll want to make sure that your copy of Photoshop is up to date.
We've got a lot to cover, so let's get started!
Setting up the document
If you want to follow along, open any image to use as a background, and then add some text above it. Here I'm using a background texture that I downloaded from Adobe Stock, and I've added the words "LAYER" and "EFFECTS". I'll be working with type layers for this tutorial, but layer effects can also be applied to pixel layers and shape layers:

In the Layers panel, we see the texture on the Background layer, and each word is on its own type layer:

What are layer effects in Photoshop?
Layer effects are a collection of non-destructive, editable effects that can be applied to almost any kind of layer in Photoshop. There are 10 different layer effects to choose from, but they can be grouped together into three main categories—Shadows and Glows, Overlays and Strokes. Layer effects are live effects that link directly to the layer. So if you make changes to a layer's contents, any effects applied to that layer will instantly update.
What are layer styles?
While you'll often hear the terms "layer effects" and "layer styles" used interchangeably, layer effects are the individual effects themselves, like Drop Shadow, Stroke, Outer Glow, and so on. A layer style is a collection of two or more layer effects working together to create a larger, overall look. Layer styles also include any Blending Options applied to the layer, including the layer's blend mode, along with its current Opacity and Fill Opacity settings.
What are the benefits of using layer effects?
Layer effects are easy to use, fully editable, and entirely non-destructive. And they add virtually nothing to the overall size of your Photoshop document. While layer effects are most often used with type, they can also be used with images and vector shapes to add realism or creativity in ways that would be difficult, if not impossible, without layer effects.
You can add multiple effects to a single layer, toggle layer effects on and off, edit their settings, and delete layer effects without making any permanent changes to your image. You can even add layer effects to an entire layer group to apply the same effects to multiple layers at once. And you can combine layer effects with type to create amazing text effects while keeping your text fully editable!
Where do I find Photoshop's layer effects?
There are two main places where you'll find the list of layer effects.
The Layer menu
One is by going up to the Layer menu in the Menu Bar and choosing Layer Style. From there, you'll see a list of all the layer effects you can choose from, including Bevel & Emboss, Stroke, Inner Shadow, and more. To add an effect, select it from the list:

The Layers panel
The other and faster way to add layer effects is by clicking the fx icon at the bottom of the Layers panel:
And then choosing from the same list of layer effects that we saw in the Menu Bar:

Why are my layer effects grayed out?
If the effects in the Layer Style menu in the Menu Bar are grayed out, or the fx icon in the Layers panel is grayed out, it's most likely because you have the Background layer selected in the Layers panel. Photoshop does not allow us to add layer effects to the Background layer, mostly because layer effects work best on layers that include areas of transparency, which the Background layer does not support:

So before adding layer effects, first make sure you have the correct layer selected:

Learn all about layers with our Layers Learning Guide!
How to use Photoshop's layer style presets
Before we start adding our own layer effects, let's look at how to use Photoshop's layer style presets. A layer style preset is like a ready-made, one-click effect. You just click on a layer style to select it and the effect is instantly applied to your layer. There are lots of preset styles to choose from, and Photoshop CC 2020 adds even more! And they're all found in Photoshop's Styles panel.
If you're not seeing the Styles panel on your screen, you can open it by going up to the Window menu in the Menu Bar and choosing Styles:

The new default layer styles in Photoshop CC 2020
Photoshop CC 2020 introduces all-new default layer styles, and the new styles are grouped into one of four sets—Basics, Natural, Fur, and Fabric. Each set has its own folder in the Styles panel, and each layer style is represented by a thumbnail.
By default, all four folders are twirled open, and the thumbnail size is set to Large. So to view all of the styles, you'll need to scroll down the list:

Customizing the Styles panel
To view more layer styles at once, you can change the size of the thumbnails. Click on the menu icon in the upper right of the Styles panel:
And then choose Small Thumbnail:

And now the thumbnails appear much smaller:

Tip! How to twirl all folders open or closed at once
Each set in the Styles panel can be twirled open or closed by clicking the arrow to the left of its folder icon. Or you can twirl all folders open or closed at once by holding the Ctrl (Win) / Command (Mac) key on your keyboard as you click one one of the arrows.
Here I've closed all folders, making it easy to see all four of the new default sets:

Then to open just the folder you need, release your Ctrl (Win) / Command (Mac) and click on the arrow. I'll open the Natural folder:

How to apply a layer style preset
To apply one of the layer styles in the folder, just click on its thumbnail. I'll select the new Sea style:

The style is instantly applied to your selected layer, and here we get this sort of dark, underwater effect:

And in the Layers panel, all of the individual layer effects that make up the style appear listed below the layer. So this one layer style is actually the result of (in this case) seven layer effects working together:

Create a Spray Paint Text Effect with Photoshop's layer effects!
Choosing a different layer style
To choose a different style, just click on a different thumbnail. I'll try another style from the Natural set, like Wood:

The new layer style replaces the previous one, and now my text is filled with this wood grain effect:

And the effects that make up the new style appear below the layer:

Choosing layer styles from a different set
I'll close the Natural set by clicking the arrow beside its folder. Then I'll twirl open the Fur set and I'll click on the Zebra style:

And this time, my text is filled with zebra stripes:

And again, we see the list of effects below the layer:

Create 80's Retro Text with layer effects!
Expanding and collapsing the layer effects list
To free up room in the Layers panel, you can collapse the list of layer effects by clicking the small arrow beside the fx icon on the far right of the layer. Click the arrow again to expand the list. This does not turn the effects themselves on or off. It's just a way to keep the Layers panel from looking cluttered, especially when you have multiple layers with effects applied:

How to load more layer styles in Photoshop CC 2020
At first glance, it looks like Photoshop CC 2020 does not include many layer style presets. And if you've upgraded from a previous version of Photoshop, you may be wondering what happened to the original preset styles that have been part of Photoshop for years. All of the preset styles from earlier versions are still available in CC 2020, along with even more brand new styles. To access them, all we need to do is load them into the Styles panel.
Click the Styles panel menu icon:

And choose Legacy Styles and More:

This adds a "Legacy Styles and More" folder below the default folders:

Twirl the folder open and you'll find two more folders inside it. The 2019 Styles folder holds more new layer styles to try out. And the All Legacy Default Styles folder holds all of the original layer style presets from earlier versions of Photoshop:

The 2019 styles
The layer styles in the 2019 Styles folder are divided into various sets, including Gel, Glass, Grunge, Chrome, Metallic, and 3D. I'll twirl the Chrome set open, and then I'll select the Bling style:

And as you would expect from something called Bling, we get this shiny, over-the-top effect:

And if I twirl open the 3D folder and I choose the Duplicates style near the bottom:

We get this completely different effect, with duplicates of the text appearing behind it in different colors:

The legacy default styles
To use any of the layer styles from previous versions of Photoshop, twirl open the All Legacy Default Styles folder and you'll find all of the original styles, again divided into sets.
I'll select the Chromed Satin style from the Legacy Default Styles set:

And now we get this classic Photoshop chrome effect:

How to toggle layer effects on and off
An easy way to see how each layer effect contributes to the overall look of the style is by toggling the individual effects on and off, which you can do by clicking the visibility icon (the eyeball) to the left of their names.
For example, if I turn off the Gradient Overlay in the Chromed Satin style:

The orange and blue gradient in the letters disappears, leaving just the shading effects and the drop shadow behind the text:

To turn the effect back on, click in the empty spot beside the effect's name:

And the gradient reappears:
How to toggle all layer effects at once
To turn all layer effects off at once, click the main visibility icon beside the word "Effects". Click it again to turn the effects back on:

How to move and copy layer styles
To copy a layer style from one layer and paste it onto a different layer, right-click (Win) / Control-click (Mac) on the fx icon on the layer that holds the style you want to copy:
And choose Copy Layer Style from the menu:

Then right-click (Win) / Control-click (Mac) on the layer where you want to paste the style:

And choose Paste Layer Style:

And now the same layer style is applied to both layers:

How to clear a layer style
To remove a layer style, clear it by right-clicking (Win) / Control-clicking (Mac) on the layer's fx icon:
And choosing Clear Layer Style:

And now I'm back to the effects being applied only to the top text layer:
How to move layer effects to a different layer
If you just want to move the effects to a different layer, click on the fx icon on the layer containing the effects, drag it onto the other layer, and then release your mouse button:

The effects are instantly moved from the original layer to the new layer:

Learn 5 easy ways to move images between Photoshop documents!
A faster way to copy layer effects
And if you press and hold the Alt (Win) / Option (Mac) key on your keyboard as you drag the fx icon:

You'll copy, rather than move, the effects from one layer to the other. I cover more about copying layer effects in my How to Copy Layer Effects tutorial:
How to edit an effect within a layer style
Notice that after copying the same Chrome layer style to both text layers, the gradient looks exactly the same in both letters, running from orange on the bottom to blue on the top. What if I wanted to flip the gradient on the bottom text? We're going to look at how to add and edit layer effects in more detail in a moment. But to edit the settings for any effect within a layer style, double-click on the effect's name below the layer.
For example, I want to edit the gradient, so I'll double-click on the Gradient Overlay effect:

Photoshop opens the Layer Style dialog box, and in the center of the dialog box are the settings for the effect:

To flip the colors in the gradient, all I need to do is select the Reverse option. Then I'll click OK to close the dialog box:

And now the gradient colors in the bottom text are reversed:

How to clear layer styles from multiple layers at once
Earlier we learned how to clear a layer style from a single layer. To clear the styles from two or more layers at once, click on one layer select it, and then hold your Ctrl (Win) / Command (Mac) key and click on the other layer(s) to select them:

Then right-click (Win) / Control-click (Mac) on any of the selected layers and choose Clear Layer Style from the menu:
And now I'm back to my plain white letters in front of the blue background:

How to scale layer effects in Photoshop
Sometimes you'll apply a layer style and the effect will look like it's either too big or too small for the contents of your layer. That's because the result you get from layer effects depends a lot on the size of your image. Larger images often need different settings than smaller images to achieve the same look. But you can correct any size problems by scaling the effects to any size you need.
For example, in the Layers panel, I'll select my top text layer:
And then in the Styles panel, I'll twirl open the KS Styles set (found in the All Legacy Default Styles folder) and I'll choose the Frosted style:

This instantly gives the text a frozen, icy look. But while it's a cool effect (pun intended), it also looks a bit overwhelming, as if the effect is too big for the size of the letters:

To fix that, we can scale the effects. One way to scale layer effects is by going up to the Layer menu in the Menu Bar, choosing Layer Style, and then choosing Scale Effects:

And the other is by right-clicking (Win) / Control-clicking (Mac) on the layer's fx icon:
And choosing Scale Effects from the menu:

Then in the Scale Layer Effects dialog box, adjust the Scale value to the amount you need. I'll lower mine from 100% down to 60%. Make sure the Preview box is checked so you can preview the results as you adjust the value. When you're done, click OK to close the dialog box:

And here's the result with the same Frosted style scaled to 60% of its original size. Notice that the size of the text itself has not changed. Only the effects applied to the text have been resized:

How to resize images without losing quality with Smart Objects!
Layer styles can include more than just effects
Before we move on, notice in the Layers panel that along with the effects, this layer style also lowered the layer's Fill value from 100% down to 56%:

We'll look at what the Fill value means in a moment. But a layer style can include not just effects but also the layer's Blending Options, which include the Opacity and Fill values along with the layer's blend mode:

One more way to clear a layer style
And here's one more way to clear a layer style in Photoshop CC 2020. In the Layers panel, make sure the correct layer is selected. Then in the Styles panel, twirl open the Basics folder and choose the default style, which is None. It's the white thumbnail with the red diagonal line:

And after clearing the style, I'm once again back to my plain white text. And that's the basics of using layer style presets in Photoshop!
How to add layer effects in Photoshop
So now that we know how to use Photoshop's layer style presets, let's learn how to add our own individual layer effects. We're not going to cover every layer effect and every setting, but you'll gain a good understanding of how layer effects work. And I'll be covering specific effects in more detail in other tutorials in this series.
Choosing a layer effect
First, in the Layers panel, select the layer where you want to apply one or more effects. I'll select my top text layer:

Then click the Layer Effects icon (the fx icon):
And choose a layer effect from the list. I'll start with Drop Shadow:

Photoshop's Layer Style dialog box
Choosing any effect opens the Layer Style dialog box. And because I selected Drop Shadow, the dialog box opens to the Drop Shadow settings so I can customize the appearance of the effect:

Restoring the layer effect's default settings
The Layer Style dialog box remembers the last settings you applied. So before you begin customizing an effect, it's usually a good idea to restore the default settings by clicking the Reset to Default button:

How to customize a layer effect
Then you can adjust the settings for the effect to create the look you need. Each layer effect has its own settings unique to that specific effect.
So for example, with the Drop Shadow, you can drag the Opacity slider to adjust the shadow's intensity. You can change the Blend Mode of the effect (although Multiply usually works best for shadows). And you can click on the color swatch to choose a different color for the shadow. Black is the default shadow color, but sometimes a different color works better:

The Angle option lets you adjust the direction of the light source, and the shadow will appear in the opposite direction. So if the light is coming from the upper left, the shadow will appear in the lower right. You can change the angle by clicking and dragging inside the radial dial or by entering a specific value:

Use Global Light
The Use Global Light option allows all of the layer effects that require a light source to share the same light source, so that the lighting will appear uniform throughout the overall effect. You'll find this option not only in the Drop Shadow settings but also in the settings for Bevel & Emboss and Inner Shadow. In most cases, you'll want to leave Use Global Light turned on, which it is by default:

The Distance value controls how far out the shadow extends from the layer's contents. For example, when applying a drop shadow to a type layer, Distance controls how far out the shadow extends from the letters.
And the Size value controls the overall size of the shadow. When the Spread value is set to 0%, increasing the Size value softens the shadow edges. And increasing the Spread value fills in the shadow and makes it more opaque:

I'll increase the shadow's Opacity to 40%, the Distance to 90px, and the Size to 40px:

How to accept your settings
If you're happy with the settings and this is the only layer effect you need to apply, click OK to accept your settings and close the Layer Style dialog box:

Create editable blurred text with Drop Shadows!
How to edit a layer effect
In the document, the drop shadow appears behind the letters in the word "LAYER":

And in the Layers panel, Drop Shadow is now listed as an effect below the layer. To edit a layer effect, double-click on the effect's name:

Photoshop reopens the Layer Style dialog box to the effect's current settings so you can make any changes you need. Layer effects are entirely non-destructive, so you won't lose image quality no matter how many changes you make.
I'll increase the shadow's Opacity to 50% and I'll increase the Distance to 100px. But I won't close the Layer Style dialog box yet because I have other layer effects I want to add:

After editing the effect, the shadow is now more visible behind the letters:

Adding more effects in the Layer Style dialog box
We know that we can add layer effects by clicking the fx icon in the Layers panel. But if the Layer Style dialog box is open, you can add more effects by selecting them from the column along the left:

How to show missing effects
If some of your layer effects are missing from the list, click the fx button in the bottom left of the dialog box:
And choose Show All Effects:

The layer effects categories
As I mentioned earlier, Photoshop's layer effects can be grouped into three main categories. We have Shadow and Glow effects, which include Bevel & Emboss, Inner Shadow, Inner Glow, Satin, Outer Glow, and Drop Shadow. Note that Contour and Texture listed below Bevel & Emboss are part of the Bevel & Emboss effect, which is why they're indented to the right:

We also have Overlay effects (Color Overlay, Gradient Overlay, and Pattern Overlay):

And we have Stroke, which adds an outline or border around the layer's contents:

Photoshop's layer effect stacking order
Notice the order in which the layer effects are listed. In the most recent versions of Photoshop, layer effects are now listed in the order in which they are applied, from bottom to top. So a Drop Shadow is always applied first, and then an Outer Glow would be applied above it. Next would be the Overlay effects (Pattern, then Gradient, and then Color), followed by Satin, Inner Glow, Inner Shadow, and then Stroke. And the Bevel & Emboss effect is always applied last, on top of any other effects we've applied.
Also, Drop Shadow and Outer Glow are the only two layer effects that appear below the layer's contents. Every other effect appears above the contents. Knowing the stacking order of layer effects may seem trivial, but it can help you understand why your effects are not giving you the results you expected:

Adding a second layer effect
To add another layer effect, click on its name in the list. I'll add a Stroke:

Customizing the Stroke effect
In the Stroke settings, I'll once again start by clicking the Reset to Default button to restore the default values:

Then I'll change the color of the stroke by clicking the color swatch:

And in the Color Picker, I'll choose a shade of orange by setting the Hue (H) value to 25, the Saturation (S) value to 100 and the Brightness (B) value also to 100. Then I'll click OK to close the Color Picker:

The Position option lets you align the stroke to either the Inside or Outside edge of the layer's contents. Or you can Center the stroke along the edge. I'll choose Outside. And the Size option is where we set the width or thickness of the stroke. I'll increase the size to 20px:

Again, I'll leave the Layer Style dialog box open. And here's the effect with the orange stroke and the drop shadow applied to the top text:

How to create Gold Text with layer effects!
The Blending Options
Along with selecting and editing effects, the Layer Style dialog box also gives us access to the layer's blending options. Click the Blending Options category above the effects in the left column:

From here, we can access the same Blend Mode, Opacity and Fill settings that are found in the Layers panel. We also have some Advanced Blending options which we'll look at in other tutorials:

How to hide the layer contents and view only the effects
A great trick that we can do with blending options is that we can hide the actual contents of a layer and view only the layer effects themselves. You can do this either in the Layer Style dialog box or in the Layers panel.
If I lower the Opacity value from 100% all the way down to 0%:

Both the text and the layer effects applied to the text disappear:

But if I set the Opacity back to 100%, and then I lower the Fill value (or Fill Opacity in the Layer Style dialog box) down to 0%:

This time, the text itself disappears but the layer effects remain visible, allowing us to see through the letters to the blue background image behind them. So the Opacity value affects the transparency of both the layer's contents and any layer effects, and the Fill value affects the transparency of just the layer's contents. Check out my Layer Opacity vs Fill tutorial to learn more:

Blend text into clouds with Photoshop's Advanced Blending options!
Closing the Layer Style dialog box
I'll close the Layer Style dialog box for now by clicking OK:

And in the Layers panel, we see the Stroke and the Drop Shadow listed as effects below the layer. Notice that the Fill value is also set to 0%, since I lowered it in the Layer Style dialog box:

New gradients and patterns in Photoshop CC 2020
Along with new layer styles, Photoshop CC 2020 also includes new gradients and patterns, both of which can be applied as layer effects. But to access all of the gradients and patterns, we first need to visit the Gradients and Patterns panels, which are also new in CC 2020.
How to load more patterns
First, switch over to the Patterns panel. You'll find it nested in with the Color and Swatches panels. Just like with the Styles panel, the new patterns are divided into sets which can be twirled open and closed. But by default, there are only a few pattern sets to choose from (Trees, Grass and Water).
To load more patterns, click on the Patterns panel menu icon:
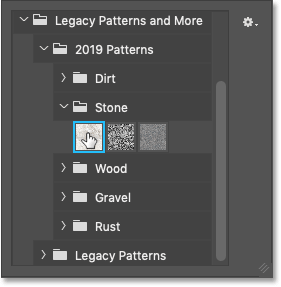
And choose Legacy Patterns and More:

A new folder named "Legacy Patterns and More" appears below the default pattern sets. And if you twirl the folder open, you'll find two more folders inside it. One holds more new patterns from 2019, and the other holds all of the original patterns from earlier versions of Photoshop. All of these patterns will now be available in the Layer Style dialog box:

How to load more gradients
Next, switch over to the new Gradients panel, nested beside the Patterns panel. Here you'll find lots and lots of new gradients to choose from in CC 2020, again divided into sets.
But if you also want access to the previous gradients from earlier versions of Photoshop, then click on the Gradients panel menu icon:
And choose Legacy Gradients:

A "Legacy Gradients" folder appears below the default gradients, and they will now be available in the Layer Style dialog box:

Adding a Pattern Overlay effect
Gradients and patterns can both be applied to layers as overlay effects. To add a pattern, click the fx icon at the bottom of the Layers panel:
And choose Pattern Overlay:

In the Layer Style dialog box, click on the pattern swatch:

And then scroll through the sets to choose a pattern. I'll twirl open the Legacy Patterns and More folder, then the 2019 Patterns folder, and then the Stone folder, and I'll select the Stone Marble pattern by clicking its thumbnail. Note that you can drag the pattern selection window larger if needed:
And now my text is filled with a marble pattern:

Adding a Gradient Overlay effect
To add a gradient, with the Layer Style dialog box still open, choose Gradient Overlay from the left column:

And then click on the small arrow next to the gradient swatch. Don't click on the swatch itself or you'll open Photoshop's Gradient Editor. We just want to choose from the gradient presets, so click the arrow instead:
Then scroll through the sets to choose a gradient. I'll twirl open the Oranges folder and I'll select the Orange 10 gradient by clicking its thumbnail:

And here's my text with the gradient applied. But notice that the gradient is blocking the pattern from view. That's because gradients are always applied above patterns, as we learned earlier when we looked at the layer effect stacking order:

Changing a layer effect's blend mode
To blend the gradient in with the pattern, go up to the Blend Mode option in the Gradient Overlay settings and choose a new blend mode from the list. I'll choose Linear Burn:

And now the colors from the gradient are blending in with the pattern below it:

Get my Layer Blend Modes Complete Guide when you download this tutorial as a PDF!
How to add multiple copies of the same layer effect
If you look at the effects along the left of the Layer Style dialog box, you'll notice that some effects (Stroke, Inner Shadow, Color Overlay, Gradient Overlay, and Drop Shadow) each have a plus sign on the right. The plus sign means that we can add multiple copies of the effect to the same layer:

Editing the first Stroke effect
Let's look at how to add a second stroke. But first, I want to change the color of my existing stroke, so I'll reselect Stroke from the list:

Then I'll click on the stroke's color swatch:

And in the Color Picker, I'll choose white:

I'll leave the Position of this stroke set to Outside:

And here we see the text with the stroke color changed to white:

Adding a second Stroke effect
To add a second stroke to the same layer, click the plus sign:

Photoshop adds the new Stroke effect above the first one, which means that it's sitting above the original stroke in the document:

Editing the second stroke
At the moment, both strokes are exactly the same. So for my second stroke, I'll change its color to black by clicking the color swatch:

And choosing black from the Color Picker:

But notice that the new stroke is now blocking the original one from view. Instead of seeing a white stroke and a black stroke around the text, all we're seeing is black:

The reason is that both strokes have their Position set to Outside, which means they are both aligned to the outside edges of the letters. And since both strokes are the same size (20px), the second one is blocking the first one from view.
To fix that, I'll change the Position of the second stroke to Inside so that it aligns to the inside edges of the letters. And I'll lower the stroke's Size from 20px down to 10px:

And now, we have a white 20px stroke around the outside of the text, and a black 10px stroke along the inside. You can add up to 10 strokes to the same layer:

Saving your effects as a custom layer style preset
Finally, to save your layer effects as a new style preset, click the New Style button on the right of the Layer Style dialog box:

And then give your preset a name. I'll name mine "2 Strokes + Orange + Marble ". Make sure Include Layer Effects is checked, and if you've used any custom blend settings, check Include Layer Blending Options as well. You can also add the new style to your Creative Cloud library:

Click OK to close the New Style dialog box, and then click OK to close the Layer Style dialog box.
Switch over to your Styles panel, and you'll find a thumbnail for your new style below the folders:

Creating your own layer styles folder
To keep the Styles panel organized, add your custom styles to a separate folder. Click the Create New Group icon at the bottom of the Styles panel:

And then give the group a name, like "My Styles". Click OK to accept it:

The new folder appears below the others. Click on your layer style's thumbnail and drag it into the folder:

How to apply your custom layer style
To apply any of your custom styles to a layer, first select the layer in the Layers panel:

Then in the Styles panel, just click on the style's thumbnail:

And the entire effect is instantly applied to the layer:

And there we have it! That's everything you need to know to start using layer effects and layer styles in Photoshop CC 2020! Check out our Photoshop Basics section for more tutorials. And don't forget, all of our Photoshop tutorials are available to download as PDFs!