
Create A Gold Text Effect In Photoshop CC and CS6

Turn type into gold with this step-by-step tutorial that shows you how to create shiny gold letters and text in Photoshop!
In this tutorial, I show you how to easily create a gold text effect with Photoshop using simple layer effects and gradients. And to make the gold letters really shine, we'll finish off by adding sparkles to the text using one of Photoshop's brushes!
I've updated this tutorial to include recent changes to Photoshop, like the new Brushes panel in Photoshop CC 2018 and the new Free Transform shortcuts in CC 2019. But where needed, I also include the steps for Photoshop CS6.
Using Photoshop 2024? Check out my new Create Gold Text in Photoshop 2024 tutorial for the latest version.
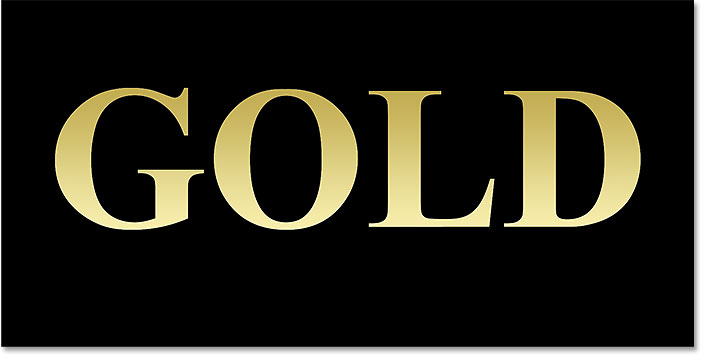
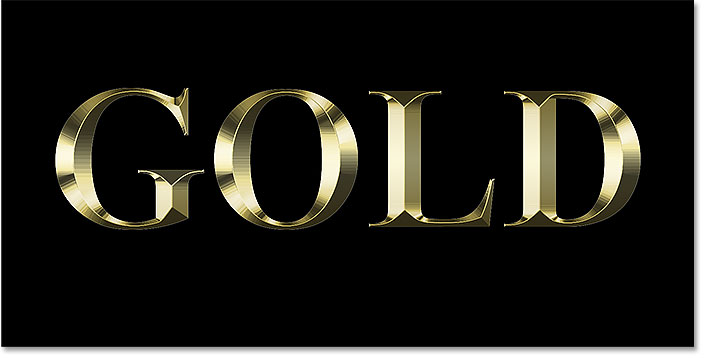
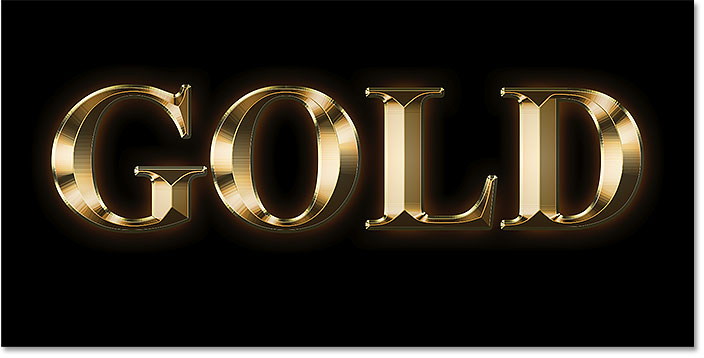
Here's what the gold text effect will look like when we're done:

Let's get started!
How to create gold text in Photoshop
I'll start with the steps for setting up the document and adding the initial text. But if you have already added your text, you can skip to Step 8 where we start turning the text into gold.
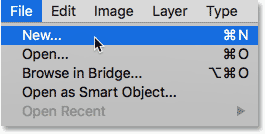
Step 1: Create a new Photoshop document
Create a new document by going up to the File menu in the Menu Bar and choosing New:
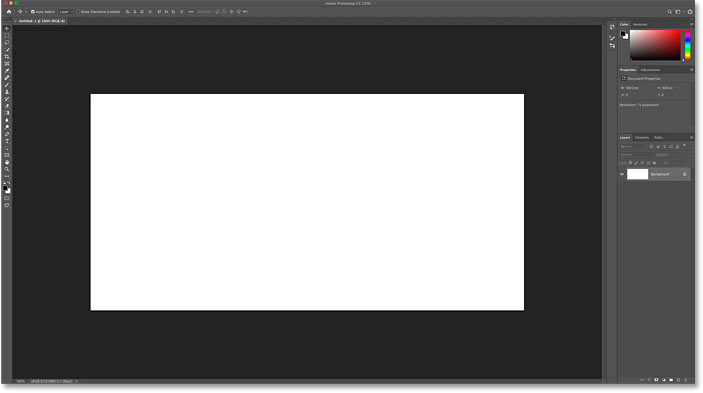
And in the New Document dialog box, set the Width of your document to 1600 Pixels, the Height to 800 Pixels, and the Resolution to 72 pixels/inch.
Then in Photoshop CC, click the Create button, or in CS6, click OK:

The new document appears:
Watch the video or continue with the written guide below:
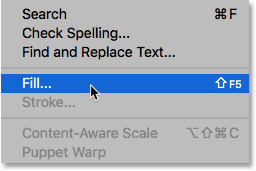
Step 2: Fill the document with black
To help the gold letters stand out, change the background color of the document from white to black.
Go up to the Edit menu in the Menu bar and choose Fill:
Then in the Fill dialog box, set the Contents to Black and click OK:
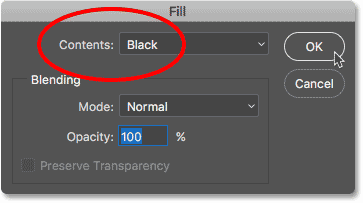
Photoshop fills the background with black:
Step 3: Select the Type Tool
To add your text, select the Type Tool from the toolbar:
Step 4: Choose your font
Then in the Options Bar, choose your font. For this tutorial, I'll keep things simple and use Times New Roman Bold, but you can use any font you like.
Set the Size of the type to 72 pt. We'll resize the type once we've added it, but this will give us the largest preset size for now:

Step 5: Set the type color to white
To see the text against the black background, set the initial color of the type to white. We'll add the gold colors later using layer effects.
Click on the color swatch in the Options Bar:
And in the Color Picker, choose white by setting the R, G and B values (Red, Green and Blue) each to 255. Then close the Color Picker by clicking OK:

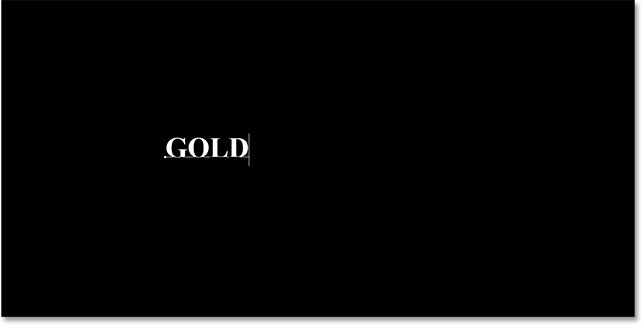
Step 6: Add your text to the document
Click inside the document and add your text. I'll type the word "GOLD".
Don't worry that the text is too small. We'll resize it in the next step:
To accept the text, click the checkmark in the Options Bar:

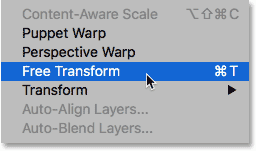
Step 7: Resize and reposition the text with Free Transform
To resize the text, and move it into the center of the canvas, go up to the Edit menu and choose Free Transform:
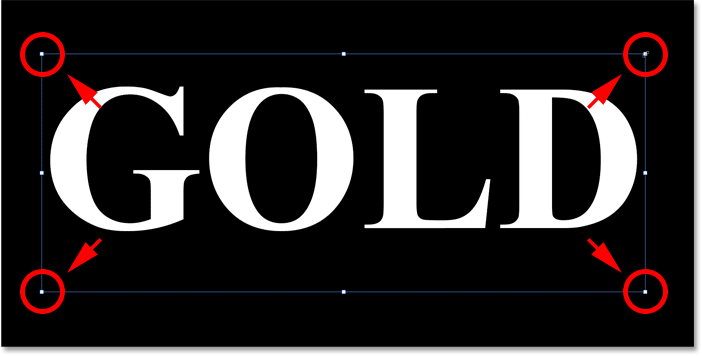
Then resize the text by clicking and dragging any of the corner handles that appear around it.
But this is where we run into a difference between Photoshop CC and CS6.
How to resize the text in Photoshop CC
As of Photoshop CC 2019, Free Transform now locks the aspect ratio automatically as you drag the handles, so you don't distort the shapes of the letters as you resize the text. This is the behavior we want, so if you're using Photoshop CC, you can just drag the handles without adding any modifier keys.
How to resize the text in Photoshop CS6
But in CS6, you need to press and hold your Shift key as you drag the handles to lock the aspect ratio in place. And when you're done resizing the text, make sure you release your mouse button before releasing the Shift key.
How to move the text into the center of the document
Once you've resized the text, move it into the center of the canvas by clicking inside the Free Transform box and dragging the text into position.
When you're done, press Enter (Win) / Return (Mac) on your keyboard to close Free Transform:
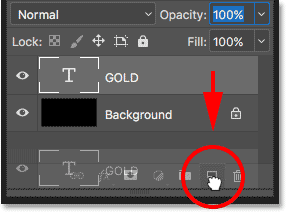
Step 8: Make a copy of the Type layer
Now that we've added the text, we're ready to start turning the letters into gold.
In the Layers panel, make a copy of the Type layer by dragging it down onto the Add New Layer icon at the bottom:
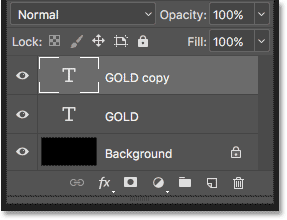
A copy of the Type layer appears above the original:
Clean up your Layers panel in Photoshop with these essential tips!
Step 9: Color the text with a Gradient Overlay layer effect
To turn the text into gold, we'll use Photoshop's layer effects. And the first effect we need is Gradient Overlay. We'll use it to add some gold colors to the letters.
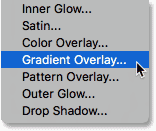
Still in the Layers panel, make sure the "GOLD copy" layer is selected. Then click the Layer Styles icon (the "fx" icon) at the bottom:
And in the layer effects menu, choose Gradient Overlay:
Step 10: Create a custom gold gradient
Photoshop opens the Layer Style dialog box set to the Gradient Overlay options.
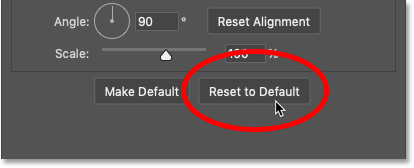
First, clear away any previous settings you may have used by clicking the Reset to Default button:
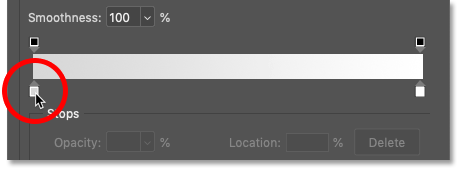
And then edit the gradient colors by clicking the gradient swatch:
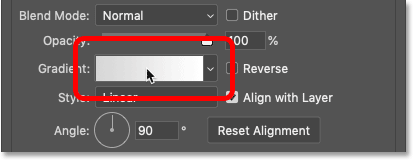
In the Gradient Editor, double-click on the color stop below the left side of the gradient:
Adding the gold gradient colors
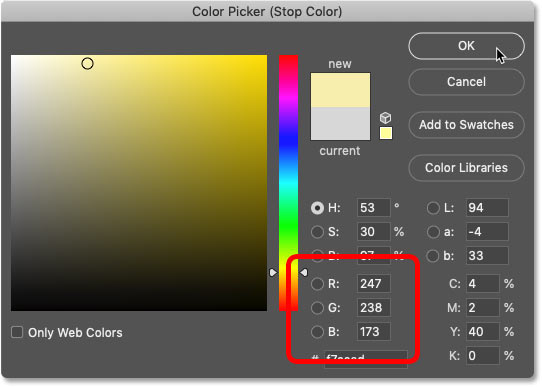
We're going to create a custom gold gradient for the text. And to help us out, I've sampled colors from a photo of a gold coin.
In the Color Picker, set the R value to 247, the G value to 238, and the B value to 173. Then click OK to close the Color Picker:
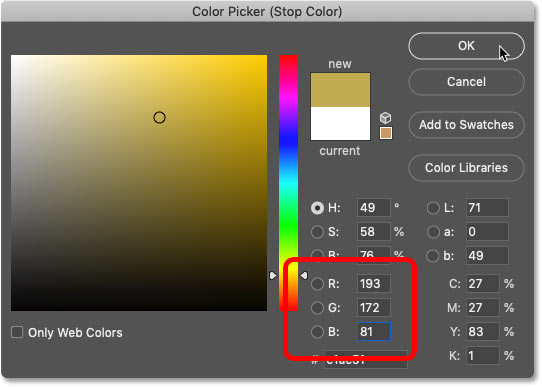
Back in the Gradient Editor, double-click on the color stop below the right side of the gradient:
And in the Color Picker, set R to 193, the G to 172 and B to 81. Then click OK:
Learn how to sample text colors from your images!
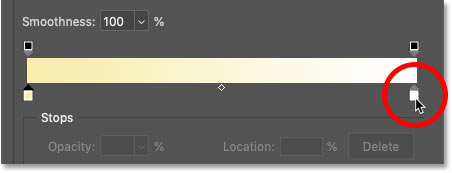
Step 11: Save the gold gradient as a preset
You'll need this gradient again, so save it as a preset.
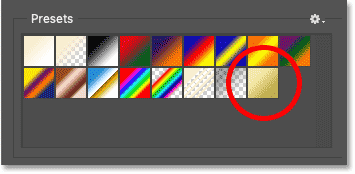
In the Gradient Editor, name the gradient "Gold", and then click the New button to save it:
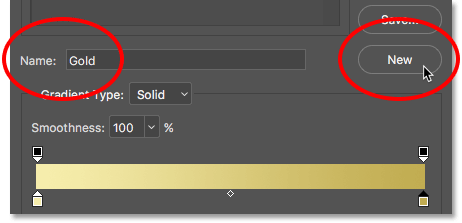
A thumbnail for the Gold gradient appears in the Presets area:
Click OK to close the Gradient Editor, but leave the Layer Style dialog box open.
Here's the text with the gold gradient applied:
Step 12: Change the gradient Style to Reflected
Back in the Layer Style dialog box, change the Style of the gradient to Reflected:
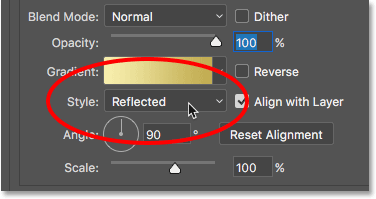
This moves the darker gold color to the top and bottom of the text, with the lighter color passing through the middle:

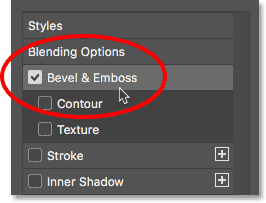
Step 13: Add a Bevel & Emboss layer effect
Along the left of the Layer Style dialog box is a list of all the layer effects we can choose from.
Select Bevel & Emboss by clicking directly on the effect's name:
And then clear away any previous custom settings by clicking the Reset to Default button:
Step 14: Change the Technique to Chisel Hard
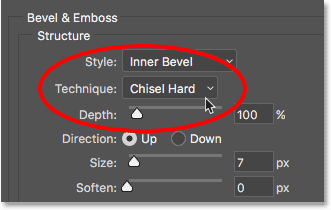
In the Structure section, make sure the Style is set to Inner Bevel.
Then change the Technique to Chisel Hard:
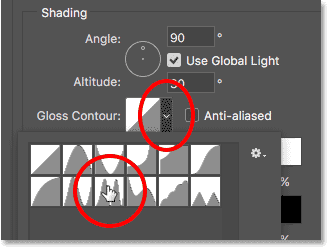
Step 15: Change the Gloss Contour to Ring - Double
In the Shading section, click on the small arrow to the right of the Gloss Contour thumbnail. Make sure you click the arrow, not the thumbnail.
Then double-click on the Ring - Double contour to select it (third thumbnail from the left, bottom row):
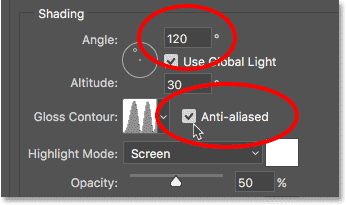
Step 16: Change the Angle and turn on Anti-Aliasing
Still in the Shading section, set the Angle to 120°.
Then turn on the Anti-aliased option to smooth out any jagged edges:
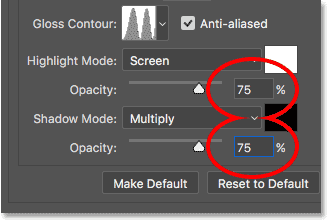
Step 17: Set the Highlight and Shadow Opacity to 75%
To add more contrast to the effect, increase both the Highlight Opacity and the Shadow Opacity to 75%:
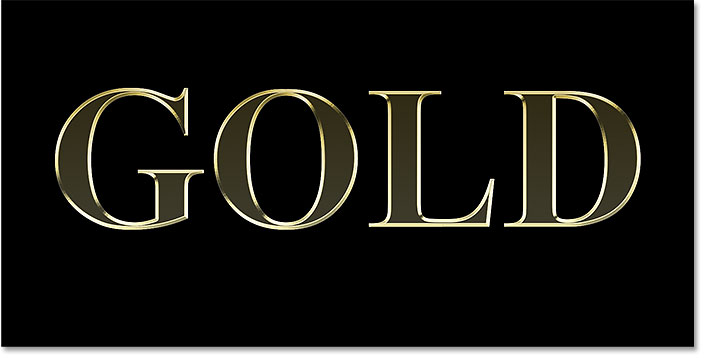
And here's the effect so far:
Step 18: Increase the Size value to fill in the letters
To make the text look more like solid gold, close up the space inside the letters by increasing the Size of the Bevel and Emboss effect.
The easiest way to do that is to first click inside the Size value box to make it active. Then use the Up Arrow key on your keyboard to slowly increase the value. As you do, you'll see the letters filling in from the outer edges towards the centers.
The Size value you need will depend on the size of your text. For me, a value of 41 pixels does the job:
And here's the gold effect with the letters filled in:
Step 19: Increase the Depth value
Next, increase the Depth value by dragging its slider towards the right. This will enhance the lighting and add more contrast to the reflection in the letters. I'll set my Depth value to around 170%:
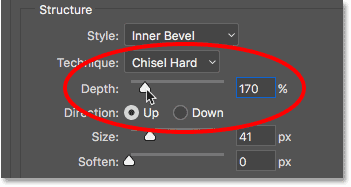
And now the letters are really starting to look like gold:
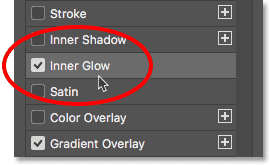
Step 20: Add an Inner Glow layer effect
Add an Inner Glow layer effect by clicking on its name on the left of the Layer Style dialog box:
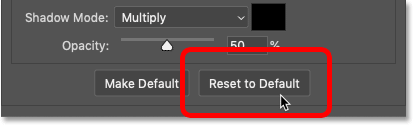
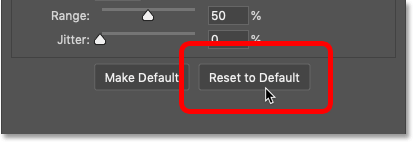
Then clear away any previous settings by clicking Reset to Default:
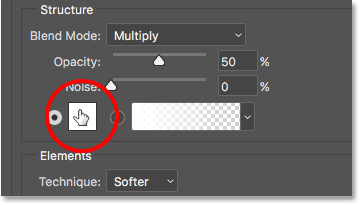
Change the Blend Mode of the Inner Glow from Screen to Multiply.
And set the Opacity to 50%:

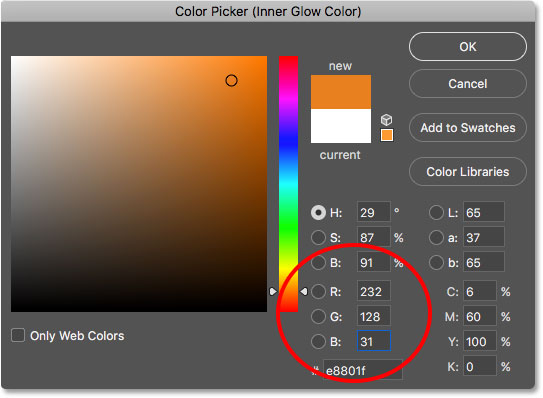
Next, change the color of the glow by clicking the color swatch:
And in the Color Picker, choose a shade of orange by setting the R value to 232, G to 128 and B to 31 (I sampled this color from a photo of a gold brick). Then click OK to the Color Picker:
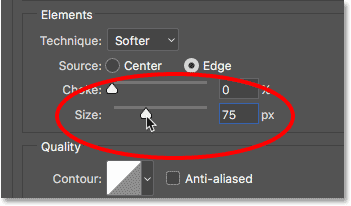
Finally, increase the Size of the glow until it completely fills the letters. In my case, I'll set the Size value to 75 px:
When you're done, click OK to close the Layer Style dialog box.
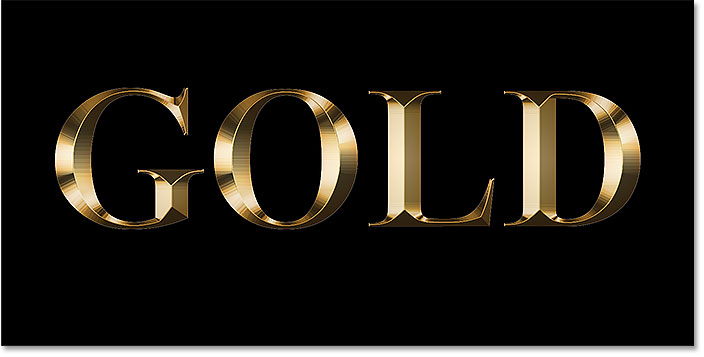
Your gold effect should now look similar to this:
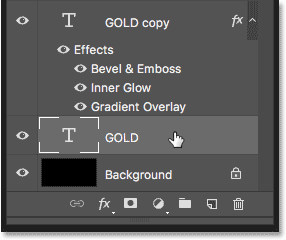
Step 21: Select the original Type layer
Back in the Layers panel, click on the original Type layer to select it:
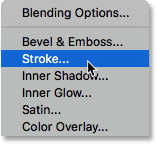
Step 22: Add a Stroke around the letters
Then click the Layer Styles icon at the bottom:
And this time, choose Stroke:
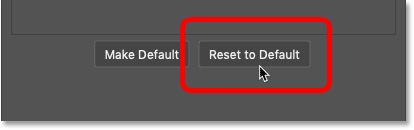
In the Layer Style dialog box, click the Reset to Default button to clear any previous Stroke settings:
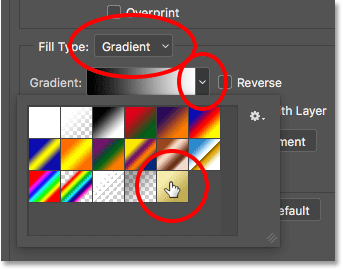
Step 23: Fill the stroke with the Gold gradient preset
Change the Fill Type of the stroke from Color to Gradient.
Then click on the small arrow to the right of the gradient swatch and select the "Gold" gradient we saved earlier by double-clicking on its thumbnail:
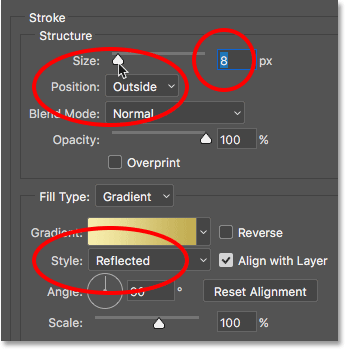
Step 24: Set the Style, Position and Size of the stroke
Change the Style of the gradient from Linear to Reflected.
Then set the Position of the stroke to Outside and increase the Size to around 8 pixels:
And now we have a stroke around the text that’s set to the same colors as the text itself:

Step 25: Apply Bevel & Emboss to the stroke
We're going to apply another Bevel & Emboss effect, not to the letters but to the stroke.
Click on the words Bevel & Emboss on the left of the Layer Style dialog box:
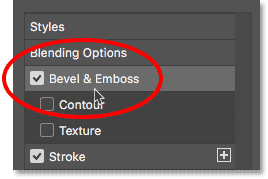
Don't click Reset to Default this time, since we're going to use most of the same settings as before.
Instead, simply change the Style from Inner Bevel to Stroke Emboss. The Technique should be set to Chisel Hard.
Set the Size value to the same size you chose for the stroke, which in my case was 8 pixels:
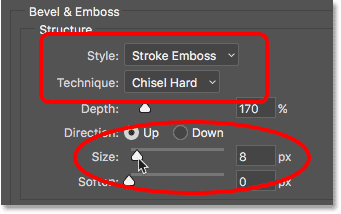
Double-checking the other Bevel & Emboss settings
Make sure all of the other Bevel & Emboss settings are the same as before. If for some reason they're not, you'll need to change them:
Depth: 170%
Angle: 120°
Gloss Contour: Ring- Double
Anti-Aliased: Checked
Highlight Opacity: 75%
Shadow Opacity: 75%

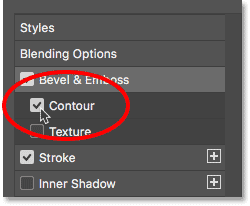
Turning on the Contour option
Below Bevel & Emboss on the left of the Layer Style dialog box is an effect named Contour. Click inside the checkbox to turn it on.
This will further enhance the lighting around the stroke:
And here's what the gold text now looks like with Bevel & Emboss applied to the stroke:
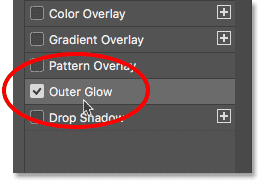
Step 26: Apply an Outer Glow layer effect
Let's finish off our layer styles by adding a faint glow around the text, as if light was reflecting off the gold letters.
Click directly on the words Outer Glow on the left of the Layer Style dialog box:
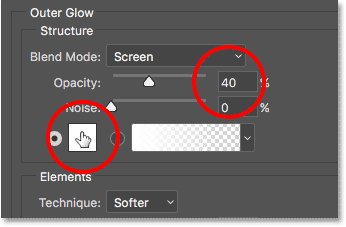
Set the Opacity of the glow to 40%, and then click the color swatch:
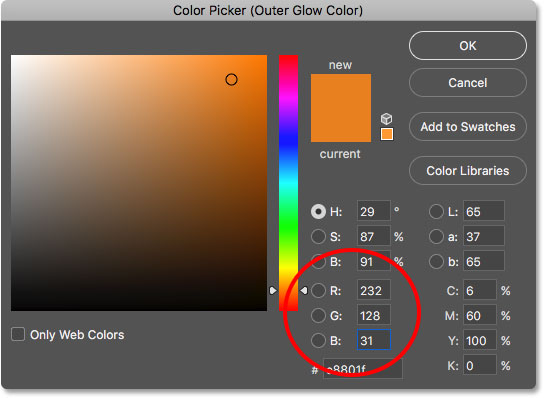
In the Color Picker, set the R value to 232, G to 128 and B to 31, and then click OK:
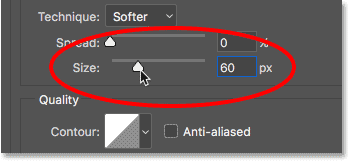
And finally, increase the Size of the glow to around 60 px:
Learn how to copy layer effects between layers in Photoshop!
We're done with our layer effects, so click OK to close the Layer Style dialog box.
And here's the gold text effect with all of our layer effects applied, including the new Outer Glow:
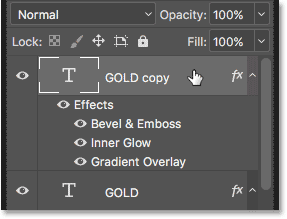
Step 27: Select the "GOLD copy" layer
We'll finish off the gold text effect by adding sparkles to the letters. And to do that, we'll need to add the sparkles on their own separate layer.
In the Layers panel, click on the "GOLD copy" layer (the top layer) to select it:
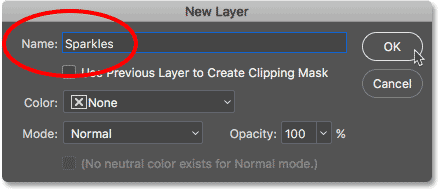
Step 28: Add a new layer above the text
Then press and hold the Alt (Win) / Option (Mac) key on your keyboard and click the Add New Layer icon:
In the New Layer dialog box, name the layer "Sparkles" and click OK:
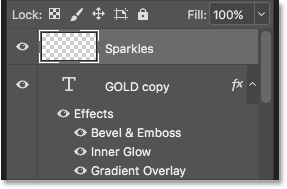
Photoshop adds a new blank layer named "Sparkles" above the text:
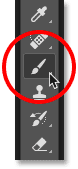
Step 29: Select the Brush Tool
We'll create the sparkles using one of Photoshop's brushes.
Select the Brush Tool from the Toolbar:
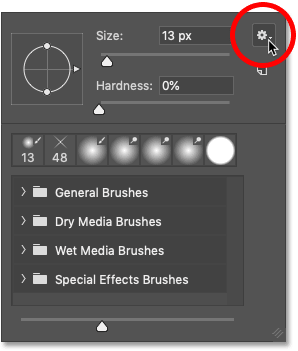
Step 30: Select the "Crosshatch 4" brush in the Assorted Brushes set
The brush we need for our sparkles, "Crosshatch 4", is included with Photoshop as part of the Assorted Brushes set. But the Assorted Brushes are not loaded automatically, so we'll need to load the set ourselves. And this brings us to another difference between Photoshop CC and CS6.
In Photoshop CC 2018, Adobe redesigned the brush panels. So use the steps below to load the brush based on your version of Photoshop.
How to load the Assorted Brushes in Photoshop CC
In Photoshop CC, with the Brush Tool selected, right-click (Win) / Control-click (Mac) inside the document to open the Brush Preset Picker.
Then click the menu icon in the upper right:
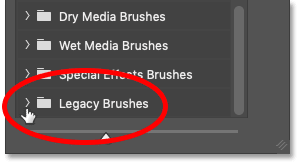
And choose Legacy Brushes from the menu:
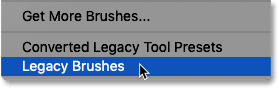
Choosing "Legacy Brushes".
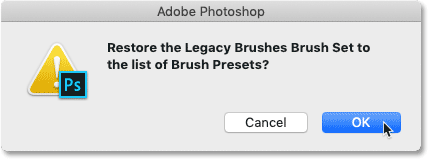
Click OK to load the Legacy Brushes set:
Back in the Brush Preset Picker, scroll down to the new Legacy Brushes folder and twirl it open:
And inside the folder, open the Assorted Brushes folder:
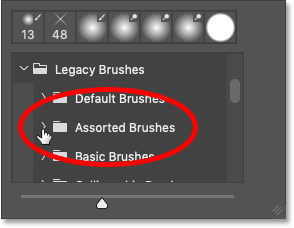
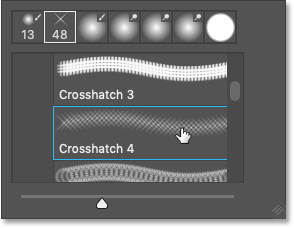
Then scroll down the list of assorted brushes until you find the Crosshatch 4 brush.
Double-click on its thumbnail to select the brush and close the Brush Preset Picker:
How to load the Assorted Brushes in Photoshop CS6
In Photoshop CS6, with the Brush Tool selected, right-click (Win) / Control-click (Mac) inside the document to open the Brush Preset Picker.
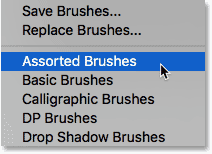
Then click the menu icon in the top right:
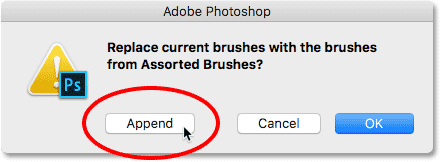
And choose the Assorted Brushes set from the menu:
Photoshop will ask if you want to replace your current brushes with the new brushes. Choose Append to add them to the existing brushes:
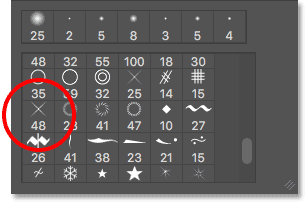
Back in the Brush Preset Picker, scroll down through the brushes until you find the 48 pixel Crosshatch 4 brush. Look for the brush that looks like an "X" with the number 48 under it (48 means that the default size of the brush is 48 pixels).
Double-click on its thumbnail to select the brush and close the Brush Preset Picker:
Step 31: Sample a gold color to use for the sparkles
Choose a color for the sparkles by sampling a color from the text.
Press and hold the Alt (Win) / Option (Mac) key on your keyboard to temporarily switch from the Brush Tool to the Eyedropper Tool, and then click on a light gold color to sample it.
I'll choose a light area from the letter "O":

Step 32: Click on the letters to add random sparkles
Release your Alt (Win) / Option (Mac) key to switch back to the Brush Tool. And then click in a few random spots around the text to add your sparkles.
For added variety, change the brush size before each click by pressing the left or right bracket keys on your keyboard. The left bracket key makes the brush smaller and the right bracket key makes it larger.
Don't add too many sparkles or you'll overdo it. A couple of larger and smaller ones is all you really need. If you don't like the last sparkle you added, press Ctrl+Z (Win) / Command+Z (Mac) on your keyboard to undo it, and then try again.
Here, I've added a couple of sparkles to the letter "G", a third, smaller sparkle at the bottom of the letter "L", and a fourth one in the upper left of the letter "D":

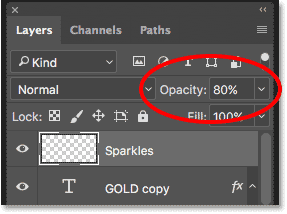
Step 33: Lower the opacity of the sparkles (optional)
And finally, if the sparkles are looking a bit too bright, simply lower the opacity of the "Sparkles" layer.
You'll find the Opacity option in the upper right of the Layers panel. I'll lower mine to 80%:
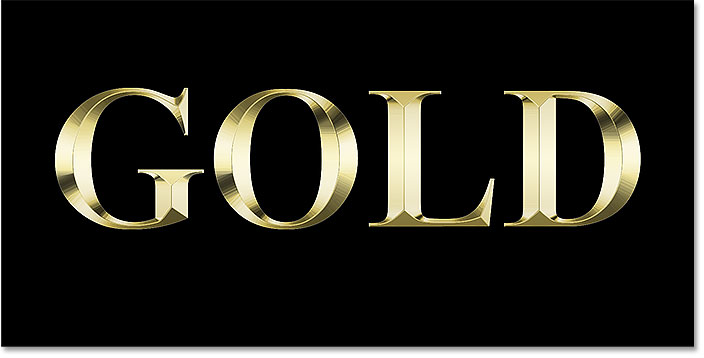
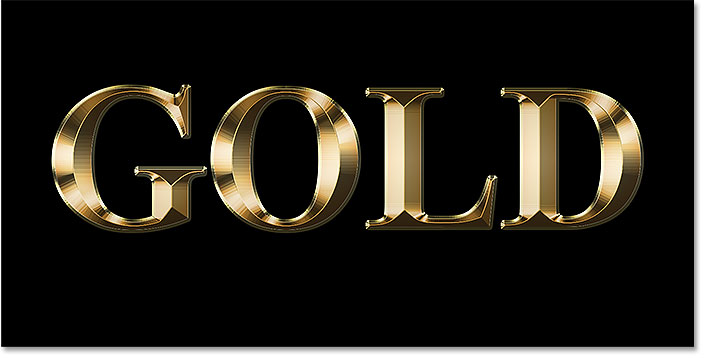
And with that, we're done! Here, after lowering the opacity of my "Sparkles" layer, is my final gold text effect:
And there we have it! That's how to create gold text in Photoshop!
Now that you've created the gold text, check out Part 2 where I show you how to easily replace the background of the effect!
Or visit our Text Effects or Photo Effects sections for more tutorials!