How to Turn Photos to Paintings with Generative Fill in Photoshop
Turn any photo into a painting in Photoshop using Generative Fill and Adobe Firefly. A step-by-step tutorial.
Download the PDF: Turn Photos to Paintings with Generative Fill
In this tutorial, I show you how to turn any photo into a painting using Generative Fill in Photoshop.
As we’ll see, the trick to creating painting effects with Generative Fill is to apply it to your image at a lower intensity. By default, Generative Fill is applied at 100% intensity which completely replaces the original detail with new detail generated by Adobe Firefly.
But by applying Generative Fill at a much lower intensity, we keep most of the original detail in the image and blend in just a little bit of AI. Let’s see how it works.
Which Photoshop version do I need?
I'm using Photoshop 2025. Use the Creative Cloud Desktop app to make sure your copy of Photoshop is up to date.
Let's get started!
How to turn a photo to a painting with Generative Fill
Whether you’re looking to turn your photo into a watercolor painting, an oil painting or some other kind of painting, here’s how to create the effect using Generative Fill in Photoshop.
Step 1: Open your image
Since generative AI always replaces original image detail with new detail (even when applied at a low intensity), painting effects created with Generative Fill tend to work best on images such as landscapes and nature photos where the exact details are not as important as, say, someone’s facial features.
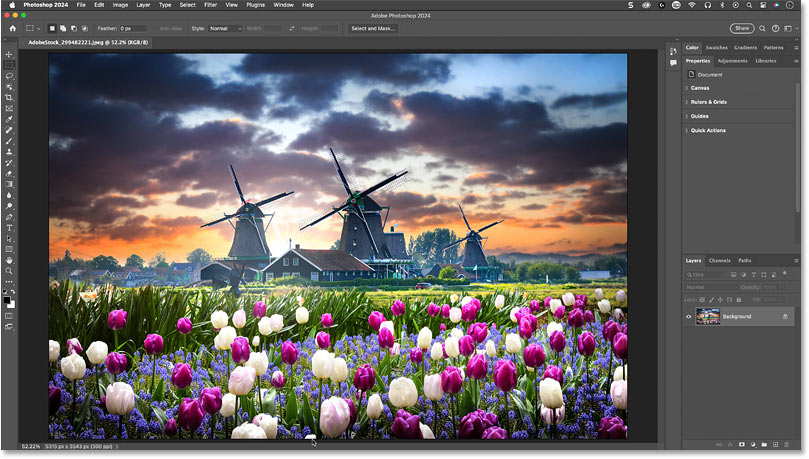
So for this tutorial, I’ll use this photo from Adobe Stock.
Step 2: Switch to Quick Mask mode
To apply Generative Fill at an intensity less than 100%, we need to start in Photoshop’s Quick Mask mode.
In the toolbar, click the Quick Mask icon (near the bottom, directly below the color swatches). Or you can press the letter Q on your keyboard.
An easy way to tell that you are in Quick Mask mode is that the Background layer in the Layers panel is highlighted in red.

Step 3: Open the Fill options
With Quick Mask mode active, go up to the Edit menu in the Menu Bar and choose Fill.

Step 4: Choose a dark gray fill color
In the Fill dialog box, change the Contents option to Color.
Note that even if Color is already selected, you need to select it again for the Color Picker to open.

In the Color Picker, set the H (Hue) and S (Saturation) values to 0 so we’re working with gray. Then set the B (Brightness) value to 30 percent.
Think of the brightness value as the AI intensity value. The higher the value, the more impact Generative Fill will have on the image (and the more the image will change). The lower the value, the more the original detail will remain intact.
For this painting effect, a value of 20-40 percent usually works best, and 30 percent tends to be the sweet spot. But you can always repeat these steps with a different brightness value to compare the results.

Step 5: Exit Quick Mask mode
Click OK to close Photoshop’s Color Picker. Then click OK to close the Fill dialog box.
Since we’re in Quick Mask mode, your image will appear with a red overlay (another easy way to tell that you’re in Quick Mask mode).

Exit Quick Mask mode by once again clicking the Quick Mask icon in the toolbar, or by pressing Q on your keyboard.

Step 6: Select Generative Fill
In Photoshop’s Contextual Task Bar, click Generative Fill.

Step 7: Enter your painting prompt and click Generate
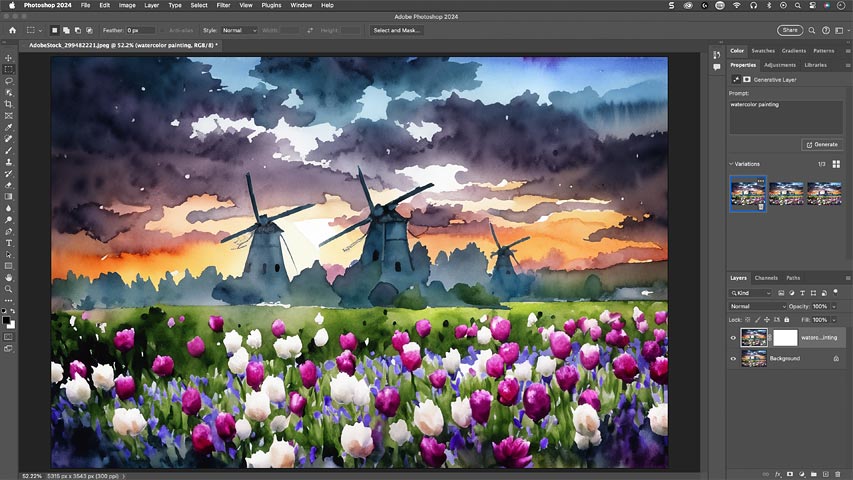
In the prompt box, enter the style of painting you want to create. I’ll enter watercolor painting
.
Then click Generate.

Step 8: Choose the best result
You’ll need to wait a few seconds for Photoshop and Adobe Firefly to generate the results.
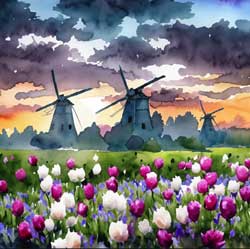
Here’s my initial watercolor painting effect. Applying Generative Fill at only 30% intensity allowed much of the original detail to remain so we can still make out the flowers and the windmills.

As usual with Generative Fill, you’ll find three variations of the result in the Properties panel so you can choose the one you like best. Or click Generate to try again.

Step 9: Try different painting styles
Once you have generated your initial painting effect, you can easily try different painting styles just by changing the prompt in the Properties panel.
For example, I’ll change my prompt from watercolor painting
to oil painting
.
Then I’ll click Generate.

Here’s my favorite of the three oil painting results.

And there we have it! That’s how to easily turn a photo to a painting using Generative Fill in Photoshop.
Related tutorials:
- How to use the Oil Paint filter in Photoshop
- Turn a photo to a pointillism painting
- Create a watercolor painting effect
Don't forget, all of my Photoshop tutorials are now available to download as PDFs!