How to Generate AI Images in Photoshop using Adobe Firefly
Learn how to use the Generate Image feature in Photoshop to generate entire AI images from scratch using the power of Adobe Firefly.
Download the PDF: 2025 - How To Generate AI Images In Photoshop
These days, Photoshop has lots of AI-powered tools, like Generative Fill, Generative Expand and the Remove Tool, that make editing and retouching images easier than ever. But in the most recent Photoshop versions, we can also generate an entire AI image from scratch using a feature called Generate Image.
Generate Image uses Adobe Firefly to create AI images directly in Photoshop. And it brings with it most of the options found in the text-to-image module on the Adobe Firefly website, including the options to match the look and style of a reference image and apply different effects.
And because Generate Image uses the latest version of Adobe Firefly (the Firefly Image 3 model), it can create images up to 2048 x 2048 pixels, a big jump from the 1024 x 1024 pixel limit of Generative Fill.
Which Photoshop version do I need?
I'm using Photoshop 2025 and you'll want to make sure that your copy of Photoshop is up to date. Use the Creative Cloud Desktop to check for updates.
Let's get started!
How to use Generate Image in Photoshop
Here’s my step-by-step guide on how to use Generate Image in Photoshop to generate a new AI image from scratch.
Step 1: Create a new Photoshop document
If you’re on Photoshop’s Home Screen, click the New file button to create a new Photoshop document.

Or from Photoshop’s main interface, go up to the File menu and choose New.

Either way opens the New Document dialog box.
Set both the Width and Height of the document to 2048 pixels since that’s the resolution limit for the new Firefly Image 3 model that Photoshop is using.

Leave all other options at the defaults and click the Create button.

The new Photoshop document appears.

You can zoom in on the canvas if needed by going up to the View menu and choosing the Fit on Screen command.

Step 2: Choose Generate Image
There are three places to access Generate Image in Photoshop.
If the Background layer is selected in the Layers panel, you’ll find a Generate Image button in the Contextual Task Bar.

You’ll also find a new Generate Image icon at the bottom of Photoshop’s toolbar.

And there’s a Generate Image command under the Edit menu in the Menu Bar.

Whichever one you choose opens the Generate Image dialog box, which brings over most of the options from the text-to-image module on the Adobe Firefly website.

Step 3: Enter a prompt to describe the image
Start by entering a prompt to describe the image you want to generate.
If you need inspiration, click on any of the sample images along the right to display the prompt that was used to create it (along with other options that were used like the content type, the reference image and any effects, all of which we’ll cover in a moment).

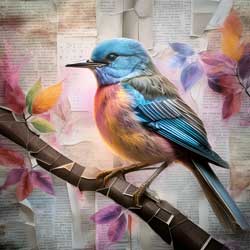
For my prompt, I’ll keep things simple and enter a closeup of a small colorful bird perched on a branch
.

Step 4: Choose the content type
Below the prompt box is the Content Type option where you can choose either Art (for a more creative result) or Photo (for a more photorealistic image). Or you can choose neither and Photoshop will choose one for you based on your prompt.
I’ll choose Art.

Step 5: Click Generate
Below Content Type is the Style section. Here you can choose a reference image to have Photoshop match its colors and its overall look and feel. And you can add one or more effects to the image.
But we can always try different style options after the image is generated. For now, all we really need is our prompt. So click Generate to see what Photoshop comes up with.

Photoshop sends the image over the internet to the Adobe Firefly servers, just like when using Generative Fill. It can take 10-15 seconds for the results to appear, and you’ll see a progress bar while you wait.

Step 6: Choose a result or click Generate again
With Generate Image in Photoshop, you get three results to choose from (the Adobe Firefly website generates four results).
Here’s my first of the three results.

Notice in the Layers panel that we now have a Generative layer which holds the results, just like we would get with Generative Fill. You can tell it’s a Generative layer by the icon in the thumbnail’s lower right.

To view and compare the other two images, click on their thumbnails in Photoshop’s Properties panel.

Or click the left and right arrows in the Contextual Task Bar to cycle through them.

I like this third result the best.
But if you don’t like any of the images, you can continue generating results by clicking the Generate button either in the Properties panel or the Contextual Task Bar.

Using Generate Similar
If you really like one of the results, you can use the Generate Similar feature to tell Photoshop to use that result as the base image and generate new results similar to it.
In the Properties panel, hover your cursor over the image thumbnail and click the menu icon that appears in the upper right.
Then click Generate similar.

Photoshop will generate three new results similar to that base image. Click the thumbnails to view and compare them.

Step 7: Edit your prompt and try again (optional)
If none of the results were what you expected, you can edit your prompt in the Properties panel and then click Generate again. Generally the more detailed you are with your prompt, the better the results will be.
But I’m happy with my result so I’ll leave the prompt the way it is.

Step 8: Choose a style reference image
Just like on the Adobe Firefly website, Generate Image in Photoshop lets you completely change the look and style of the results by using a reference image. Photoshop will generate new results that match the colors, the lighting and the overall look and feel of the reference image.
If you are still in the Generate Image dialog box (before generating the initial results), you can click the Reference image option in the dialog box itself.

Or if you have already generated images like I have here, you can still choose a reference image by clicking the Edit Reference Image icon in the Properties panel.
Then either choose an image from the gallery, or click the Choose image button to upload your own reference image.
I’ll choose one of the watercolor style images from the gallery.

Once you have chosen your reference image, click the X icon in the upper right of the dialog box to close it.

Then click the Generate button again.

And here I get three new results matching that watercolor style. Same prompt, but a completely different look thanks to the reference image.
This third variation is my favorite.

You can try out as many reference images as you like. Just click the Edit Reference Image icon in the Properties panel to reopen the gallery, then choose a different one (or choose Replace image to upload your own).
I’ll try this 3D-rendered beach scene image from the gallery.

And here’s one of the three results after clicking Generate. Again same prompt, but a completely different style.

Just for fun, I’ll try one more reference image. This neon image looks interesting.

And here’s the result, again very different from the previous two even though the prompt was the same.

Step 9: Add effects
Reference images are not the only way to drastically change the style of the results. Generate Image also includes lots of effects you can apply.
In the Properties panel, click the Edit Effects icon.
The effects are divided into categories (Movements, Themes, Techniques, and so on), and you can combine as many effects as you like. Choose the Popular category to see the effects currently most popular.
I’ll open the Materials category and choose Layered Paper.

Then I’ll open the Themes category and choose Newspaper. I’m going for a very papery
kind of look.

Finally, I’ll open Techniques and choose Double Exposure just to see if it helps blend everything together.

The Selected category shows all the effects that will be applied. You can remove an effect by deselecting it.

I’ll click Generate one last time.
And with my prompt, my style reference image and my three effects all working together, I get this result that I think looks great.

And there we have it! That’s how to generate entire images from scratch using Generate Image in Photoshop.
Related tutorials:
- Using Structure Reference and Style Reference in Adobe Firefly
- Using Visual Intensity in Adobe Firefly for more detailed images
- How to remove people from photos with Generative Fill
Don't forget, all of my Photoshop tutorials are available to download as PDFs.