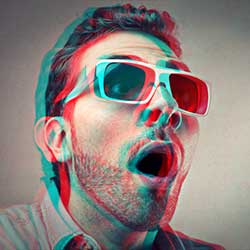
How to Create a Retro 3D Movie Effect in Photoshop
Put on your old red and blue 3D glasses and recreate the look of classic 3D movies from the 1950's with this quick and easy Photoshop effect. A step-by-step tutorial for Photoshop 2023 or earlier.
Download the PDF: Retro 3D Movie Effect
Long before modern 3D movies like "Avatar" and its sequel "The Way of Water", movie monsters in the 1950’s were leaping out from the screen in terrifying red and blue. And in this tutorial, I show you how easy it is to recreate that same red and blue (technically red and cyan) retro 3D movie effect with Photoshop.
Of course, since Photoshop works with flat 2D images, we're limited in what we can do. But we can at least make something that looks like it’s from an old 3D movie. And as we’ll see, this effect is so easy to create that once you know the steps, you can go from start to finish in 60 seconds or less.
Here’s an example of what the retro 3D effect will look like when we’re done.

Along with the classic red and cyan colors, I’ll also show you how to create variations of the effect using other color combinations, like green and magenta.

Which version of Photoshop do I need?
I’m using Photoshop 2023 but any recent version will work. You can get the latest Photoshop version here.
The document setup
I’ll use this image from Adobe Stock, but you can also follow along with your own image.

Let's get started!
Step 1: Make a copy of the Background layer
In the Layers panel, the image appears on the Background layer:

Related: Learn all the ways to get your images into Photoshop!
Make a copy of the Background layer by dragging it down onto the New Layer icon.

Photoshop adds the copy above the original.

Double-click on the copy’s name to highlight it.

Then rename it "3D". Press Enter on a Windows PC, or Return on a Mac, to accept it.

Step 2: Open Photoshop’s Blending Options
Still in the Layers panel, open Photoshop’s Blending Options, either by double-clicking on an empty gray area of the “3D” layer or by clicking the fx icon at the bottom of the Layers panel:
And choosing Blending Options from the top of the list.

The Layer Style dialog box opens with the Blending Options in the middle column.

Step 3: Turn off the Green and Blue color channels
In the Advanced Blending section, look for the R, G and B checkboxes next to the word Channels.

R, G and B represent the Red, Green and Blue color channels that Photoshop mixes together to create all the colors in the image.
Turn off the Green and Blue channels by unchecking the G and B boxes, leaving only the Red channel (the R checkbox) turned on.

Then click OK to close the Layer Style dialog box.

It won’t look like anything has happened to the image. But if you turn off the Background layer by clicking its visibility icon:

You’ll see that the image on the "3D" layer now appears only in red.

Turn the Background layer back on to return to the full color image.

Step 4: Select the Move Tool
To create the red and cyan 3D effect, all we need to do now is offset the two versions of the image.
In the Layers panel, make sure the "3D" layer is active.

Then in the toolbar, select the Move Tool. We're not going to use the Move Tool. We just need it to be active.

Step 5: Nudge the image to the left
Use the left arrow key on your keyboard to nudge the image on the “3D” layer to the left. Hold Shift while pressing the arrow key to move the image in 10 pixel increments.
As the image moves, a red outline appears along one side of each object. And because the opposite of red is cyan, a cyan outline appears along the opposite side.
The more you offset the two images, the thicker and more obvious the red and cyan outlines will appear. So continue nudging the image until you’re happy with the result.

Trying other color combinations
Along with the classic red and cyan 3D colors, you can also choose other color combinations for variations on the effect.
In the Layers panel, reopen the Blending Options by double-clicking on an empty gray area of the “3D” layer.

Green and Magenta
Then in the Layer Style dialog box, uncheck the R box to turn off the Red channel and check the G box to turn on only the Green channel.

This gives you a green and magenta effect (since magenta is the opposite of green).

Blue and Yellow
Or turn off the Green channel and turn on only the Blue channel:

For a blue and yellow effect (yellow is the opposite of blue). To return to the classic red and cyan colors, simply uncheck both the Green and Blue channels and turn the Red channel back on. Then click OK to close the Layer Style dialog box.

And there we have it! That's how easy it is to recreate the look of retro 3D movies in Photoshop.
Related tutorial:
Don't forget, all of my Photoshop tutorials are now available to download as PDFs!