Using Smart Sharpen for the Best Image Sharpening in Photoshop
Learn how to sharpen images like the pros with Smart Sharpen, Photoshop's most advanced (but still easy to use) image sharpening filter! And why Smart Sharpen is a better choice than Unsharp Mask!
Download PDF: Smart Sharpen
In a previous tutorial in this series, I showed you how to sharpen images with Unsharp Mask, the most basic sharpening filter in Photoshop. This time, I show you how to get even better results using Smart Sharpen.
Smart Sharpen vs Unsharp Mask
Both Unsharp Mask and Smart Sharpen are great choices for sharpening images. But Smart Sharpen is even better, with important advantages. Unsharp Mask is a much older filter, and has no way of detecting edges in your image. It also lacks control over the highlights and shadows, which often leads to clipping and a loss of detail in the lightest and darkest pixels.
By comparison, Smart Sharpen is a newer filter that takes advantage of more recent technology. Smart Sharpen can detect edges, so it sharpens edges without sharpening noise. It also creates thinner, less noticeable halos around edges, resulting in a cleaner image. And Smart Sharpen includes controls for fading the edge contrast in both the highlights and shadows, so your image looks sharper without losing detail. Let's see how it works!
New to Smart Sharpen in Photoshop CC: Reduce Noise
For best results with Smart Sharpen, you'll want to be using Photoshop CC which includes a Reduce Noise feature not available in previous versions of the filter.
Let's get started!
How to sharpen images with Smart Sharpen
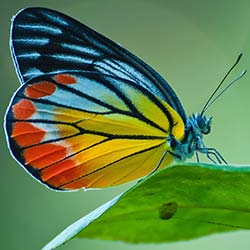
You can use any image to follow along. I'll use this image from Adobe Stock:

I'll zoom in so we can get a closer look at the butterfly. There's a lot of detail here that I can bring out with sharpening. But at the moment, it's looking too soft:

Step 1: Convert the image layer into a smart object
Smart Sharpen can be applied as a static filter, but it's better to apply it as a smart filter. This keeps the filter settings editable, and makes changing the filter's blending options easier. To apply Smart Sharpen as a smart filter, first convert your image layer into a smart object.
But keep in mind that Photoshop can only sharpen one layer at a time. So if your document contains multiple layers, you'll need to merge them onto a new layer before sharpening.
In the Layers panel, my image appears on the Background layer. To convert the layer to a smart object, click the menu icon in the upper right of the Layers panel:
And then choose Convert to Smart Object from the menu:

A smart object icon appears in the lower right of the layer's preview thumbnail, telling us that we're now working with a smart object:
Step 2: Select the Smart Sharpen filter
To apply Smart Sharpen, go up to the Filter menu in the Menu Bar, choose Sharpen, and then choose Smart Sharpen:

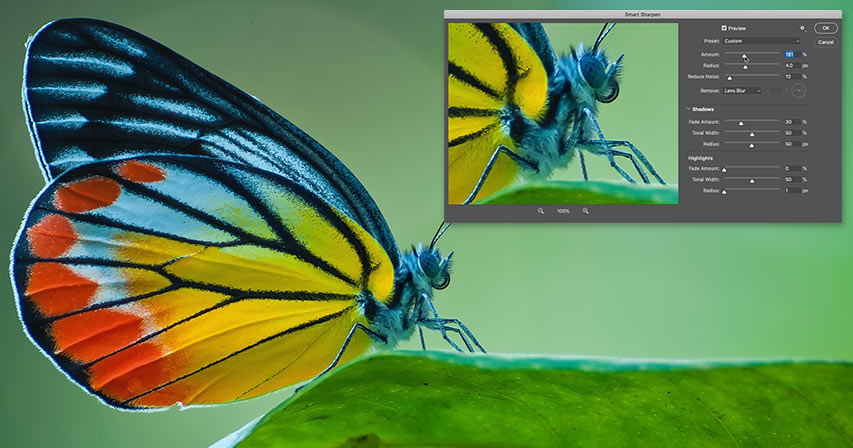
The Smart Sharpen dialog box
This opens Photoshop's Smart Sharpen dialog box, with a preview window on the left and various sliders and options on the right.
The preview window displays the image at the 100% zoom level, where each image pixel takes up exactly one screen pixel, giving you the most accurate sharpening preview. The zoom level can be changed using the plus and minus icons below the preview, but it's best to leave it at 100%:

Step 3: Resize the Smart Sharpen dialog box for a larger preview
One of the first big advantages that Smart Sharpen has over Unsharp Mask is that the dialog box can be resized to make the preview window much bigger. To resize it, click and drag the sides or corners of the dialog box outward.
Then once you've resized the dialog box, click and drag inside the preview window to center the preview on your subject:

Step 4: Make sure Remove is set to Lens Blur
Another big advantage with Smart Sharpen is that it can detect edges, just like the High Pass filter which I cover in a separate tutorial. An edge is an area with a sudden, abrupt change in brightness between neighboring pixels. But for Smart Sharpen to detect edges, the Remove option must be set to Lens Blur.
The two other choices here are Gaussian Blur and Motion Blur. Gaussian Blur causes Smart Sharpen to behave exactly like Unsharp Mask, with no edge detection ability. And Motion Blur is for removing blur caused by your subject moving or by camera shake.
For most images, you'll want to make sure that Remove is set to Lens Blur before you continue:

Step 5: Adjust the Amount value to add edge contrast
Image sharpening is all about increasing contrast along edges, making the light side lighter and the dark side darker. The stronger the edge contrast, the sharper the image looks. And just like with Unsharp Mask, Smart Sharpen uses an Amount slider to control the amount of contrast.
At the default Amount value of 200%, the image is already looking sharper. But how much sharper it looks depends on the size of your image and on the amount of detail.

How to toggle the sharpening preview on and off
You can toggle the preview window in the dialog box between the original and sharpened versions of the image by clicking and holding inside the preview window. With your mouse button held down, you'll see the original image. And when you release your mouse button, you'll return to the sharpened version.
On the left is my original image. And on the right is the sharpening using Smart Sharpen's default settings (Amount: 200%, Radius: 1 px, Reduce Noise: 10%). Note that the Reduce Noise option, which we'll look at in a moment, is only available in Photoshop CC:

Increasing the Amount value to add more sharpening
By increasing the Amount value, we add more contrast to the edges, making the image look even sharper. I'll increase the Amount to its maximum value of 500%:

On the left is the default sharpening at 200%, and on the right is with the Amount increased to 500%. In my case, because I'm working with a large, high resolution image, the increased contrast is less noticeable than it would be with a smaller image:

Choosing the best Amount value for sharpening your image
So what's the best Amount setting to use? It really depends on the size of your image and the amount of detail. But for most images, Amount values of between 150% and 200% work best.
However, the Amount option does not sharpen images on its own. To really see the effect that the Amount value has on sharpening, we also need to adjust the Radius option, which we'll look at next. And to make it easier to see how Radius works, I'll leave my Amount value set to 500%.
Step 6: Adjust the Radius value to set the edge thickness
The Radius value in the Smart Sharpen dialog box controls the thickness of the edges, by setting the number of pixels extending outward from an edge that should be considered part of the edge. Radius has a big impact on sharpening because thicker edges make the increased contrast from the Amount setting more obvious. So the two options, Amount and Radius, work hand-in-hand.
The default Radius value of 1 pixel means that the Amount value is affecting only a single pixel on either side (one pixel on the light side of the edge and one on the dark side). But as we increase the Radius, a wider and wider area is affected:

I'll increase the Radius from 1 pixel to 2 pixels, which means that the edges are now 4 pixels thick (2 pixels on the light side and 2 on the dark side). And already we see a big jump in contrast and sharpness. The 1 pixel Radius is on the left, and the 2 pixel Radius is on the right:

Creating halos by setting the Radius value too high
But if we set the Radius value too high, the edges become too thick, creating visible halos (light and dark outlines).
On the left is the sharpening with a Radius of 2 pixels. And on the right is the result after increasing the Radius to 5 pixels. Notice the outlines (the halos) now appearing around the butterfly's legs, hairs, the antennae, and in the details of the wing. These are sure signs that the image has been over-sharpened. Plus, it just looks really ugly:

Comparing Smart Sharpen's halos to Unsharp Mask
But as bad as the halos look at such a high Radius value, they actually look better with Smart Sharpen than they would using Unsharp Mask. And we can prove it right here in the Smart Sharpen dialog box.
To make Smart Sharpen behave like Unsharp Mask, with no edge detection ability, simply change the Remove option from Lens Blur to Gaussian Blur:

And notice how much thicker the halos now appear, even though the Radius value remains the same (5 pixels). Lens Blur is on the left and Gaussian Blur is on the right. This is how the exact same Amount and Radius settings would look if I was sharpening the image with Unsharp Mask. So not only can Smart Sharpen detect edges, but it also produces thinner halos. Another win for Smart Sharpen:

To turn the edge detection feature back on, I'll set Remove back to Lens Blur:

Choosing the best Radius value for sharpening your image
Like the Amount value, the best Radius value to use depends on your image. But it also depends on whether the image is being sharpened for print or for viewing on screen. That's because pixels appear much smaller in print, so the halos appear much thinner and less obvious.
To compensate, you'll need a higher Radius value and thicker halos for the printed version to look just as sharp as the on-screen version. And the flip side is that an image being sharpened for print will usually look over-sharpened on your screen.
When sharpening for print, a Radius of 1 to 3 pixels usually works great. But since Smart Sharpen produces thinner halos than Unsharp Mask, you can often get away with even higher Radius values. If 3 pixels isn't enough, try pushing the Radius to 4 or even 5 pixels (making sure, of course, that Remove is set to Lens Blur).
When sharpening for email, the web or any sort of screen viewing, a Radius of 0.5 pixels to 1 pixel works better. Try to keep the Radius under 1 pixel for the best screen sharpening results.
For my image, I'll go with a Radius of 4 pixels, and I'll lower the Amount value from 500% back down to the default of 200%:

These settings make the image look over-sharpened on screen, but when printed, they'll look much better:

Step 7: Drag the Reduce Noise slider to clean up the image
In Photoshop CC, Adobe added a Reduce Noise feature to Smart Sharpen. The problem with noise is that it creates the same sudden change in brightness between neighboring pixels that Photoshop looks for when detecting edges. So the noise gets sharpened along with everything else.
You can reduce the noise using the Reduce Noise slider. But if you try to remove all the noise, you'll smooth out too much detail. So instead, drag the slider to the right until the image looks cleaner and the noise is less distracting. The default value of 10% is often all you need:

Step 8: Fade the sharpening in the highlights and shadows if needed
At this point, the main sharpening effect is done. But there's one more potential problem we can fix with Smart Sharpen, and it's yet another advantage that Smart Sharpen has over Unsharp Mask.
Depending on your image and the amount of edge contrast you've added, sharpening can sometimes lead to clipping in the highlights and shadows, where the brightest edge pixels are blown out to pure white and the darkest edge pixels are crushed to pure black.
How to access the Shadows and Highlights options
If you notice any overly-bright or dark areas after sharpening, twirl open the Shadows/Highlights section:

This opens two additional sets of options, one for the Shadows and one for the Highlights. Each section contains three sliders (Fade Amount, Tonal Width and Radius) and they work exactly the same in both sections:

Fade Amount
The Fade Amount slider fades the sharpening in either the shadows or highlights (depending on which section you're in). The higher the value, the less sharpening is applied. At the default Fade Amount value of 0%, all of the options in the Shadows / Highlights section are effectively turned off.
Tonal Width
Tonal Width controls the range of brightness levels that are affected by the Fade Amount.
In the Shadows section, lower Tonal Width values limit the fade to just the darkest edge pixels, while higher values include more of the midtones. And in the Highlights section, lower values limit the fade to just the brightest edge pixels, while higher values include more midtones.
You generally don't need to worry about the Tonal Width because the default value of 50% works well.
Radius
And the Radius value controls the width of the area around each pixel that Photoshop looks at to determine if the pixel fits within the specified tonal range. If it does, then it will be affected by the Fade Amount. If not, it won't.
The default Radius of 1 pixel is usually too low. To affect a wider area, try increasing the value closer to 50 pixels.
Example: Restoring highlight detail after sharpening
My image doesn't have any obvious problems in the shadows or highlights, but to see how these sliders can be used to restore clipped detail, I'll increase the edge contrast by raising the main Amount value back up to 500%. And now if we look near the butterfly's eye, we see an area of distractingly bright highlights along the left edge:

I can dial back the brightness and restore detail in that area by increasing the Fade Amount value in the Highlights section. To keep as much edge contrast as possible in the rest of the image, don't automatically crank the Fade Amount all the way to 100%. Instead, find the lowest value that still gives you the result you need.
I'll increase the value to 30%. And I'll also increase the Radius value to 50 pixels:

And here we see the result. It's subtle, but on the left is the original version with the clipped highlights around the eye. And on the right is the version with less clipping and more of the highlight detail restored:

Step 9: Close the Smart Sharpen dialog box
When you're ready to apply your sharpening settings, click OK to close the Smart Sharpen dialog box:

Step 10: Change Smart Sharpen's blend mode to Luminosity
And finally, whether we're sharpening an image with Smart Sharpen or Unsharp Mask, the final step is always the same. We need to avoid color artifacts in the sharpened version by changing the filter's blend mode.
Back in the Layers panel, Smart Sharpen appears as a smart filter below the image. Open the filter's blending options by double-clicking on the Blending Options icon:
And in the Blending Options dialog box, change the blend mode from Normal to Luminosity. This prevents Smart Sharpen from sharpening the color by limiting its effect to just the brightness of the pixels.
If you find that your sharpening looks too strong, you can reduce it here by lowering the Opacity of the Smart Sharpen filter. But I'll leave mine at 100%. Click OK when you're done to close the dialog box:

Suggested: Three Ways to Blend Two Images in Photoshop
How to toggle the sharpening on and off
To compare the original and sharpened version of your image, toggle Smart Sharpen on and off by clicking the smart filter visibility icon in the Layers panel:

On the left is my original unsharpened image, and on the right is the final sharpened result:

And there we have it! That's how to sharpen images using the Smart Sharpen filter in Photoshop!
Visit our Photo Editing section for more Photoshop tutorials. And don't forget, all of our tutorials are now available to download as PDFs!