
How to Remove Blemishes in Adobe Camera Raw (New AI Feature)
Retouching portraits just got a whole lot faster. Adobe Camera Raw’s new AI-powered Blemishes feature intelligently separates temporary acne from permanent features like moles and freckles, removing unwanted spots while keeping skin texture completely natural. In this step-by-step tutorial, I’ll show you how to use it in both Camera Raw and Photoshop’s Camera Raw Filter.
Download the PDF: 2026 - How to Remove Blemishes in Adobe Camera Raw
Adobe Camera Raw version 18.5 (released in August 2026) introduces a new Blemishes feature that targets not only skin blemishes but also the most tedious and time-consuming aspects of removing blemishes from your photos.
Gone are the days of zooming in, panning around the image, and manually painting over each and every blemish with a healing brush to remove it. Camera Raw now inspects the photo, using AI, and automatically detects the blemishes for us. And it replaces the blemishes with natural skin texture, unlike other blemish removal methods that leave skin overly smooth and looking like plastic.
The best part is that Camera Raw intelligently separates unwanted, temporary blemishes (like acne) from permanent features (like moles and freckles). We can then remove the unwanted blemishes completely while fading the permanent features so they’re less distracting.
The new Blemishes feature does use AI, but not generative AI, so it won’t replace your subject’s skin with AI-generated content. Instead, it acts like a helpful and capable assistant, handling the grunt work of blemish removal for us.
In this tutorial, I’ll show you how the Blemishes feature works, how to use it with photos of a single person or multiple people, and how to fix a couple of issues you may run into.
Which Camera Raw version do I need?
You’ll need Camera Raw 18.5 or higher. The Blemishes feature is found both in the standalone Camera Raw plugin and in Photoshop's Camera Raw Filter. We’ll be using the Camera Raw Filter in this tutorial, but it works the same either way.
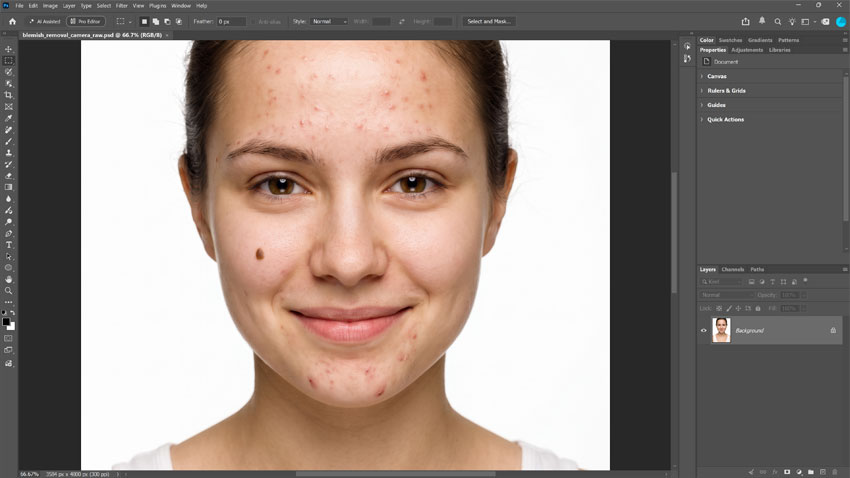
Here’s the image I’m starting with. Full disclosure, this is an AI image I created using Google’s Nano Banana Pro. I figured it was an easy way to avoid asking a real person if I could use their portrait in a Photoshop tutorial on how to remove blemishes, which may not have ended well.
Let's get started!
Step 1: Make a copy of the Background layer
With my image newly opened in Photoshop, the Layers panel shows it on the Background layer.

I like to keep my original image untouched on the Background layer so I can quickly and easily return to it at any time. You can skip this step if you want because the next step will keep our edits non-destructive. This is just how I prefer to work.
So in the Menu Bar, I’ll make a copy of the image by going to Layer > New > Layer via Copy. Or you can press Ctrl+J (Win) / Cmd+J (Mac) on your keyboard.

Back in the Layers panel, Photoshop adds the copy above the original.

Step 2: Convert the layer to a smart object
The new Blemishes feature is found both in the standalone Camera Raw plugin (for those of us working directly with raw files) and in Photoshop’s Camera Raw Filter.
For this tutorial, since we’re in Photoshop, we’ll use the Camera Raw Filter.
But before we open the filter, let’s first convert our layer into a smart object. That way, the filter will be applied as a smart filter, which keeps our edits non-destructive.
Still in the Layers panel, right-click on the image copy layer (Layer 1) and choose Convert to Smart Object.

Not much happens except that a smart object icon appears in the thumbnail, telling us that the layer is now a smart object. Exactly what we need.

Step 3: Select the Camera Raw Filter
With the smart object active, go to Filter > Camera Raw Filter in the Menu Bar.

The image opens inside the Camera Raw Filter interface.

Step 4: Open the Remove panel
Click the Remove icon in the column along the right (or press B on your keyboard) to open the Remove panel.

Step 5: Twirl open Blemishes
Down in the Distraction Removal section of the Remove panel, click the new Blemishes button to twirl open its options.

Step 6: Click Apply
Check the Apply box to begin the blemish removal process.

Camera Raw uses AI to inspect the image, looking for skin blemishes. It takes a few seconds.
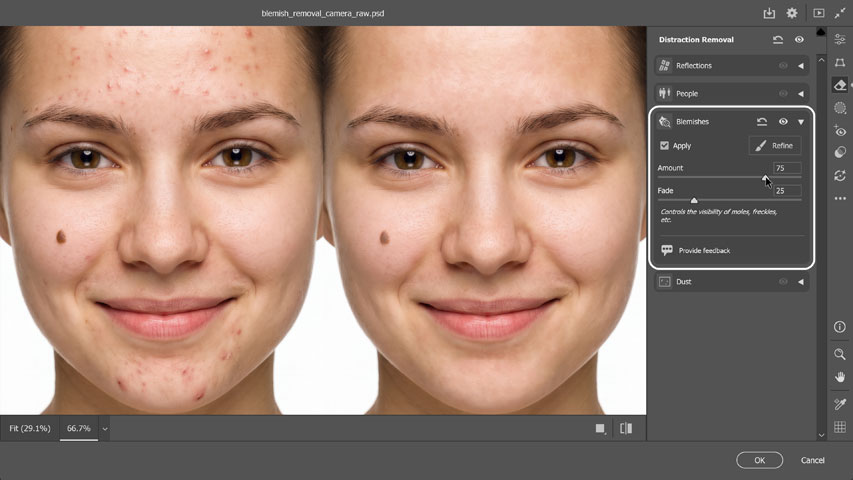
When it’s done, detected unwanted blemishes (like acne) instantly disappear, while permanent skin features (moles, freckles, etc.) are simply faded so they’re less distracting.
Notice that all of the acne on the woman’s face has vanished, while the mole on her cheek (which you wouldn’t want to remove because it’s a feature, not a blemish) is still there but not as dark as it was originally.

Viewing the before and after
Use the eye icon in the Blemishes section to compare the results with the original image.
Click and hold on the icon to view the original photo. Then release your mouse button and the blemishes disappear.

On the left is the original image, and on the right is the automatic blemish removal.

A helpful AI assistant
Camera Raw's Blemishes feature uses AI but not generative AI, so it’s not replacing the person’s skin with AI-generated content. Instead, the AI acts more like a helpful assistant, saving you from the hassle of inspecting the image yourself and clicking on each and every blemish manually with the healing tools.
The best evidence that the new Blemishes feature is not using generative AI comes from another new feature in Camera Raw 18.5 that lets us easily disable all generative AI features.
In Camera Raw, open the Preferences by clicking the gear icon (upper right corner).

In the Preferences dialog, choose Generative AI on the left.
Here we have a new Enable Generative AI Features checkbox, letting you enable or disable all of Camera Raw’s generative AI features.
It mentions Generative Remove, Generative Expand, and Distracting People Removal, but not Blemishes. And if you uncheck the box to disable generative AI, Blemishes will still be available.

Temporary blemishes vs permanent features
Camera Raw’s Blemishes feature doesn’t treat all skin blemishes equally. Instead, it intelligently separates temporary, unwanted blemishes like pimples (which usually disappear a few days after the photo was taken) from permanent features like moles, freckles and birthmarks (things that are part of who you are).
The Amount and Fade sliders let you edit the temporary blemishes separately from the permanent features.

Step 7: Drag the Amount slider to remove temporary blemishes
Forget what you likely assume about the Amount slider (that it’s an Opacity or Strength control). The Amount slider is way more impressive than that.
When Camera Raw scans the photo for temporary unwanted blemishes like acne or sores, it ranks each blemish it detects according to how prominent it is. Larger, more obvious blemishes are ranked higher. Smaller, less obvious ones are ranked lower. Each blemish gets a score.
The Amount slider controls which blemishes are removed based on their ranking score. Again, we’re talking about the unwanted blemishes here. Amount has no effect on permanent features like moles and freckles, which we'll get to next.
At the default Amount value of 100, all detected temporary blemishes completely vanish, as we saw with the initial results.
If I lower the Amount slider all the way down to 0:

Every blemish returns. We’re not removing anything.

Keep an eye on the large pimples on her chin. These are the blemishes Camera Raw will have ranked highest in prominence, so they’ll be the first to go.
As soon as you start increasing the Amount value, the highest-ranked blemishes begin to disappear. They don’t simply fade away; they vanish instantly, replaced with natural skin texture.
I’ll begin dragging the Amount slider to the right and stop at a value of 20.

Notice that her chin is already looking much better. The largest, most distracting pimples are gone.
But most of the smaller pimples on her chin, and on her forehead, remain.

As I continue increasing the Amount value, more pimples disappear. I’ll drag the value to 40.

Even at this relatively low value, most of the acne on her face is already gone, with natural skin texture in its place.

Usually by the time you reach an Amount value of 50:

Most of the unwanted skin blemishes have vanished.

And if we go all the way to 100 (the default value):

Every unwanted blemish that Camera Raw detected is removed.

Step 8: Drag the Fade slider to reduce permanent skin features
The Fade slider reduces the appearance of permanent features (moles, freckles, birthmarks, and so on) so they’re less distracting without being removed completely. You can remove them entirely, but just because you can doesn’t mean you should.
The default Fade amount is 50, which partially fades the appearance of moles, freckles and similar personality features.
Lowering the Fade value to 0 will completely restore them, while pushing the value to 100 fades them completely.

On the left is the result with the Fade value at 0, restoring the mole on her cheek to full visibility. On the right, Fade is set to the default value of 50. The mole is partially faded.

From my experience, the default Fade value can be too strong. I suggest dragging the Fade value to 0, then increasing it slowly to find the setting that works for the specific image.
Here I’ve chosen a Fade value of 25, which (to me) looks more natural.

Step 9: Click the Refine button
Camera Raw removes or fades all skin blemishes it detected when it analyzed the image. But sometimes it misses a spot. Or it may remove something you didn’t want it to remove. Not to worry.
The Blemishes feature includes two Refine brushes; one for removing spots that were missed, and one for restoring areas you want it to ignore.
To use the brushes, click the Refine button.

Camera Raw displays an overlay showing all the blemishes it detected. There are usually quite a few.

If you don’t like the default red overlay, click the color swatch to choose a new color. I’ll stick with red.

Step 10: Paint with the Restore brush to bring areas back
To bring back an area that Camera Raw removed or faded, click the Restore brush.
For some reason, my buttons are not displaying the full names even though I’ve tried everything to fix it, so if you have the same issue, the Restore brush is the one on the left.

Use the Size slider, or the left and right bracket keys ( [ and ] ) on your keyboard, to choose a brush size. Then simply paint over the area you want to restore.
I’ll paint over the mole on her cheek.

When I release my mouse button, the mole is restored because it’s no longer included in the blemish removal.

Step 11: Paint with the Remove brush to remove blemishes
The Remove brush is the opposite. It lets you remove a blemish that Camera Raw’s auto-detection missed.
Click the Remove button to select it. Again, it’s the button on the right in case yours are not displaying the full names.

Choose your brush size, and then paint over a blemish you want to remove.
But there’s a catch: Using the Remove brush will completely remove any blemish you paint over, even if it’s a permanent feature.
I’ll paint over the mole with the Remove brush. Ideally, Camera Raw will detect it as a permanent feature and fade it.

But that’s not what happened. Instead, Camera Raw removed it completely.
What’s worse is that it actually did a surprisingly bad job. It looks like she physically had the mole removed, leaving a patch of lighter skin in its place. I tried repeatedly and got a similar bad result each time.
Later, I’ll show you a better way to manually fade permanent features when needed. For now, I’ll press Ctrl+Z (Win) / Cmd+Z (Mac) to undo it.

Step 12: Apply the refinements
To exit Refine mode, click the Apply button.

Step 13: Accept the changes and close Camera Raw
If you’re happy with the results, click OK to accept them and close the Camera Raw Filter.

This returns us to the main Photoshop interface.
In the Layers panel, the Camera Raw Filter is now listed as a smart filter below the image. You can reopen the filter and make changes by double-clicking the filter’s name.

Removing blemishes from photos with multiple people
As we’ve seen, Camera Raw’s new Blemishes feature works great on portraits with a single subject. But it works equally well with photos of two or more people.
Here I’ve opened a portrait of two people in the Camera Raw Filter, using the same steps we covered previously.

Check the Apply box in the Blemishes section to start the blemish removal process, as you normally would.
Camera Raw not only detects the blemishes but also the individual people.
Choose the person you want to edit and the blemish removal controls will target just that person. Or choose All People to edit everyone in the photo at once.

Bonus: How to fix remaining blotchy skin
Camera Raw does an outstanding job of removing unwanted blemishes and replacing them with natural skin texture.
But if we switch back to my original photo and look around her forehead and chin, there are still a few blotchy red areas that were not removed.
That’s because the Blemishes feature removes the texture of the blemish but often leaves behind some of the underlying reddish tone.

So here’s a quick and simple way to clean them up, again using Camera Raw.
I’ll reopen the Camera Raw Filter by double-clicking its name in the Layers panel.

In the Camera Raw dialog box, I’ll reopen the Remove panel by clicking its icon on the right (or by pressing B on my keyboard).
This time, I’ll select the Remove Tool so I can work manually.
And I’ll leave Use Generative AI unchecked so the Remove Tool pulls healthy skin texture from the existing image, rather than generating it with AI. This also lets us work much faster.

I’ll resize my brush using the left and right bracket keys ( [ and ] ) on my keyboard.
Then I’ll paint over a blotchy area on her forehead.

When I release my mouse button, the blotchiness is replaced with healthy skin texture from the surrounding area.

I’ll continue clicking on, or painting over, other blotchy areas including the obvious ones on her chin, until they’re all cleaned up.

Bonus: Fading a permanent feature manually
Finally, what if I decide I want to fade the appearance of the mole on her cheek? I can do that by combining Camera Raw’s Remove Tool with the Opacity slider.
I’ll paint over the mole with the Remove Tool, just like I did with the blotchy skin areas a moment ago.

Camera Raw does a great job of removing the mole and replacing it with natural skin texture.
But the problem is, I don’t want to remove the mole completely. I just want to fade it a bit.

To bring back the mole, I can simply lower the Opacity slider in the Remove panel. It works just like the Opacity slider in the Layers panel, but here it affects the last area we painted over with the Remove Tool (the mole, in this case).
I’ll lower the opacity all the way down to 15.

This restores the mole and fades it just enough so it blends nicely with the rest of the image.

I’ll accept my edits and click OK to close the Camera Raw dialog box.
And there we have it! That’s how to remove unwanted skin blemishes (and fade permanent features) using the new Blemishes feature in Adobe Camera Raw version 18.5 and the Camera Raw Filter in Photoshop.
Don't forget, all of my Photoshop tutorials are available to download as PDFs!
Related tutorials:
- How to Sharpen Images in Photoshop 2026
- Using the New Clarity and Dehaze Adjustment Layer in Photoshop
- How to Upscale AI Images with Photoshop’s Generative Upscale