How to Sharpen Images in Photoshop 2026
Learn the best way to sharpen images in Photoshop! In this step-by-step tutorial, discover how to use the High Pass filter and layer blend modes to easily sharpen portraits without ruining skin texture! Updated for Photoshop 2026.

Download the PDF: How to Sharpen Images in Photoshop
When sharpening images in Photoshop, most people turn to the Smart Sharpen or Unsharp Mask filters. While these work well, their confusing options can make sharpening more challenging than it needs to be.
Sharpening an image simply means increasing the contrast along its edges. To do this easily, we can use the High Pass filter. High Pass is actually an edge-detection filter, but when combined with a layer blend mode, it becomes a powerful, foolproof sharpening tool.
Which Photoshop version do I need?
I'm using Photoshop 2026 but this sharpening method works with any recent version.
Let's get started!
Step 1: Duplicate your image
Open the image you want to sharpen.

In the Layers panel, your image sits on the Background layer.

Make a copy of your image layer.
Go to Layer > New > Layer via Copy (or press Ctrl+J on Windows, Cmd+J on Mac).

In the Layers panel, the copied layer (Layer 1) appears above the original.

Double-click the new layer's name and rename it to Sharpening. Press Enter (Win) / Return (Mac) to accept it.

Sharpening.
Step 2: Desaturate the copy
Next, desaturate the new sharpening layer to remove its color.
Go to Image > Adjustments.

From there choose Desaturate.

This converts your sharpening layer into a grayscale version of the image.

In the Layers panel, notice that only the sharpening layer is desaturated. The original image on the Background layer remains in full color.

Step 3: Convert the copy into a smart object
Before applying the High Pass filter, convert the sharpening layer into a smart object. This applies the filter as a smart filter, keeping its settings editable so you can adjust the sharpening amount later.
In the Layers panel, right-click on the sharpening layer and choose Convert to Smart Object.

A smart object icon appears in the lower right corner of the layer's thumbnail.
Step 4: Select the High Pass filter
With the smart object selected, go to Filter > Other > High Pass.

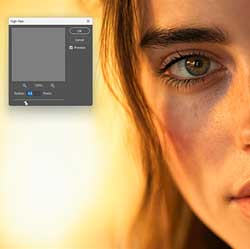
This opens the High Pass filter dialog box and turns your image gray.
Depending on your current Radius value, you will see either solid gray or fine outlines of your image details.

Step 5: Adjust the Radius value to detect the edges
Use the High Pass filter to detect the edges you want to sharpen.
In the dialog box, drag the Radius slider all the way to the left to its lowest setting (0.1 pixels). The image will turn completely solid gray.

Slowly drag the Radius slider to the right until the edges begin to appear. Release your mouse button after dragging to see the changes update on your screen.
A Radius value between 3 and 6 pixels generally works best. If the value is too low, the filter won't detect enough edges. If it is too high, it will include areas around the edges, producing an ugly halo effect (a telltale sign of oversharpening).
For this portrait, a Radius of 4.5 pixels is perfect. The eyes, eyelashes, and hair are clearly visible as outlines, while the skin texture remains solid gray so it won't be sharpened.

Click OK to close the High Pass filter dialog box.
In the Layers panel, the High Pass filter now appears as a smart filter directly below your smart object.

Step 6: Change the layer blend mode to Overlay
To increase the contrast of your detected edges, change the layer's blend mode from Normal to Overlay.

Overlay is a contrast-boosting blend mode. Selecting it instantly hides all the solid gray areas on the sharpening layer, revealing your original image underneath.
The edge outlines detected by the High Pass filter now act to increase contrast, resulting in a beautifully sharpened image.

Download my Complete Guide to Photoshop's Layer Blend Modes PDF!
Toggle the sharpening effect on and off by clicking the visibility icon (the eyeball) next to the sharpening layer.

Here is a comparison of the subject’s eyes before (left) and after applying the effect (right).

Step 7: Adjust the sharpening if needed
To fine-tune the sharpening amount at any time, double-click the High Pass smart filter in the Layers panel.

Drag the Radius slider to increase or decrease the intensity of the sharpening effect. Click OK to accept the new setting, or Cancel to discard the changes.

Step 8: Add a layer mask
Currently, the sharpening effect applies to the entire image. This is great for landscapes, but for portraits, you only want to sharpen specific features (like the eyes) while keeping the skin soft.
Select the sharpening layer in the Layers panel. Press and hold the Alt (Win) / Option (Mac) key and click the Add Layer Mask icon at the bottom of the panel.

This adds a layer mask filled with black. A standard white mask reveals the entire layer, but holding Alt/Option fills the mask with black, instantly hiding the sharpening effect completely.
You can now paint with white to reveal the sharpening exactly where you want it.

Related tutorial: Layer mask advanced tips and tricks!
Step 9: Paint with white to reveal the sharpening in specific areas
Select the Brush Tool in the toolbar .

Set your Foreground color (your brush color) to white. If it is set to black or any other color, press D on your keyboard to quickly reset your default colors.

Right-click anywhere on your image canvas to open the Brush Options.
Lower the Hardness to 0%. Using a soft-edge brush ensures the sharpened areas blend seamlessly into the rest of the unsharpened photo.

Adjust your brush size using the left and right bracket keys ([ and ]) on your keyboard.
Paint carefully over the areas where you want to bring back the sharpening. For portraits, brush over the eyes, eyelashes, and eyebrows. Avoid painting over the skin.

To fine-tune the overall effect, use the layer visibility icon to compare the before and after.
If the sharpening feels too intense, simply lower the sharpening layer's Opacity in the Layers panel until it looks natural.

Here is the final result, with perfectly sharp eyes and beautifully smooth skin!

And there we have it! That’s an easy (and in my opinion, the best) way to sharpen an image in Photoshop.
Related tutorials:
- Using the Remove Tool with Generative AI
- How to remove distracting people from your photos
- How to remove wires and cables from your photos