Two Ways to Open JPEG Files in Adobe Camera Raw
Learn how to open JPEG images in Adobe Camera Raw, first by using Adobe Bridge and then by telling Photoshop to open JPEGs in Camera Raw automatically. A step-by-step tutorial.
Download the PDF: Two Ways to Open JPEG Files in Camera Raw
Adobe Camera Raw is Photoshop’s best way to edit images because it gives you access to the same powerful yet intuitive editing features found in Adobe Lightroom and Lightroom Classic. And when we open a raw file from Photoshop, it opens automatically in Camera Raw.
But when we open a JPEG file from Photoshop, it does not open in Camera Raw. Instead it opens directly into Photoshop.
So in this tutorial, I show you two easy ways to open your JPEG images in Adobe Camera Raw. The first way is by using Adobe Bridge, and the second is by telling Photoshop to open JPEGs in Camera Raw automatically.
Let's get started!
How to open JPEGs in Camera Raw from Adobe Bridge
The first and easiest way to open JPEG files in Camera Raw is by using Adobe Bridge.
Bridge is a file browser and asset manager that’s included with your Creative Cloud subscription and can be installed from the Creative Cloud Desktop app (the same app you used to install Photoshop).
Step 1: Open Adobe Bridge
Once Adobe Bridge is installed, you can open it from the Creative Cloud Desktop app by clicking the Open button.

Or you can open Bridge from Photoshop by going up to the File menu and choosing Browse in Bridge.

Step 2: Select your image
In Bridge, navigate to your JPEG image on your computer and click on its thumbnail to select it.

Step 3: Click the Open in Camera Raw icon
With the image selected, simply click the Open in Camera Raw icon at the top.
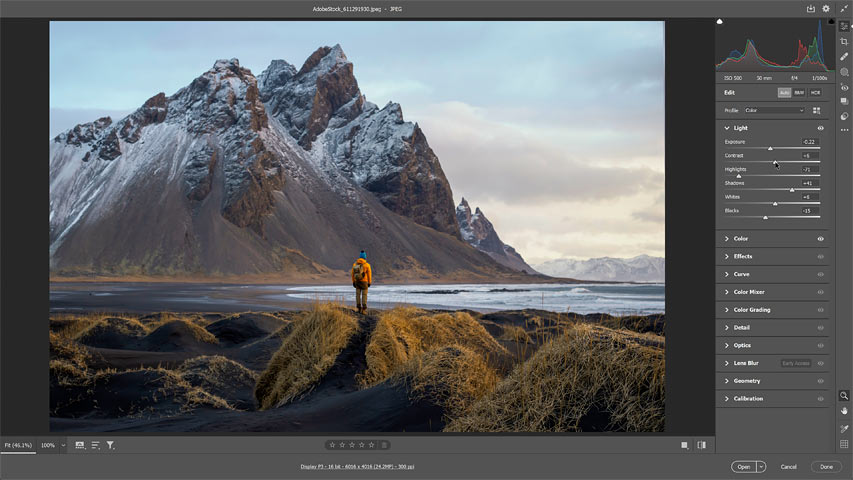
Your JPEG image opens in Camera Raw, ready for editing.

Related: Raw vs JPEG for photo editing - Which is better?
How to open JPEG files in Camera Raw from Photoshop
If you don’t want to install Adobe Bridge, then you can set up Photoshop to open JPEG files in Camera Raw automatically.
Step 1: Open the Camera Raw preferences
In Photoshop, on a Windows PC, go up to the Edit menu, choose Preferences and then Camera Raw.

On a Mac, go up to the Photoshop menu, choose Settings and then Camera Raw.

Step 2: Set JPEGs to open automatically in Camera Raw
In the Camera Raw Preferences dialog box, choose File Handling on the left.
Then change the JPEG Handling option to Automatically open all supported JPEGs. This tells Photoshop to open all JPEG files in Camera Raw from now on.
When you’re done, click OK to close the dialog box.

Step 3: Open a JPEG file
Go up to the File menu and choose Open.

Navigate to your JPEG image, click on it to select it, then click the Open button.

Instead of opening in Photoshop, it opens in Camera Raw.

And there we have it! Those are two easy ways to open your JPEG files in Adobe Camera Raw.
Related tutorials:
- Remove noise from photos with AI Denoise in Camera Raw
- Upscale photos with Super Resolution in Camera Raw
- Manage and organize your photos with Adobe Bridge
Don't forget, all of my Photoshop tutorials are now available to download as PDFs!