
Place An Image In Text With Photoshop
In this tutorial, we'll learn how to place an image in text with Photoshop, a very popular effect to create and one that also happens to be very easy to do thanks to the power of Photoshop's clipping masks, as we're about to see!
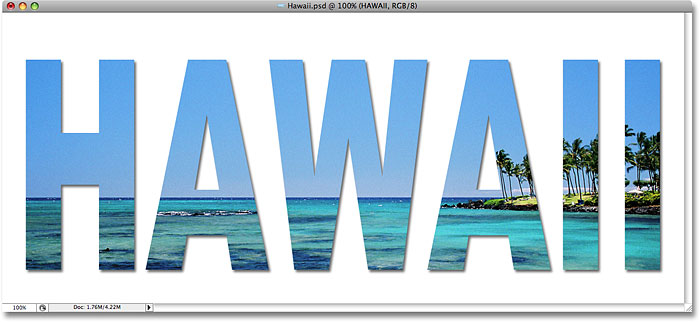
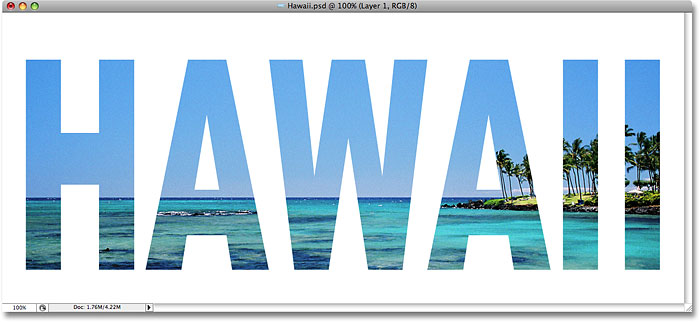
This version of the tutorial is for Photoshop CS5 and earlier. If you're using Photoshop CC or CS6, see the fully revised and updated version of this tutorial. Here's the effect we're going for:
Let's get started!
How To Place An Image In Text
Step 1: Open A Photo To Place Inside Your Text
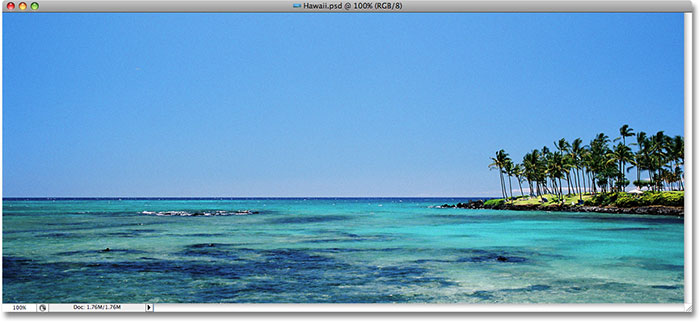
First, we need the image that we're going to place inside of our text. I'll use this panoramic photo of Hawaii:
Watch the video tutorial on our YouTube channel!
Step 2: Duplicate The Background Layer
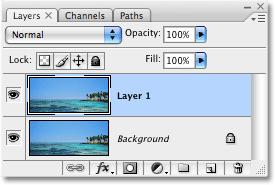
If we look in the Layers palette, we can see that we currently have one layer, named Background. This layer contains our image. We need to duplicate this layer, and the easiest way to do that is by using the keyboard shortcut Ctrl+J (Win) / Command+J (Mac). If we look once again in the Layers palette, we see that we now have two layers. The original Background layer is on the bottom, and a copy of the Background layer, which Photoshop automatically named "Layer 1", is sitting above it:
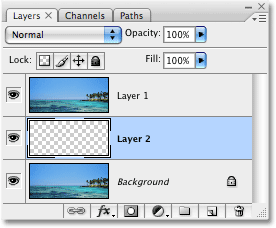
Step 3: Add A New Blank Layer Between The Two Layers
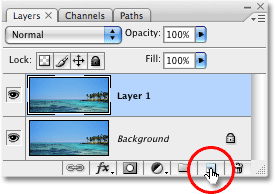
Next, we need to add a new blank layer between the Background layer and "Layer 1". Currently, "Layer 1" is the layer that's selected in the Layers palette. We can tell which layer is selected because the selected layer is always highlighted in blue. Normally, when we add a new layer, Photoshop places the new layer directly above whichever layer is currently selected, which means that Photoshop would place the layer above "Layer 1". That's not what we want. We want the new layer to be placed below "Layer 1". Here's a useful trick. To add a new layer below the currently selected layer, hold down your Ctrl (Win) / Command (Mac) key and click on the New Layer icon at the bottom of the Layers palette. Holding down Ctrl (Win) / Command (Mac) is the trick to placing the layer below the currently selected layer:
We now have a new blank layer named "Layer 2" sitting directly between the Background layer and "Layer 1":
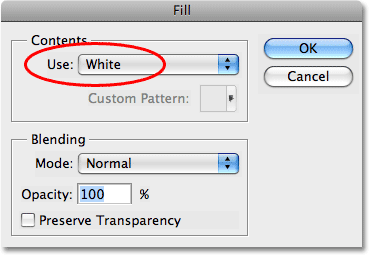
Step 4: Fill The New Layer With White
At the moment, our new layer is completely blank. Let's fill it with white so it will appear as a white background after we've placed our image inside the text. Go up to the Edit menu at the top of the screen and choose Fill. This will bring up Photoshop's Fill dialog box. Select White for the Contents option at the top of the dialog box, then click OK to exit out of the dialog box:
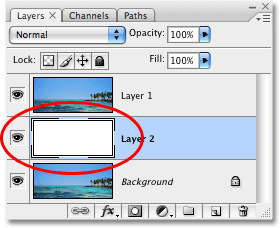
Nothing will appear to have happened in the document window, since the image on "Layer 1" is blocking "Layer 2" from view, but if we look at the layer preview thumbnail for "Layer 2" in the Layers palette, we can see that sure enough, the layer is now filled with solid white:
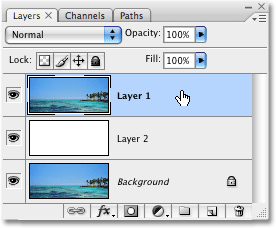
Step 5: Select "Layer 1" In The Layers Palette
It's time to add our text, but in order to see the text when we add it, we'll need to have the text appear above "Layer 1", otherwise the image on "Layer 1" will block the text from view. To make sure we can see our text, click on "Layer 1" in the Layers palette to select it. This way, as soon as we begin typing, Photoshop will create a new type layer for us and place the type layer directly above "Layer 1":
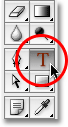
Step 6: Select The Type Tool
To add the text, we'll need Photoshop's Type Tool, so select the Type Tool from the Tools palette. You can also quickly select the Type Tool by pressing the letter T on your keyboard:
Step 7: Choose A Font In The Options Bar
With the Type Tool selected, go up to the Options Bar at the top of the screen and choose whichever font you want to use for the effect. Generally, fonts with thick letters work best. I'm going to choose Arial Black. Don't worry about the font size for now:

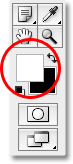
Step 8: Set White As Your Foreground Color
This step isn't absolutely necessary, but to help me see my text, I'm going to use white for my text color. The color you choose for your text doesn't really matter since we'll be filling the text with an image in a moment, but it still helps to be able to see the text when we're adding it. To set the text color to white, all we need to do is set Photoshop's Foreground color to white. First, press the letter D on your keyboard, which will reset the Foreground and Background colors to their defaults. Black is the default color for the Foreground color and white is the default color for the Background color. To swap them so white becomes the Foreground color, press the letter X on your keyboard. If you look at the Foreground and Background color swatches near the bottom of the Tools palette, you'll see that white is now the Foreground color (the left swatch):
Step 9: Add Your Text
With the Type Tool selected, your font chosen and white as your Foreground color, click inside your document window and add your text. Since I'm using a photo of an ocean scene in Hawaii, I'm going to type the word "HAWAII":
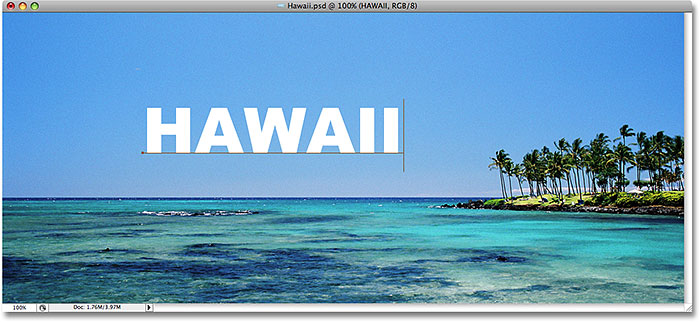
When you're done, click on the checkmark up in the Options Bar to accept the text.

Step 10: Resize and Reposition The Text With The Free Transform Command
You'll probably need to resize and reposition your text at this point, and we can do both of those things using Photoshop's Free Transform command. Press Ctrl+T (Win) / Command+T (Mac) on your keyboard to bring up the Free Transform box and handles around your text, then drag any of the handles to resize the text. If you want to resize the text without distorting the look of it, hold down your Shift key and drag any of the four corner handles. You can also resize the text from its center by holding down the Alt (Win) / Option (Mac) key as you drag. Finally, to move the text, click anywhere inside the Free Transform box and drag your mouse to move the text around inside the document window:
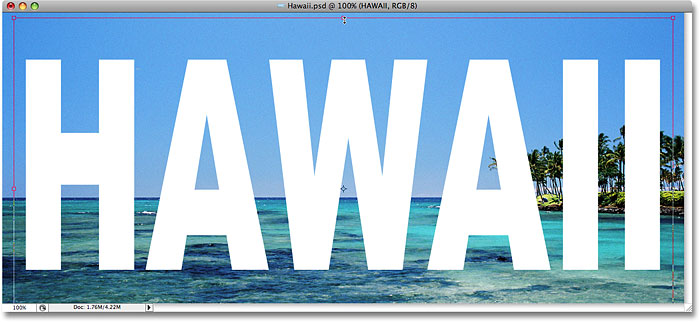
Press Enter (Win) / Return (Mac) when you're done to accept the transformation and exit out of the Free Transform command.
Step 11: Drag The Text Layer Below "Layer 1"
Now that we have our text the way we want it, we need to move the type layer below the text in the Layers palette. Click on the text layer, then simply drag it down below "Layer 1". You'll see a thick black line appear between "Layer 1" and "Layer 2":
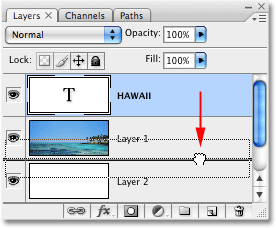
Release your mouse button when the black line appears to drop the type layer into place between "Layer 1" and "Layer 2":
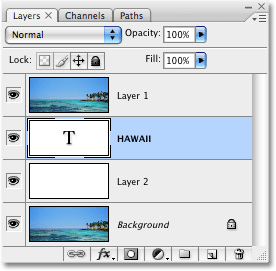
Step 12: Select "Layer 1" Again
Click once again on "Layer 1" in the Layers palette to select it:
The text will temporarily disappear inside the document window now that the image on "Layer 1" is blocking it from view.
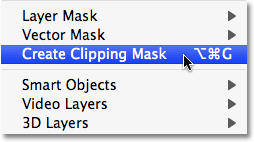
Step 13: Create A Clipping Mask
To create the illusion that the photo is inside the text, we need to use a clipping mask. This will "clip" the photo on "Layer 1" to the text on the layer directly below it. Any areas of the photo that appear directly above the letters will remain visible in the document. The rest of the photo will disappear from view.
With "Layer 1" selected in the Layers palette, go up to the Layer menu at the top of the screen and choose Create Clipping Mask:
If we look in the document window, we can see that the photo now appears to be inside the text:
Step 14: Add A Drop Shadow (Optional)
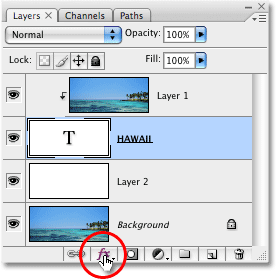
To complete my effect, I'm going to add a drop shadow to the letters. If you want to follow along, first select the type layer in the Layers palette, then click on the Layer Styles icon at the bottom of the Layers palette:
Select Drop Shadow from the list of layer styles that appears:

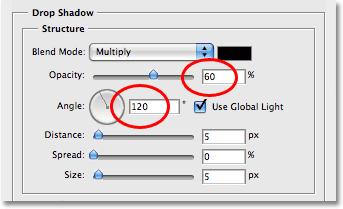
This brings up Photoshop's Layer Style dialog box set to the Drop Shadow options in the middle column. I'm going to leave most of the options alone, but I'll lower the Opacity of the drop shadow down to about 60% so it's not quite so intense, and I'll set the Angle of the drop shadow to 120°:
Click OK when you're done to apply the drop shadow an exit out of the Layer Style dialog box. Here is my final "image in text" effect:
Next tutorial: How to place an image in multiple text layers at once!
Placing An Image In Text - Quick Summary
We covered a lot in this tutorial. Here's a quick summary of the steps for when you need it:
- In Photoshop, open your photo, then press Ctrl+J (Win) / Command+J (Mac) to duplicate the Background layer.
- Press and hold Ctrl (Win) / Command (Mac) and, in the Layers panel, click the New Layer icon to add a new blank layer between the two existing layers.
- Go up to the Edit menu in the Menu Bar and choose Fill. In the Fill dialog box, set Use to White. Click OK.
- In the Layers panel, select the top layer (Layer 1) to make it active.
- Select the Type Tool, then in the Options Bar, choose your font options.
- Set your Foreground color to white, then click in the document and add your text.
- Press Ctrl+T (Win) / Command+T (Mac) to select Free Transform, then resize and reposition your text as needed. Press Enter (Win) / Return (Mac) to exit out of Free Transform.
- In the Layers panel, drag your Type layer below the photo on Layer 1.
- Select Layer 1 to make it active, then go up to the Layer menu in the Menu Bar and choose Create Clipping Mask.
- To add a drop shadow to the text, in the Layers panel, click the "fx" icon, choose Drop Shadow, then set the Angle and Opacity as needed.
And there we have it! That's how to easily place an image in text with Photoshop! Visit our Text Effects or Photo Effects sections for more Photoshop effects tutorials!