
Dual View Photo Editing In Photoshop
If it's true that two heads are better than one, it's also true that two views of the same image are better than one, especially when it comes to photo editing In this tutorial, we'll look at how to give ourselves two different views of the same image by opening it in two separate document windows, each set to a different zoom level, making it much easier to judge the effect our edits are having on the overall image. This is really more of a Photoshop tip than an actual photo editing technique, but it's so incredibly useful and I find myself using it so often that it really deserves to be included in with our other photo editing tutorials.
Have you ever found yourself zoomed in close to a specific area in a photo, maybe brightening someone's eyes or whitening their teeth, or you may have been panning around an image looking for minor skin blemishes or dust marks on an antique photo, and you're having trouble judging how effective your edits really are because you're too close to the image? Wouldn't it be great if you could see the entire photo as you're working no matter how zoomed in you are? Sure, you could always zoom in to make a few edits, zoom out to the 100% view size to judge the results, zoom back in to make a few more edits, zoom out, back and forth, on and on, but who wants to do that, especially when there's a much better and easier way! Just open the same image in a second document window!
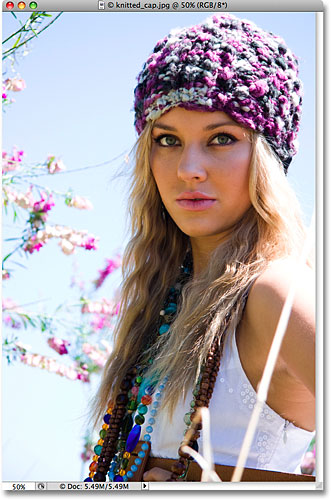
Here's a photo I currently have open in Photoshop. I'm using Photoshop CS4 here but this tip works with any version:
Let's say I wanted to work on the woman's eyes, either lightening them or changing their color. I'll need to zoom in on her eyes, so I'll grab the Zoom Tool from the Tools palette and drag a rectangular selection around her eyes. When I release my mouse button, Photoshop zooms in on the area I selected:

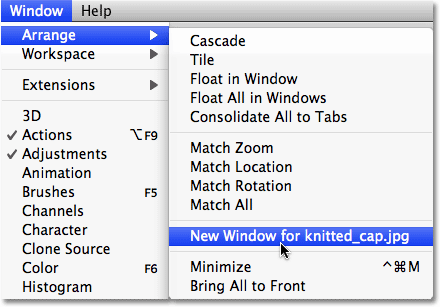
The problem is, I'd still like to be able to see the rest of the photo as I'm working so I can get a better sense of how the changes I'm making are impacting the overall image. As I mentioned, I could zoom in and out as I'm working, but a much better solution would be to open a second view of the image in a separate document window. To do that, simply go up to the Window menu at the top of the screen and choose Arrange. You'll see an option called New Window for, followed by the name of the image you currently have open. In my case, the name of my image is "knitted_cap.jpg", so my option shows up as "New Window for knitted_cap.jpg":
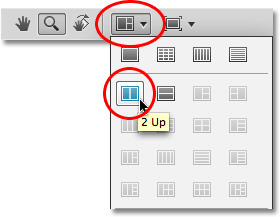
This opens the exact same image in a second document window. If you're working in Photoshop CS4 as I am here, the default behavior of Photoshop CS4 is to open new windows as a series of tabbed documents. Go up to the new Application Bar at the top of the screen, click on the Arrange Documents icon, then click on the 2 Up two column document layout:
In Photoshop CS3 and earlier, choosing "Window > Arrange > New Window for (name of your image)" opens the image in a second floating document window. To place the document windows side by side each other, simply click on the tab area at the top of the document windows and drag them into position. Or, go up to the Window menu, choose Arrange, and then choose Tile Vertically:

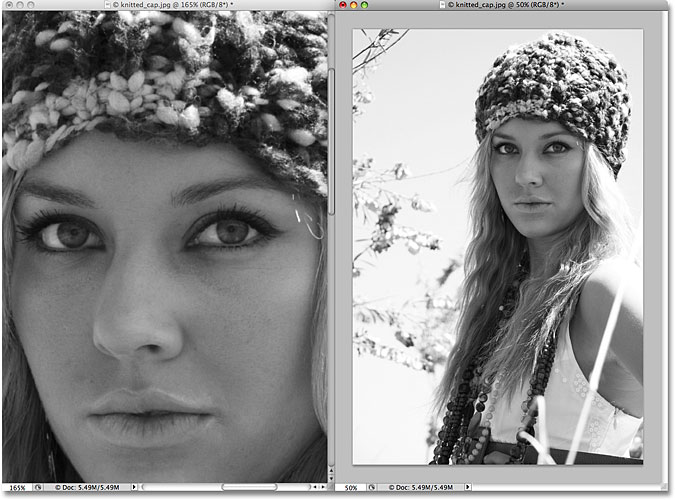
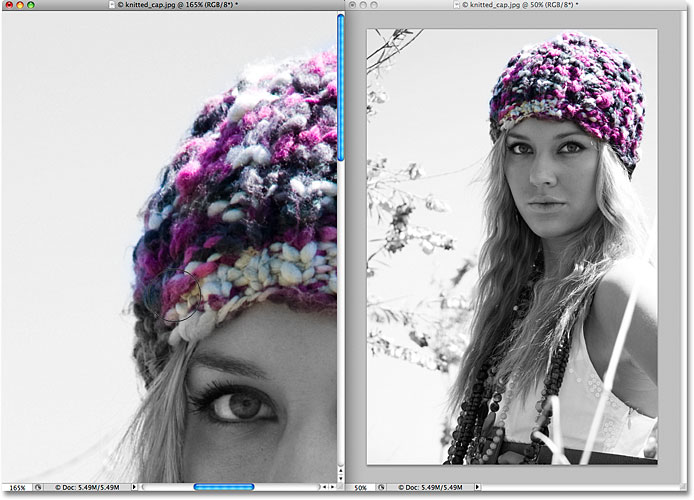
Whichever version of Photoshop you're using, you should now see both document windows side by side showing the exact same image. The only difference is that both windows are set to a different zoom level:

Many people get tricked here into thinking that they've just opened a second copy of the image, but we actually have the exact same image appearing in both document windows. We've given ourselves two separate views of the same image, but it is the same image in both document windows. If you think of how your eyes work, each eye sees an object from a different angle but both eyes are seeing the same object. With our document windows, each one is showing us a different view of the image but it's the same image in both windows.
Since both windows are showing the same photo, anything you do in one of them will be instantly reflected in the other. As a quick example, I'll desaturate the image by going up to the Image menu, choosing Adjustments, and then choosing Desaturate:

This instantly removes all color from the image, leaving me with a black and white photo. Notice that regardless of which document window I had selected, both windows are showing the desaturated version, and that's because both are showing the exact same photo:
Just for fun, I'll grab Photoshop's History Brush from the Tools palette (I could also press the letter Y on my keyboard to select it with the shortcut):

The History Brush is like Photoshop's version of a time machine, allowing us to paint previous history states back in to the image. For example, I can restore the original color of the woman's cap by painting over it with the History Brush. I'll select the document window on the left (the zoomed in view) and begin painting over her cap with the brush. Even though I'm painting in the document window on the left, both document windows are showing the results of what I'm doing:
Hopefully you now have a sense of just how useful this dual view mode can be when editing images, and the nice thing is, it doesn't require an expensive dual monitor setup. Simply open the image in a second document window, do all of your editing work in the original window, zooming and panning as needed, and leave the second window set to either the Actual Pixels or Fit on Screen view modes, both of which can be accessed from the View menu at the top of the screen. Be sure to check out our full Zooming and Panning in Photoshop tutorial in our Photoshop Basics section for lots more information on how to navigate around images in Photoshop.
And there we have it! That's how to give yourself two separate views when editing an image in Photoshop! Check out our Photo Retouching section for more Photoshop image editing tutorials!