
How To Whiten Teeth In Photoshop
In this tutorial, I'll show you how to whiten teeth in Photoshop using a Hue/Saturation adjustment layer which lets us both whiten and brighten teeth at the same time. We'll start by learning how to whiten teeth for a single person in an image, and then we'll learn how to whiten the teeth for two or more people in the same photo using separate adjustment layers.
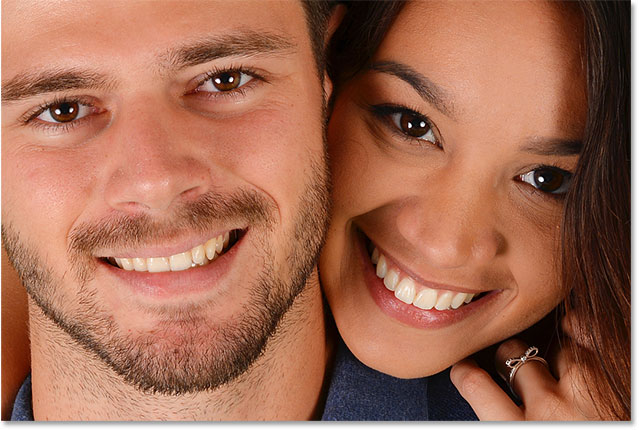
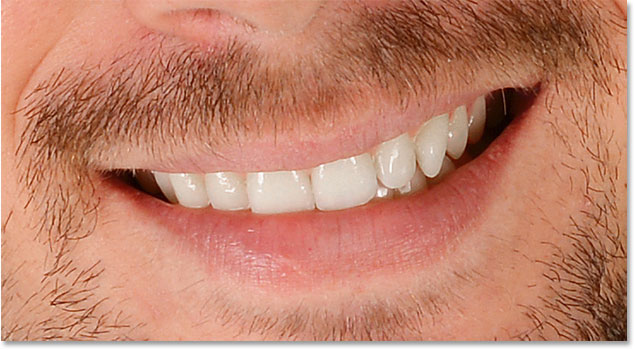
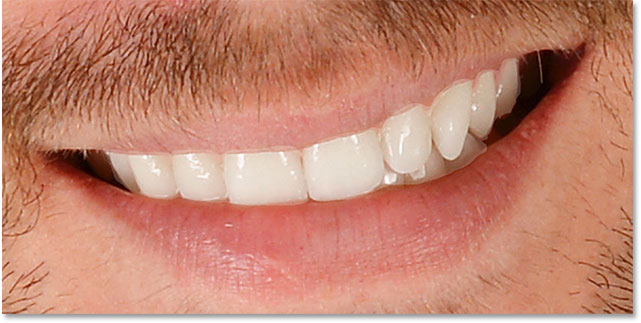
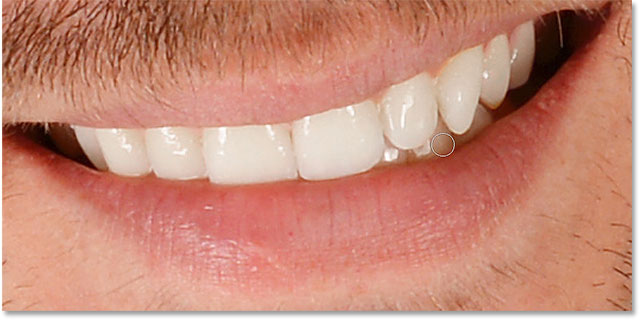
To follow along, you can use any photo where someone's teeth could look whiter. I'll use this image that I downloaded from Adobe Stock:

If I zoom in for a closer look, we see some yellow in the teeth, especially with the man on the left. Both people's teeth could also use some brightening. We can do both of these things (whiten and brighten teeth) using a single Hue/Saturation adjustment layer:
Let's get started!
How To Whiten Teeth In Photoshop
For this tutorial, I'm using Photoshop CC but every step is compatible with Photoshop CS6. You can also follow along with my video of this tutorial on our YouTube channel. Or download this tutorial as a print-ready PDF!
Step 1: Select The Lasso Tool
Start by drawing a selection around the teeth. Select the Lasso Tool from the Toolbar:

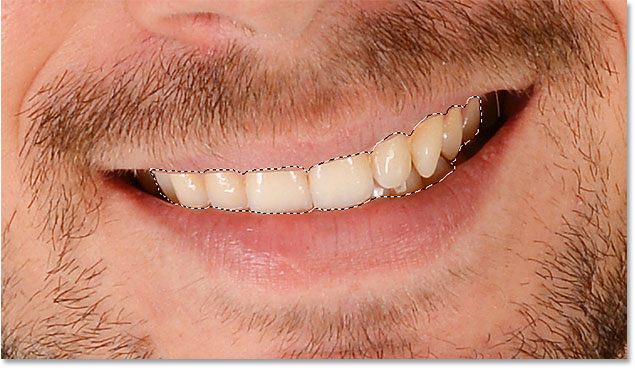
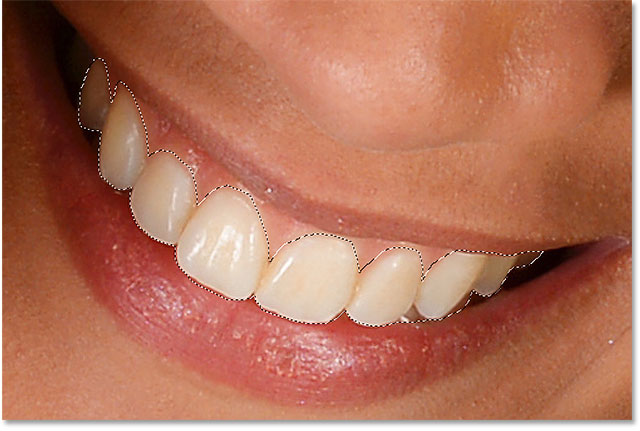
Step 2: Draw A Selection Around The Teeth
If you're working on a photo with two or more people in it, as I am here, you may be tempted to select and whiten everyone's teeth at once. But the problem is, everyone's teeth are different and usually need different amounts of whitening. You'll get better results by whitening one person's teeth at a time. I'll start with the man on the left.
Draw a selection around the teeth. Don't worry if it's not the most accurate selection because we can easily clean it up later. Just trace around the teeth, staying as close to the edges as possible:
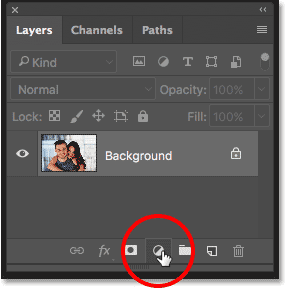
Step 3: Add A Hue/Saturation Adjustment Layer
Click the New Fill or Adjustment Layer icon at the bottom of the Layers panel:
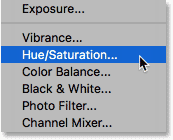
Choose Hue/Saturation from the list:
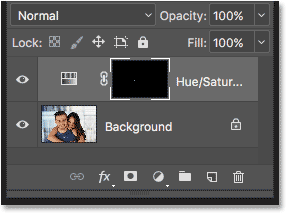
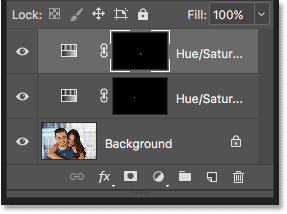
A Hue/Saturation adjustment layer appears above the Background layer:
Step 4: Change The Edit Option To Yellows
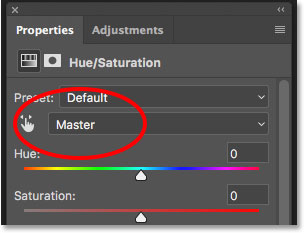
The controls and options for the Hue/Saturation adjustment layer are found in Photoshop's Properties panel. By default, Hue/Saturation affects all colors in the image equally, and that's because the Edit option is set to Master:
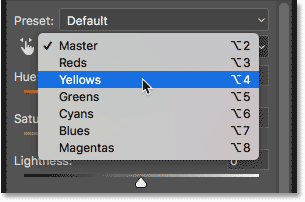
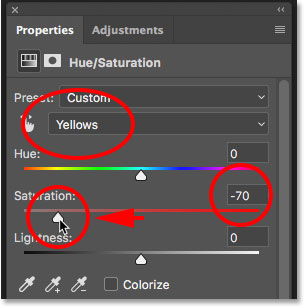
To edit only the yellows in the image so we can remove the yellow from the teeth, change the Edit option to Yellows:
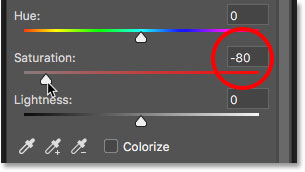
Step 5: Lower The Saturation Of The Yellow
Click on the Saturation slider and begin dragging it to the left. The further you drag, the more you'll desaturate the yellow in the teeth, making them whiter. Keep in mind, though, that teeth naturally have some yellow in them. If you drag the Saturation slider all the way to the left, as I'm doing here:
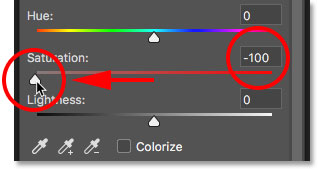
You'll remove the yellow completely, resulting in teeth that look dull and lifeless:
Instead, keep an eye on your image as you drag the slider and leave just enough yellow to keep the teeth looking natural. The setting you need will depend on how yellow the teeth were to begin with. For my image, a Saturation value of around -80 works well:
Whitening The Teeth: Before And After
To better judge the results, compare the whitened version of the teeth with how they looked originally. In the Layers panel, click the Hue/Saturation adjustment layer's visibility icon. Click it once to temporarily hide the effects of the adjustment layer and view the original image. Click it again to turn the adjustment layer back on and view the whitened version:
Here's a before-and-after comparison showing the improvement so far. The left half of the teeth are how they looked originally. The right half are how they look after removing most (but not all) of the yellow:
Step 6: Change The Edit Mode Back To Master
We've whitened the teeth, so now let's brighten them. Change the Edit option in the Properties panel from Yellows back to Master so we can adjust all colors at once, not just the yellows:
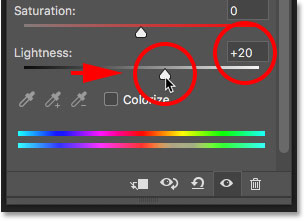
Step 7: Drag The Lightness Slider To Brighten The Teeth
Click the Lightness slider and begin dragging it towards the right. The further you drag, the lighter the teeth will appear. Keep an eye on your image as you drag the slider so you don't brighten them too much. For my image, a Lightness value of around +20 works well:
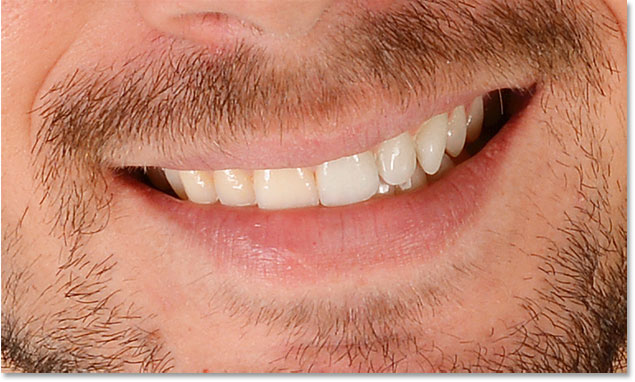
The teeth are now looking brighter. But depending on how accurate you were when selecting the teeth with the Lasso Tool, you may notice some areas around the teeth that have also been brightened. In my case, there's some unwanted brightening in the lips and gums along the top and bottom of the teeth. We'll clean up these areas next:
Step 8: Select The Brush Tool
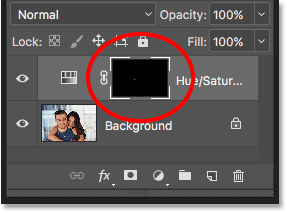
A nice feature of adjustment layers in Photoshop is that they include a built-in layer mask. In the Layers panel, we see the layer mask thumbnail on the Hue/Saturation adjustment layer. The thumbnail is filled mostly with black, with only a small area filled with white. The black represents the areas in our image that are not being affected by the adjustment layer. The white is the area that is being affected. Photoshop used our initial Lasso Tool selection to create the layer mask for us, filling the area we selected (the teeth) with white and filling everything else with black:
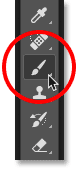
To clean up the areas around the teeth, all we need to do is paint on the layer mask with a brush. Select the Brush Tool from the Toolbar:
Step 9: Set Your Foreground Color To Black
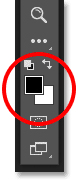
We need to paint over the unwanted areas with black. Photoshop uses our current Foreground color as the brush color, which means we need to set our Foreground color to black. The current Foreground and Background colors appear in the color swatches near the bottom of the Toolbar. The swatch in the upper left is the Foreground color. The swatch in the lower right is the Background color. First, press the letter D on your keyboard. This resets your Foreground and Background colors to their defaults, making your Foreground color white and your Background color black. Then, to swap them and set your Foreground color to black, press the letter X on your keyboard:
Step 10: Paint Around The Teeth To Clean Up The Area
Paint around the teeth to clean up any problem areas. A small, soft-edge brush will work best. You can adjust the size of your brush from the keyboard. Press the left bracket key ( [ ) repeatedly to make the brush smaller or the right bracket key ( ] ) to make it larger. To make the brush softer, press and hold Shift while pressing the left bracket key, or hold Shift and press the right bracket key to make the brush edges harder.
Example: Cleaning Up Around The Teeth
Here, I'm painting along the upper lip and gum line above the teeth to remove the whitening and brightening from those areas. Since we're painting on the layer mask, not on the image itself, we don't see the brush color as we paint. Instead, the effects of the Hue/Saturation adjustment layer disappear:
I'll paint along the bottom edges of the teeth as well to remove the whitening and brightening from the lower lip:
If you make a mistake and accidentally paint over the teeth, press the letter X on your keyboard to swap your Foreground and Background colors. This sets your brush color to white. Paint over the mistake to bring back the whitening, and then press X again to set your brush color back to black and continue painting.
I'll paint away the remaining problem areas on the left and right sides of the teeth, and here's the result. The teeth are now looking whiter and brighter while the areas around them are back to normal:
Adjusting The Brightness Of Specific Teeth
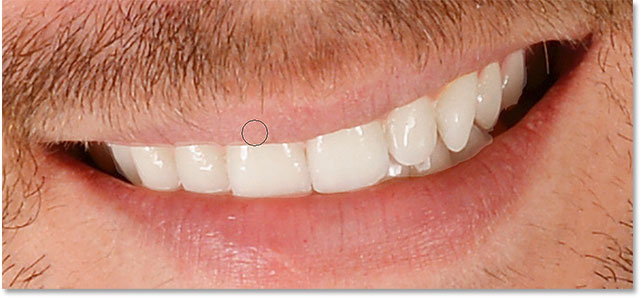
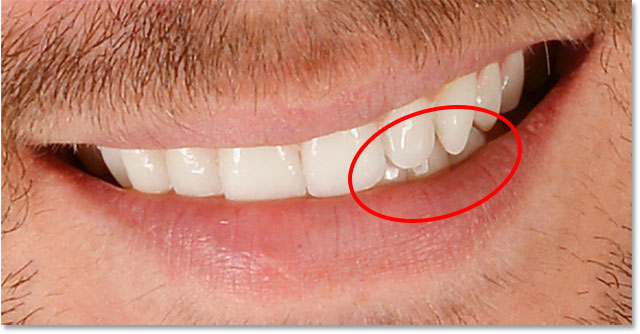
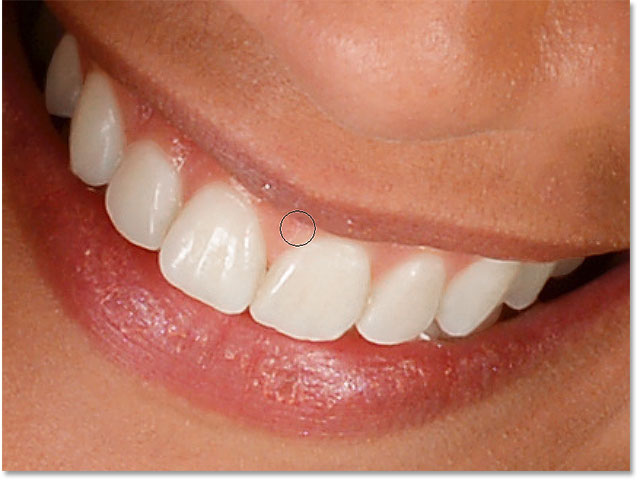
The teeth are looking good, except for one area. There's three bottom teeth on the right that were initially darker than the others because of shadows being cast on them. After brightening the teeth with the Lightness slider, those three teeth now look faded and washed out:
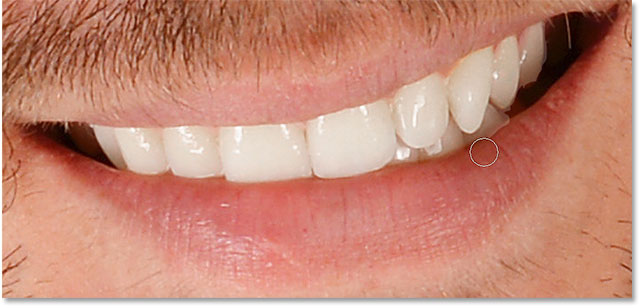
To fix a problem like this, you can reduce the effect of the Hue/Saturation adjustment layer on specific teeth by painting over them with black using a lower brush opacity. You'll find the Opacity option in the Options Bar. I'll lower mine from 100% (the default setting) down to 50%:

Then, with my brush color still set to black, I'll paint over those teeth to restore some of their original brightness. When you're done, remember to set the opacity back to 100%, otherwise you'll get unexpected results the next time you use the brush:
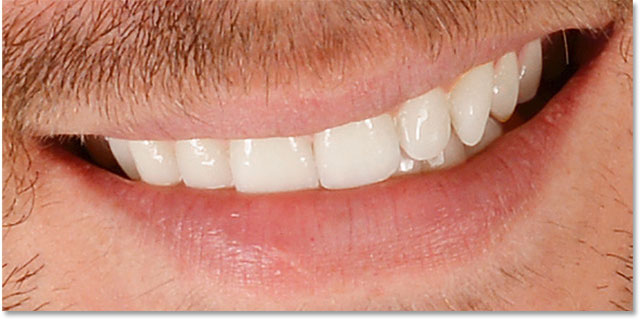
I'll zoom out so we can see the final result. So far, so good. The man's teeth are looking whiter and brighter. By comparison, the yellow in the woman's teeth has become more noticeable:

Learn more: Understanding Layer Masks in Photoshop
Whitening Teeth For More People In The Photo
As I mentioned earlier, for best results when whitening teeth for two or more people in the same photo, you'll want to use a separate Hue/Saturation adjustment layer for each person. We've already gone through the details of each step when I corrected the man's teeth, so I'll go through them again quickly here with the woman's teeth just so we can see how to work with multiple adjustment layers in Photoshop.
Selecting The Teeth
First, I'll reselect the Lasso Tool from the Toolbar. You can also select the Lasso Tool by pressing the letter L on your keyboard:
Then, I'll draw a selection outline around the woman's teeth:
Adding A New Hue/Saturation Adjustment Layer
I'll click the New Fill or Adjustment Layer icon at the bottom of the Layers panel:
Then I'll once again choose Hue/Saturation from the list:
A second Hue/Saturation adjustment layer is added. The one at the top is the one I'll be using to whiten the woman's teeth. The one below it is the original adjustment layer I used for the man's teeth:
Whitening The Teeth
With the second adjustment layer added, the steps for whitening and brightening her teeth are the same as before. In the Properties panel, I'll change the Edit option from Master to Yellows. Then I'll drag the Saturation slider to the left to reduce, but not completely remove, the yellow from her teeth. For the man's teeth, I lowered the saturation to a value of -80. This time, I don't need to go quite that far. A value of around -70 should do it:
Brightening The Teeth
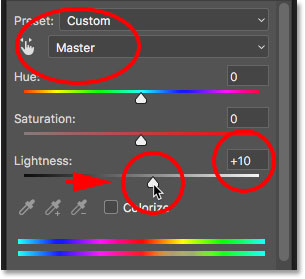
To brighten her teeth, I'll change the Edit option from Yellows back to Master, then I'll increase the Lightness value by dragging the slider towards the right. Her teeth are already fairly bright so I won't push the Lightness value as far this time. I'll increase it to +10:
Cleaning Up Around The Teeth
Finally, I'll select the Brush Tool, either from the Toolbar or by pressing the letter B on my keyboard:
Then I'll paint with black on the layer mask using a small, soft-edge brush to clean up the areas around the teeth:
Before And After
And with that, we're done! Both people's teeth are now whiter and brighter. To compare the edited version of the image with the original version, press and hold the Alt (Win) / Option (Mac) key on your keyboard and click the Background layer's visibility icon:
This hides all layers in the document except the Background layer, revealing the original photo:
To turn the adjustment layers back on, press and hold Alt (Win) / Option (Mac) and click again on the Background layer's visibility icon. And here, after whitening the woman's teeth using a separate adjustment layer, is my final result:

How To Whiten Teeth In Photoshop - Quick Summary
We covered a lot in this tutorial. Here's a quick summary of the steps for how to whiten teeth in Photoshop:
- 01. First, select the Lasso Tool and draw a selection around the teeth.
- 02. In the Layers panel, click the New Fill or Adjustment Layer icon and choose a Hue/Saturation adjustment layer.
- 03. In the Properties panel, change the Edit option from Master to Yellows.
- 04. Drag the Saturation slider to the left to reduce the yellow in the teeth.
- 05. Still in the Properties panel, change the Edit option from Yellows back to Master.
- 06. Select the Brush Tool, set your Foreground color to black, then paint around the teeth on the layer mask to hide the effects of the adjustment layer in the lips and gums.
- 07. For images with two or more people, use a separate Hue/Saturation adjustment layer for each person for best results.
And there we have it! That's how to easily whiten and brighten teeth using a simple Hue/Saturation adjustment layer in Photoshop! Visit our Photo Retouching section for more image editing tutorials!