
Auto Tone, Auto Contrast And Auto Color In Photoshop
In this series of tutorials, we'll learn various ways to fix tone and color problems in our images with Photoshop! Some of the essential topics we'll be covering include how to correct overall brightness and contrast problems with Photoshop's Levels and Curves commands (as well as the aptly-named Brightness/Contrast command), how to gain more control and flexibility with adjustment layers, and how to target specific problem areas in a photo with layer masks!
We'll learn the importance of knowing how to read and work with histograms, and how Photoshop's Red, Green and Blue color channels work to reproduce the millions of possible colors in our images! We'll be learning how to adjust colors with Color Balance, Hue/Saturation and Vibrance, how to warm up or cool down an image with a Photo Filter adjustment, how to do much (and possibly all) of this work in Camera Raw without even touching Photoshop, and so much more!
In this first tutorial, we'll start things off with a look at three of Photoshop's simplest, most popular and widely-used commands for correcting tonal problems and color casts in an image - Auto Tone, Auto Contrast and Auto Color. Now, before we begin, it's important to note here that as with many things in life, what's "popular" isn't necessarily what's best, and the Auto Tone, Auto Contrast and Auto Color commands are no exceptions. What makes them so popular is that they're just so darn quick and easy to use. In fact, you don't need to know anything about how these commands work to get decent results when it comes to improving overall contrast or removing an unwanted color cast.
Yet while speed and ease of use are what make them so popular, the downsides with these commands are that they offer only the most basic of image corrections and they're completely automatic, with no options or controls for fine-tuning or improving on the results. If we try them and like how our image looks afterwards, great! If not, then we need to turn to something better, like the Levels or Curves commands (which I'll be covering in detail in other tutorials).
Photoshop's three Auto commands are best suited for those less-important images you don't want to spend a lot of time retouching; the ones where "good enough" is, well, good enough. Let's see how they work, and how to easily compare the results that each of the three commands gives us.
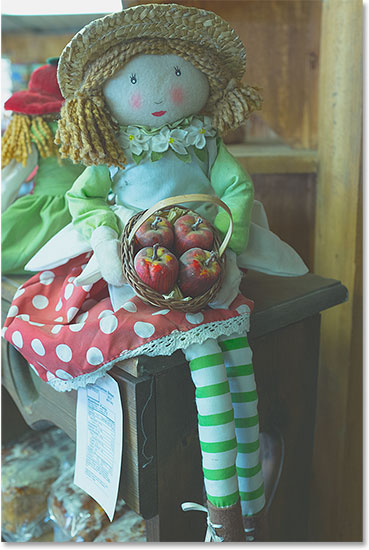
Here's a photo I snapped one weekend at a roadside market. This image suffers from a couple of obvious problems; it's low-contrast, and it has a greenish color cast:
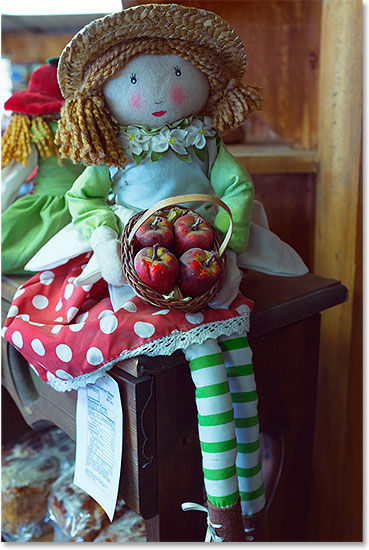
Here's what the same image will look like when we're done using nothing more than Photoshop's Auto image adjustments:
How Auto Contrast, Auto Tone And Auto Color Work
Even though I mentioned earlier that we don't really need to know how the Auto commands work in order to use them, a little knowledge of what's going on behind the scenes can help us understand why one of the three commands gave us better results than the others. Or why, say, Auto Tone worked better with this image yet Auto Color worked best with a different image. And to understand how the Auto commands work, we need to know a little something about Photoshop's color channels. I'll keep things short and simple here, but if you want to learn more about color channels, be sure to check out our full RGB And Color Channels In Photoshop tutorial.
Here's the short version. Much like a painter mixes colors to create all the other colors we see in the final masterpiece, Photoshop mixes colors to produce all the other colors we see in our images. In fact, it may sound hard to believe, but of all the the millions of colors we see, not just in our photos but in the world around us, every single one of them is made from just three primary colors - red, green, and blue.
These are the primary colors of light, and every other color is made from some combination of these three primary colors. White is made from mixing red, green and blue equally at their full intensities. Black is the complete absence of all three primary colors, and every other color and shade in between is made from some combination of red, green and blue. Yellow, for example, is made by mixing red and green. Mix red and blue and you'll get magenta, while green and blue together will give you cyan. Throw in all the possible shades of red, green and blue and you end up with millions, and even billions, of colors!
Photoshop mixes the three primary colors using color channels. There's one channel for red, another for green, and a third for blue. We can find these color channels in the Channels panel which, by default, is nested in beside the Layers panel. Click on its tab at the top of the panel group to open it:

Here, we see the Red, Green and Blue channels, along with that looks like a fourth channel - RGB - at the top. Don't let the RGB channel confuse you, though. It's not really a channel at all. RGB stands for "Red, Green and Blue" and it's simply the combination, or composite, of the Red, Green and Blue channels working together to give us our full color image:

If you look at the preview thumbnails for the Red, Green and Blue channels, you'll notice something that may come as a bit of a surprise; these color channels are not actually in color at all! Instead, each one is a grayscale image. In fact, if we look closer at them, we can see that each channel's grayscale image is different from the others. To preview what each channel looks like in your document, simply click on each one. For example, I'll click on my Red channel to select it:

With the Red channel selected, the full color version of my image in the document is temporarily replaced with the Red channel's grayscale version of the image. What does a grayscale image possibly have to do with the color red? Well, Photoshop uses the brightness values in the grayscale image to determine how much red to mix into each area. The brighter the area, the more red is added to the full color version, while darker areas have less red mixed in. Areas of pure white in the grayscale image have red added at its full intensity, while areas of black have no red at all:

To see what the Green channel looks like, I'll click on it in the Channels panel to select it:

This temporarily turns off the Red and Blue channels, showing me only the Green channel in the document. Here, we see another grayscale image, but this one looks a bit different from what we saw with the Red channel. That's because this one is showing us how green is being mixed into the full color version. Once again, the brighter the area, the more green is added, while darker areas have less green. Any areas of pure white have green added at full intensity, while areas of pure black have no green at all:

Let's do the same thing with the Blue channel. I'll click on it in the Channels panel to select it, which turns off the Red and Green channels:

The Blue channel's grayscale image now appears in the document, and once again, it looks different from the other two but it works exactly the same way. Lighter sections represent areas where more blue is being mixed into the full color version, while darker sections get less blue. Areas of pure white have blue added at full intensity. Areas of pure black contain no blue at all. In this case, my full color version doesn't contain much blue (or any other color that needs blue as a main ingredient), which is why the Blue channel looks darker overall than the Red and Green channels:

So, now that we know that Photoshop mixes red, green and blue color channels to reproduce all the colors we see in an image, and that these color channels are actually grayscale versions of the image, what does any of this have to do with the Auto Tone, Auto Contrast and Auto Color commands? The answer is, it has everything to do with them! Each of the three Auto commands manipulates these color channels (these grayscale images) in different ways, producing different results. Here's a brief description of each one before we look at them in action.
Auto Contrast is the most basic and straightforward of the three. When we select Auto Contrast, Photoshop looks at the composite of all three color channels (in other words, it treats all three as if they were a single grayscale image) and simply darkens the darkest pixels to pure black, lightens the lightest pixels to pure white, and redistributes all the other tonal values in between. The result is an image with improved overall contrast. What's important to note here is that because it treats all three color channels as a single composite image, Auto Contrast does not change the colors in the image. It simply boosts the overall contrast, making it a good choice for images that don't suffer from any sort of color problems and just need a bit more "pop".
Auto Tone is similar to Auto Contrast in that it also darkens the darkest pixels to pure black, lightens the lightest pixels to pure white, and redistributes all the other tonal values in between, but there's one big difference. It does so on a channel-by-channel basis, meaning that the Red, Green and Blue channels each receive their own separate boost in contrast. We know that Photoshop uses the brightness values in each color channel to determine how much of each color to mix into the full color version, so by changing the color channels independently of each other, we effectively change how the colors are mixed together. This means that, unlike Auto Contrast which does nothing more than boost overall contrast, Auto Tone changes the colors in the image at the same time. If your image has an unwanted color cast, Auto Tone may be able to correct it. Unfortunately, if your image did not originally have a color cast, Auto Tone may end up introducing one.
Auto Color is similar to Auto Tone. It also darkens the darkest pixels to black and lightens the lightest pixels to white on a channel-by-channel basis, so once again, the Red, Green and Blue channels are affected separately and independently of each other. But Auto Color goes a step further. Rather than simply redistributing all the other tonal values in between, it tries to correct any unwanted color cast by neutralizing the midtones in the image. This usually (but not always) makes Auto Color the best choice for both boosting contrast and correcting color problems at the same time.
How To Use The Auto Image Adjustments
Now that we know a bit more about how Photoshop's color channels and the three Auto commands work, let's return to our full color version of the photo so we can see the Auto image adjustments in action. To switch back to the full color version, click on the composite RGB channel in the Channels panel. This will instantly turn all three color channels (Red, Green and Blue) back on, and your full color version will re-appear in the document:

Then, switch back to the Layers panel by clicking its tab:

I mentioned at the beginning of the tutorial that we'd see how to easily compare the results that each of the three Auto commands gives us, and we can do that by simply duplicating our image three times to create three additional layers, one for each of the three Auto commands. Let's see how it works.
Step 1: Duplicate The Background Layer Three Times
At the moment, my document consists of a single layer - the Background layer - which holds my original image. To duplicate the layer, press Ctrl+J (Win) / Command+J (Mac) on your keyboard (or, you could go up to the Layer menu in the Menu Bar along the top of the screen, choose New, then choose Layer via Copy, but the keyboard shortcut is much faster). A copy of the image will appear on a new layer named "Layer 1" above the Background layer:

Then, press Ctrl+J (Win) / Command+J (Mac) two more times to create two more copies. You should now have three copies of the image, each on its own layer above the Background layer:

Step 2: Rename The Copy Layers
Double-click directly on the name of the top-most layer in the Layers panel ("Layer 1 copy 2") to highlight its name, then type in "Auto Color" for the new name:

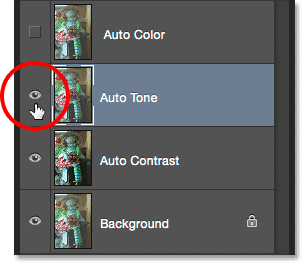
Once you've typed in the first new name, press the Tab key on your keyboard. This will both drop you down to the next layer directly below it ("Layer 1 copy") and automatically highlight the layer's name. Type in "Auto Tone" for the new name. Then, press the Tab key again to drop down to the next layer ("Layer 1") and type in "Auto Contrast" for its new name. When you're done renaming all three layers, press the Enter (Win) / Return (Mac) key on your keyboard to accept the new layer names. You should still have your original Background layer on the bottom, with the "Auto Contrast" layer directly above it, then the "Auto Tone" layer, and finally the "Auto Color" layer at the top:

Step 3: Turn Off The Top Two Layers
Click on the visibility icon (the "eyeball" icon) for the top two layers ("Auto Color" and "Auto Tone") to turn them off temporarily. This lets us see the Auto Contrast version of the image in the document, which is the command we'll start with:

Step 4: Select The Auto Contrast Command
Make sure the "Auto Contrast" layer is selected in the Layers panel (it should be highlighted in blue), then go up to the Image menu at the top of the screen and choose Auto Contrast:

As I mentioned earlier, the three Auto commands are entirely automatic, so as soon as we select one of them, Photoshop goes ahead and does its thing. In this case, since I chose the Auto Contrast command, Photoshop looked at all three color channels as a single composite image, darkened the darkest pixels to black, lightened the lightest pixels to white, and redistributed all the tonal values in between. The result, in this case, is a version of the image with greatly improved overall contrast. Here's the original image once again for comparison:
And here's the Auto Contrast result. Of course, results will vary from one image to another. Notice, though, that while the contrast is improved, we're still seeing the same greenish color cast, and that's because the Auto Contrast command does nothing that would have corrected it:

Step 5: Select And Turn On The Auto Tone Layer
Let's see what the Auto Tone command can do for the image. Click on the Auto Tone layer in the Layers panel to select it, then click on its visibility icon (the empty square where the eyeball used to be) to turn the layer back on. Since we haven't actually done anything yet to this version of the image, you'll see the original, uncorrected version once again in the document:
Step 6: Select The Auto Tone Command
With the "Auto Tone" layer selected, go back up to the Image menu at the top of the screen and this time, choose Auto Tone:

As we learned earlier, the Auto Tone command boosts contrast by darkening the darkest pixels to black, lightening the lightest pixels to white, and redistributing all the tonal values in between. But unlike Auto Contrast which affects the image as a whole, Auto Tone does it on a channel-by-channel basis, so the Red, Green and Blue channels are each affected differently. This changes the original colors in the image. In this case, the change seems to have been for the better, as not only do we see improved overall contrast but the greenish color cast has been reduced. Remember, though, that depending on your image, Auto Tone can just as easily introduce an unwanted color cast, so results will vary:

If you want to easily compare your results between the Auto Contrast and Auto Tone commands, simply click on the "Auto Tone" layer's visibility icon to toggle the layer on and off. With the "Auto Tone" layer off, you'll see the Auto Contrast result in your document. Toggle the "Auto Tone" layer back on to see the Auto Tone results:

Step 7: Select And Turn On The Auto Color Layer
Finally, let's see what the Auto Color command will do for us. Click on the Auto Color layer in the Layers panel to select it, then click on its visibility icon to turn it back on. Again, since we haven't yet done anything to this version of the image, you'll see the original, uncorrected version in your document:

Step 8: Select The Auto Color Command
With the "Auto Color" layer selected, go up to the Image menu and choose Auto Color:

Auto Color works just like Auto Tone in that it boosts contrast in the Red, Green and Blue channels independently, but it also tries to correct any unwanted color cast by neutralizing the midtones, and in this case, with this particular image, Auto Color achieves the best results. The overall contrast isn't quite as strong as what we saw with Auto Contrast and Auto Tone, but it did the best job at removing the greenish tint:

Again, you can easily compare the Auto Color results with the Auto Tone results simply by clicking the "Auto Color" layer's visibility icon to toggle it on and off. With the layer off, you'll see the "Auto Tone" layer in your document. Toggle the layer back on to see the "Auto Color" layer:

Step 9: Try Combining Auto Commands Together
This next step is optional, but there's nothing that says you have to choose either Auto Contrast, Auto Tone or Auto Color on their own and be done with it. In fact, you can easily combine them to see if you can improve the results even further. For example, in my case, Auto Color did the best job of the three, but there's still room for improvement. The image still doesn't have quite as much "pop" with the contrast as I'd like. I know that both the Auto Contrast and Auto Tone commands did a better job at boosting overall contrast. So, let's try combining one of them with my Auto Color result to see what happens!
With my Auto Color layer selected, I'll press Ctrl+Alt+J (Win) / Command+Option+J (Mac) on my keyboard to create a copy of it. By adding the Alt (Win) / Option (Mac) key to the shortcut, we tell Photoshop to first pop open the New Layer dialog box so we can name the layer before it's added. I'll name my new layer "Auto Color + Auto Tone":

I'll click OK to close out of the dialog box, and we can see in my Layers panel that I now have an "Auto Color + Auto Tone" layer above the others:

Since Auto Color has already been applied to this layer, I'll go up to the Image menu and choose Auto Tone:
This ends up giving me what I consider the best version of the image. On its own, Auto Color did a great job of removing the color cast but still left the image looking a bit flat. Auto Tone was then able to improve on the initial results by further boosting contrast, and it even made the colors look slightly better! Of course, I can't stress enough that results will vary from one photo to the next so you may not see the same result with your image. And if you're wondering why I chose Auto Tone instead of Auto Contrast, it's because I actually did try Auto Contrast (while you weren't looking) and Auto Tone just happened to work out better. I wouldn't have known that, though, without trying it:
Step 10: Select And Delete The Unwanted Layers
Once you've compared your results and chosen the Auto command you like best, you can delete the layers you don't need. To do that, click on one of the unwanted layers to select it, then press and hold the Ctrl (Win) / Command (Mac) key on your keyboard and click on the other unwanted layers. In my case, I want to keep the "Auto Color + Auto Tone" result, so I'll click on the "Auto Color" layer to select it, then I'll press and hold my Ctrl (Win) / Command (Mac) key and click on the "Auto Tone" and "Auto Contrast" layers. All three layers are now selected:

With the unwanted layers selected, press the Backspace (Win) / Delete (Mac) key on your keyboard to delete them, leaving you with just your original, untouched photo on the Background layer and your favorite Auto-corrected version above it:

And there we have it! In this tutorial, we learned the basics of how Photoshop's Auto Contrast, Auto Tone and Auto Color commands work and how to use them to quickly fix contrast and color cast problems in your images. In the next tutorial, we'll learn how we can take these three Auto commands a step further by applying them as an adjustment layer!