
How To Apply The Auto Image Commands As Adjustment Layers In Photoshop
In the previous tutorial in this series on correcting tone and color problems, we learned how Photoshop's three Auto image adjustments (Auto Tone, Auto Contrast and Auto Color) work and how they can quickly improve the overall look of our images by boosting contrast and removing unwanted color casts.
While these commands are by no means the best ways to fix these issues, they have the advantages of being very fast and very easy to use, making them popular choices for correcting and retouching those less important, everyday snapshots.
However, one big disadvantage with Photoshop's Auto image commands is that they're static adjustments, meaning they make permanent changes to the pixels in the image. This is often referred to as destructive editing and as you might imagine, it's not the best way to work. A good image editing workflow takes advantage of non-destructive adjustments layers whenever possible. So in this tutorial, we'll learn how to easily apply these same Auto commands as adjustment layers!
As we'll see, there's other advantages as well to applying the Auto commands as adjustment layers. Not only does it make it even easier for us to switch between the commands and compare the results, but it also makes it easier to combine Auto commands together to improve your results even further!
This tutorial builds on what we covered in the previous tutorial, so if you're not yet familiar with the Auto image commands, be sure to read through the Auto Tone, Auto Contrast and Auto Color tutorial first before you continue.
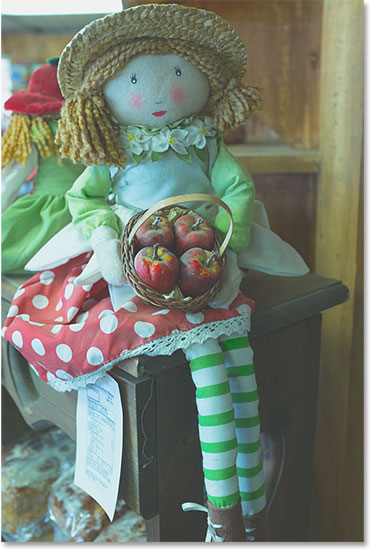
To make it easier to see that the adjustment layer versions of the Auto commands are the exact same commands (Auto Tone, Auto Contrast and Auto Color) found under Photoshop's Image menu, I'll use the same image here that I used in the previous tutorial so we can see that the results I end up with are exactly the same as before. Here's the photo as it was originally shot, with poor contrast and a greenish color cast:
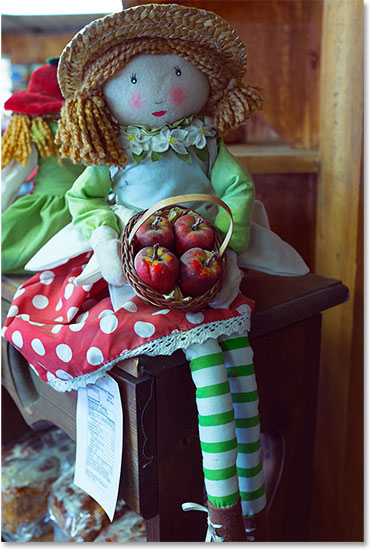
And here's how it will look when we're done, this time after applying the Auto commands as an adjustment layer:
Step 1: Add A Levels Or Curves Adjustment Layer
Even though it's easy to apply Photoshop's Auto image commands as adjustment layers, the way you do it isn't all that obvious. For starters, there's no actual Auto Tone, Auto Contrast or Auto Color adjustment layer. Instead, the commands are made available to us as options in other adjustment layers, namely Levels and Curves. With my image newly opened in Photoshop, I'll add a Levels adjustment layer by clicking on the New Fill or Adjustment Layer icon at the bottom of the Layers panel:
Then I'll choose Levels from the list that appears. I could also choose a Curves adjustment layer here which would give me access to the same Auto options, but most people find Levels less intimidating:
Nothing will happen to the image just yet, but if we look in the Layers panel, we see that Photoshop has added the Levels adjustment layer above the image:

Step 2: Open The Auto Color Correction Options
The options and controls for the Levels adjustment layer are found in the Properties panel, and this is where we access the Auto commands. There's a couple of ways to get to them. One way is by clicking on the small menu icon in the top right corner of the Properties panel:
Then choosing Auto Options from the menu:

The other way to access the Auto options is by pressing and holding the Alt (Win) / Option (Mac) key on your keyboard and clicking the Auto button:

Either way opens the Auto Color Correction Options dialog box. The section we're interested in here is the Algorithms section at the top. Notice that there's four different options to choose from. For this tutorial, we're only going to focus on the top three (Enhance Monochromatic Contrast, Enhance Per Channel Contrast, and Find Dark & Light Colors) since they're the ones that correspond to the three Auto image commands. We'll save the fourth one, Enhance Brightness and Contrast, for later when we look more closely at Photoshop's Brightness/Contrast adjustment:

Step 3: Try Out The Different Algorithms
As I mentioned, each of the top three options corresponds to one of the three Auto image commands. They're not actually named Auto Tone, Auto Contrast and Auto Color, but if you've read through the previous tutorial, you might have noticed that the names we find here are actually descriptions of how each of the Auto commands works.
The first option at the top, Enhance Monochromatic Contrast, describes how the Auto Contrast command works. Choosing this option will give us the exact same result as if we had selected the static Auto Contrast command from under the Image menu. To quickly recap, Auto Contrast looks at all three color channels (Red, Green and Blue) as a single composite image and boosts overall contrast by making the darkest pixels in the image black, the lightest pixels white, and then redistributing all the other tonal values in between. Only the contrast is affected. The original colors in the image remain the same.
If you can't remember the details of how each Auto command works but you have Tool Tips enabled in Photoshop's Preferences, there's an easy way to tell which of these options corresponds to which Auto command. Simply hover your mouse cursor over the name of an option to see a more detailed description of it. Notice that at the very end of the description, it actually says which Auto command it matches. In the case of this first option, Enhance Monochromatic Contrast, it shows Auto Contrast in parenthesis:

To select the option, simply click inside the little circle to the left of its name, then look at your image to judge the results. Here's what my photo looks like with Enhance Monochromatic Contrast applied. The overall contrast is improved but the greenish color cast remains. If you compare it with the Auto Contrast result from the previous tutorial, you'll see that both versions look exactly the same. The only difference here is that we're applying Auto Contrast as an non-destructive adjustment layer rather than as a static adjustment:

The second option from the top, Enhance Per Channel Contrast, is the same as the Auto Tone command. Again to quickly recap, Auto Tone is similar to Auto Contrast in that it darkens the darkest pixels to black, lightens the lightest pixels to white, and then redistributes the other tonal values in between, but it does so on a channel-by-channel basis rather than a composite basis, so each individual color channel is treated differently. This not only boosts overall contrast but also changes the colors in the image. If your photo suffers from an unwanted color cast, Auto Tone may be able to correct it, but it could also just as easily introduce a color cast if there wasn't one originally.
I'll hover my mouse cursor over the Enhance Per Channel Contrast option to view a more detailed description of it, and we see at the end that it lists Auto Tone in parenthesis:

I'll select the option by clicking inside the little circle and here, we see the exact same result as we saw when I applied the Auto Tone command in the previous tutorial. There's a nice boost in contrast over the original version, and some, but not all, of the greenish color cast has been corrected:

The third option, Find Dark & Light Colors, is the same as the Auto Color command, which also darkens the darkest pixels to black, lightens the lightest pixels to white, and redistributes the other tonal values in between on a channel-by-channel basis, just like Auto Tone. The difference with Auto Color is that it also tries to neutralize the midtones, giving us the best chance of removing an unwanted color cast.
I'll hover my mouse cursor over the Find Dark & Light Colors option to view the description, and we see Auto Color listed at the end:

There's one extra step here to recreating the same effect as Auto Color. In order to neutralize the midtones, we also need to turn on the Snap Neutral Midtones option by clicking inside its checkbox. Again, notice that if you hover your mouse cursor over the option to view the description, you'll see that it lists Auto Color at the end:

Here's my result with both Find Dark & Light Colors and the Snap Neutral Midtones options selected. Just as with the Auto Color result in the previous tutorial, the overall contrast isn't quite as strong here as what we saw with the previous two options, but the greenish color cast has been greatly reduced:

Step 4: Combine "Snap Neutral Midtones" With The Other Options
One really great benefit of applying the Auto commands this way, rather than as static adjustments, is that we can actually combine the Snap Neutral Midtones option with any of the Auto commands, not just Auto Color! For example, I'll leave Snap Neutral Midtones selected, but I'll switch from the Find Dark & Light Colors option to the Enhance Per Channel Contrast option, effectively combining the Auto Color and Auto Tone commands:

And here's my result. The overall contrast is greatly improved over the original thanks to the Enhance Per Channel Contrast (Auto Tone) option, and the color cast has been removed thanks to the Snap Neutral Midtones option. In fact, this is the same result as what we saw in the previous tutorial when I applied Auto Tone to the image immediately after applying Auto Color:
As I mentioned earlier, we'll save the fourth option (Enhance Brightness and Contrast) for later when we look at Photoshop's Brightness/Contrast image adjustment. Once you've tried all three options and chosen the one that works best for your image, click OK to close out of the Auto Color Correction Options dialog box. If you want to compare the corrected result with the original, simply click the adjustment layer's visibility icon in the Layers panel to temporarily turn the adjustment layer off:
With the adjustment layer off, you'll see your original, uncorrected version in the document:
Click again on the visibility icon to turn the adjustment layer back on:

This returns you to the auto-corrected version:
And there we have it! That's how to easily apply Photoshop's Auto Tone, Auto Contrast and Auto Color commands as flexible, non-destructive adjustment layers! In the next tutorial in this series on tone and color correction, we'll look at the first of Photoshop's manual image adjustments, the Brightness/Contrast command, and how we can use it to easily improve the overall brightness and contrast of our photos!