
Fade an Image to Color in Photoshop with Live Gradients
Learn how to fade an image to a solid color in Photoshop! This beginner-friendly, step-by-step tutorial teaches you how to use Live Gradients to seamlessly blend any photo into a background color, creating the perfect space for text and design elements. Fully updated for Photoshop 2026
Download the PDF: Fade an Image to Color with Live Gradients
Need to add space to a photo for text or other design elements? Learn the fastest and easiest way to fade an image to a solid color in Photoshop using live gradients.
A live gradient means you can easily change the colors, length, and angle even after the gradient is drawn. When combined with Photoshop’s Foreground to Transparent gradient, a live gradient gives you a fast, flexible way to fade an image perfectly into any background color.
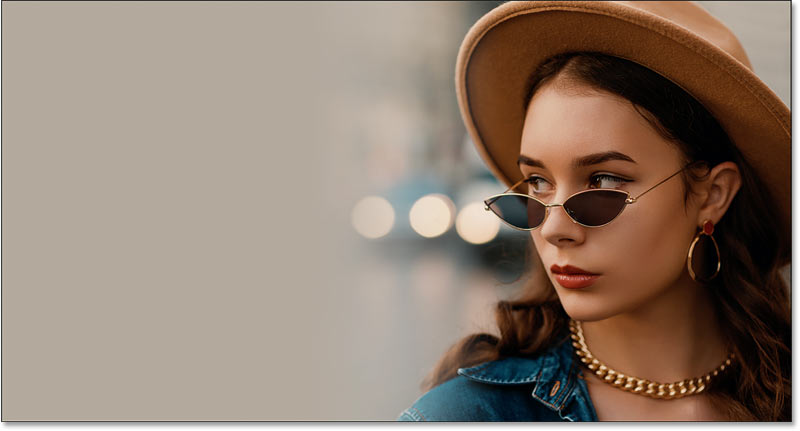
Here is an example of what the final fade to color
effect will look like when we are done.
Which Photoshop version do I need?
I'm using Photoshop 2026. You can get Photoshop here or use the Creative Cloud Desktop app to make sure your copy of Photoshop is up to date.
Let's get started!
Step 1: Create a new Photoshop document
Start by creating a new document. If you are on the Home Screen, click the New file button.

Alternatively, from Photoshop’s main interface, go to File > New.

In the New Document dialog box, enter the settings for your document.
For this tutorial, set the Width to 3000 pixels, the Height to 1600 pixels, the Resolution to 300 pixels per inch, and the Background Contents to White.

Click Create.

Photoshop creates the new document.

If needed, zoom in on the document by going to View > Fit on Screen.

Step 2: Place your image into the document
Add your image to the document by going to File > Place Embedded.

Navigate to where the image is stored on your computer, click to select it, and click Place.

Photoshop places the image on the canvas.
It also adds Free Transform handles around the image so you can resize and position it. (Portrait photo from Adobe Stock).

Step 3: Reposition the image on the canvas
Drag the image to the left or right to make room for the solid color. Hold the Shift key as you drag to keep the movement perfectly horizontal.
I'll move my subject to the right so the image will fade to color on the left.

Click the check mark in the Options Bar to accept the placement and close Free Transform.

In the Layers panel, the image appears on its own layer above the Background layer.

Related tutorial: How to extend an image with Generative Expand
Step 4: Select the Gradient Tool
To create the fade effect, select the Gradient Tool from the toolbar.

In the Options Bar, ensure the Tool Mode is set to Gradient. This allows you to draw a modern live gradient. (If set to Classic Gradient, you will draw the old style of gradient without the live features).

Step 5: Choose the Foreground to Transparent gradient
Still in the Options Bar, click the gradient swatch.

Open the Basics folder and select the Foreground to Transparent gradient. Press Enter (Win) / Return (Mac) to accept it.

Set the Gradient Style to Linear to draw the gradient in a straight line. Ensure Reverse is turned off, Dither is turned on (to reduce color banding), and set the Method set to Perceptual.

Step 6: Choose a color to fade the image into
Choose a color for your gradient by clicking the Foreground color swatch in the toolbar.

This is the color your image will fade into. Because you are using a live gradient, you can always change this color later.
For now, choose white by setting the R, G, and B values all to 255.
Click OK to close the Color Picker.

Step 7: Draw the gradient across the image
Click and hold on the image to set the starting point for your gradient.
I'm starting near the left edge of my image.

Keep your mouse button pressed and begin dragging away from that point. Hold Shift as you drag to keep the line perfectly straight.
A major advantage of live gradients is that you see a real-time preview of the gradient as you draw it.

Release your mouse button to complete the initial gradient. Dn't worry about getting it exactly right just yet.

In the Layers panel, Photoshop adds the live gradient on its own Gradient Fill layer, keeping it completely separate from your image.

Step 8: Adjust the start and end of the fade
Notice the on-canvas controls you can now use to edit the gradient.

Click and drag the color stop on either end of the gradient to adjust where the transition starts and ends.
Hold Shift as you drag to keep the color stop moving in a straight line.

Click and drag the line connecting the color stops to reposition the entire gradient on the canvas.

Above that line is a diamond-shaped icon. Normally, this icon controls the midpoint between colors. However, because you are using a Foreground to Transparent gradient, dragging this specific on-canvas icon will not do anything.
Step 9: Adjust the midpoint of the fade
To adjust the midpoint between the color and the transparency, go to the Properties panel and scroll down to the Opacity Controls.

Drag the diamond icon below the preview bar to shift the midpoint closer to the solid color or the transparency.
Drag it back to the middle at any point to reset it.

Step 10: Adjust the smoothness of the fade
Sometimes, the transition between the color and the transparency doesn’t look perfectly smooth. For example, the color might bunch up on one side and fade too abruptly.

Switching the gradient method in the Options Bar can help smooth things out.
Perceptual renders colors the way our eyes naturally perceive them, which is usually ideal. However, it's not always the best choice for this specific fade effect.

Change the Method to Classic to render the gradient the way older versions of Photoshop did.

The transition now looks smoother and more gradual. Choose whichever method works best for your specific image, but in many cases, Classic provides a better fade.

Step 11: Choose a different fade color (optional)
To change the background color, double-click the color stop on the canvas. Ensure you click the color stop, not the transparency stop.

You can choose a new color directly from the Color Picker.

Alternatively, sample a color directly from your image while the Color Picker is open.
Before sampling, go to the Options Bar and change the Sample Size from Point Sample to a larger area, like 5 by 5 Average or 11 by 11 Average. This samples the average color of an area rather than one specific pixel.

Click on your image to sample a color. For this example, a shade of gray from the upper right works perfectly.
Click OK to close the Color Picker.

Step 12: Make final adjustments to the fade
Make any final adjustments to the gradient's start and end points by dragging the color stops on the canvas.

To hide the on-canvas controls when you are finished, select any layer other than the Gradient Fill layer in the Layers panel.
To bring the controls back later, reselect the Gradient Fill layer and make sure the Gradient Tool is active in the toolbar.

Here is the final result, with the image fading smoothly into the solid color, leaving perfect space for text or design elements on the left.

And there we have it! That's how to fade an image to color using live gradients in Photoshop.
Don't forget, all of my Photoshop tutorials are available to download as PDFs!
Related tutorials:
- How to use Live Gradients in Photoshop
- Find Photoshop's Missing Gradients, Patterns and Shapes
- How to Color Grade Images with Gradient Maps