
Use Smart Portrait in Photoshop to Change Your Subject’s Look
Change your subject's appearance using Photoshop's Smart Portrait filter. Add facial expressions, make them look younger or older, adjust hair thickness and more just by dragging siders! For Photoshop 2022 or newer.
Download PDF: Use Smart Portrait To Change Your Subject's Look
Photoshop’s Smart Portrait Neural Filter may not be its most practical feature, but it can still be a lot of fun. You can use Smart Portrait to quickly add facial expressions to your subject, like happiness, surprise or anger. You can change the age of your subject, making them look younger or older. And you can adjust hair thickness, eye direction, head direction and more just by dragging sliders.
Like all of Photoshop’s Neural Filters, Smart Portrait uses artificial intelligence to redraw the image with new detail that was not present in the original. But unlike other Neural Filters, Smart Portrait processes your image in the cloud, meaning that the effect is rendered online by Adobe’s servers. The advantage with the cloud is that the result will be better than if it relied solely on your computer’s power. But the disadvantage is that it takes longer, especially if your internet connection is slow.
In this tutorial, I’ll show you how each of the Smart Portrait sliders affects your image, and I’ll share a few tips for getting the best possible results.
Which version of Photoshop do I need?
The Smart Portrait Neural Filter has been upgraded from beta to an official release as of Photoshop 2022. So make sure that your copy of Photoshop is up to date. You can get the latest Photoshop version here.
Setting up the document
You can follow along with any portrait photo. I’ll use this image (portrait photo from Adobe Stock).

Let's get started!
Apply Smart Portrait to a copy of your image
Here’s my first tip. Before opening the Smart Portrait Neural Filter, make a copy of your image layer and then apply the Smart Portrait filter to the copy. As we’ll see later on, having the original image below the layer you're working on will help you clean up any problems that the Smart Portrait filter creates.
In the Layers panel, the image appears on the Background layer.

Make a copy of the Background layer by pressing Ctrl+J on a Windows PC or Command+J on a Mac. A copy appears above the original.

Open the Neural Filters workspace
With the copy layer selected, go up to the Filter menu in the Menu Bar and choose Neural Filters.

Your image opens inside Photoshop’s Neural Filters workspace. And a blue box appears around the face in the image that Photoshop detected.

How to hide the blue box
If the blue box is distracting, you can hide by going up to the View menu and unchecking Extras. Or press Ctrl+H on a Windows PC or Command+H on a Mac to toggle the extras on and off.

Download and enable Smart Portrait
Photoshop's Neural Filters are all listed in the panel to the right of the image. And as of Photoshop 2022, Smart Portrait has been upgraded from a beta filter to an official Featured filter. If you are still seeing Smart Portrait listed in the Beta section, you’ll need to update your copy of Photoshop.
But before we can use a filter, we first need to download it. So if you have not done so already, click the cloud icon to download Smart Portrait.

Once Smart Portrait has finished downloading, click the toggle icon to turn it on.

The Smart Portrait effect sliders
Each Smart Portrait effect is controlled by a slider, and the sliders are divided into groups (Featured, Expressions, Global and Settings). We’ll start by looking at the Featured effects at the top.

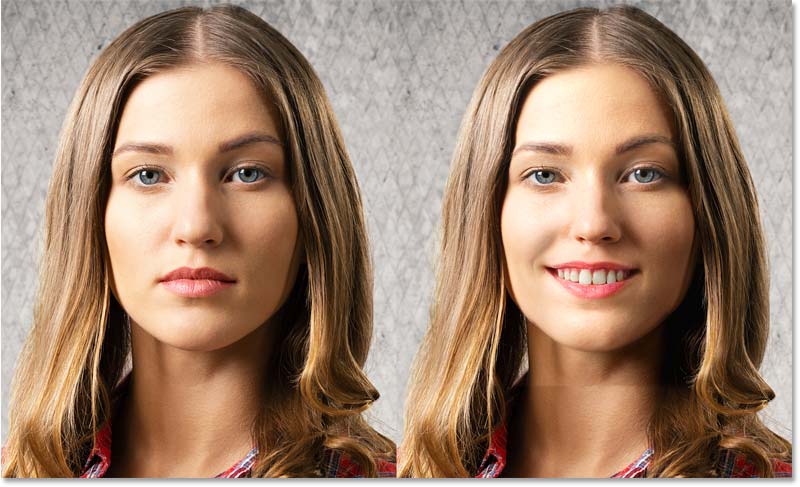
Happiness
The Happiness slider makes your subject look happier. At least, that’s the idea. But sadly, of all the Smart Portrait effects, Happiness can be one of the least impressive. In fact, depending on the amount of happiness you add, the result can look creepy.
For best results with the Happiness slider, keep the effect subtle. Here I’m increasing the amount to +10 (the maximum is +50).

The progress bar
Any time you drag a Smart Portrait slider, a progress bar will appear as you wait for the result. And the first time you drag a slider is when you’ll wait the longest because that is when Photoshop processes the image in the cloud using Adobe’s servers. The progress bar itself will say Processing in the cloud
.

But after that, Smart Portrait switches to processing the image on your device (your computer). The progress bar will say Processing on device
. So once Photoshop switches from the cloud to your computer, the wait time after dragging a slider should be shorter.

How to toggle the effect on and off
Toggle the effect on and off to compare it with your original image by clicking the Preview icon in the lower left of the Neural Filters panel.
On the left is my original image, and on the right is with Happiness increased to 10. The result looks pretty good. He does look a little happier.
But notice that even at a low setting, Smart Portrait is starting to add detail that was not present in the original image. For example, his mouth was initially closed. But Smart Portrait has added teeth. It’s a believable effect, but they are not his real teeth. Instead, Photoshop used machine learning to draw what it thinks his teeth would look like.

Increasing Happiness to the max
While subtle increases to Happiness can look good, big increases usually don’t. I’ll drag the Happiness slider all the way to +50.

Here again is the original image on the left and the Happiness effect on the right. At this point, things just look goofy.

Trying the Happiness slider on a different image
But goofy is better than creepy. Here’s the effect using a different image. On the left is the original photo and on the right is with Happiness increased to the maximum amount. This is what I mean by creepy, and I doubt she would be too happy with the result.
So your experience with the Happiness slider will vary from one image to the next. But from my testing, subtle adjustments work best.
Reducing the Happiness amount
The Happiness slider can also be used to make your subject look less happy (if that’s something you ever need to do). And perhaps not surprising, the result tends to look more believable. Even with Photoshop, it seems easier to take away someone’s happiness than add to it.
To reduce happiness, drag the slider to the left. I’ll lower it all the way down to -50.

Even at the lowest Happiness setting, when compared to the original image on the left, the result on the right still looks fairly realistic. A more subtle adjustment would look better.

How to reset the Smart Portrait sliders
As we make our way through each of the Smart Portrait effects, I’m going to reset the slider we just looked at back to 0. You can quickly reset an individual slider by double-clicking on it.

Or to reset all sliders at once, click the Reset icon in the upper right.
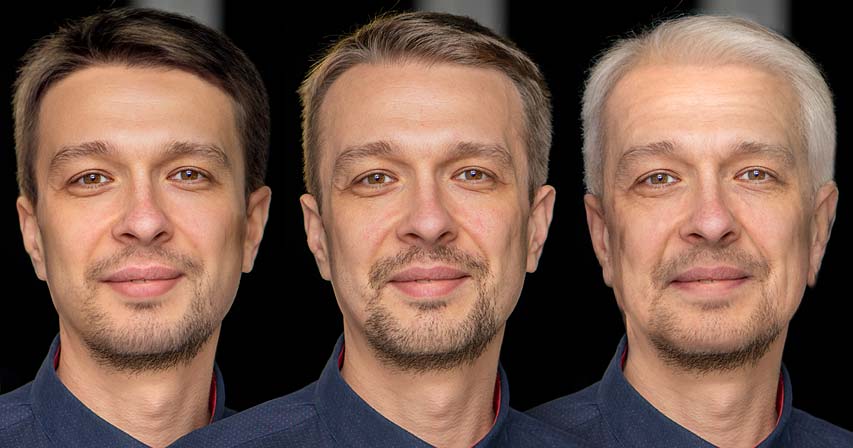
Facial age
The Facial age slider makes your subject look younger or older, and is one of the more impressive Smart Portrait effects. But a better name may have just been Age since the person’s hair style and hair color are also affected
Drag the Facial age slider to the left to make your subject look younger. I’ll drag it all the way to -50.

Compared to the original image (left), he definitely looks younger (right), with smoother skin and softer lighting. But his hair also looks thicker and darker in the younger version.

Dragging the Facial age slider to the right makes the person look older. I’ll drag it all the way to +50.

And again compared to the original image on the left, he looks quite a bit older. Plus his hair is now thinner and gray.
Later on, I’ll show you how to enhance these effects even more, to the point where your subject looks like a completely different person.

Hair thickness
The Hair thickness slider makes your subject’s hair thicker or thinner. If I drag the slider all the way to the right:

His hair looks thicker, which has the added effect of making him look younger.

And if I drag Hair thickness all the way to the left:

His hair looks much thinner, as if he just had a haircut.

Eye direction
The final Smart Portrait effect in the Featured group is Eye direction which can change where your subject is looking.
If I drag the Eye direction slider all the way to the right:

His gaze moves from center (in the original image) to the right.

And if I drag the slider to the left:

He’s now looking off to the left:

The Auto balance combinations checkbox
So far we’ve been looking at Smart Portrait effects individually. But of course, you can drag multiple sliders to combine their effects. And when you do, Photoshop limits each slider’s impact on your subject to create a more balanced and natural result.
But if you would rather see the full effect of each slider, uncheck Auto balance combinations above the Featured group.

Here I’ve increased Happiness to +15, lowered Facial age to -40 and increased Hair thickness to +40. On the left is the result with Auto balance combinations checked, and on the right is with it unchecked.
Notice how the effect is much stronger with it unchecked. You can toggle the option on and off to compare the results and choose which version you like best.

Surprise
The Expressions group holds two sliders. Drag the Surprise slider to the right to make your subject look more surprised, or drag to the left to make them look like they knew about the surprise party all along.

On the left is with Surprise set to the maximum of +50. To me, he looks more disappointed than surprised. And on the right is with Surprise set to the minimum of -50.

Anger
The last of the Smart Portrait facial expressions is Anger. But much like the Happiness slider we looked at earlier, Anger works best with subtle adjustments and tends to look better when reducing anger than adding more.

On the left is with the Anger slider all the way to the right to +50. Notice how his face looks distorted, which would make anyone angry. And on the right is with Anger set to the minimum of -50.

Head direction
The Global group is where you’ll find sliders for adjusting the Head direction and Light direction. There is also a Fix head alignment slider which is grayed out when Head direction is set to 0.
Drag the Head direction slider left or right to turn your subject’s head in that direction. I’ll drag the slider to the right to a value of around +40.

Photoshop tries to redraw your subject with their head turned. But what often happens, as we see here, is that your subject’s head becomes detached from their neck.

Fix head alignment
That’s where the Fix head alignment slider comes in, which is no longer grayed out. Drag the slider in the same direction until the head and neck are realigned.

With this image, I needed to drag the slider to +47 for the alignment to work. But with other images I tested, I was not able to realign them even after dragging the Fix head alignment slider to the max. So your results will vary.

Light direction
Use the Light direction slider to reposition the light source on your subject after turning their head. Since I turned his head to the right, I’ll compensate by dragging the Light direction slider to the left.

On the left is the head tilt without repositioning the light source. Notice how the light is shining directly on his face. And on the right is with the light source moved slightly to the left of center.

Retain unique details
At this point, we’ve covered all of the Smart Portrait effects that you can apply to your subject. And you may have noticed that no matter which effect we applied, our subject still remained recognizable.
The reason is because of a slider found in the Settings group called Retain unique details, which by default is set to 90. The default setting is usually what you want because it tells Photoshop to keep most of the person’s unique facial features.

Lowering the Retain unique details value
But lowering the value gives Photoshop more freedom and can help enhance the result. For example, I’ll again drag the Facial age slider all the way to the left to make him look younger. And when we compare the result to the original image, it’s obvious that he is still the same person.
If I then lower Retain unique details from 90 down to 10:

He still looks like the same person but Photoshop was able to smooth and soften his skin a little more.

Turning Retain unique details off
But watch what happens if I drag Retain unique details all the way down to 0.

Photoshop no longer cares about his unique features and instead makes him look like a completely different person.

The same things happens if I drag the Facial age slider all the way to the right to make him look older. On the left is the result with Retain unique details set to 90 and on the right is with it set to 0. Again he looks completely different in the two versions.
Even if you lower Retain unique details down to 1, your subject will still be recognizable. It’s only when you lower it down to 0 that they become someone else.

Mask feathering
The final Smart Portrait slider, also found in the Settings group, is Mask feathering which by default is set to 10. Increasing this value softens the edge between the Smart Portrait effect and the surrounding image, which may help clean up certain problem areas but usually just creates new ones.

For example, notice that after turning his head to the right using the Head direction slider, there is an abrupt transition across his neck where the effect suddenly ends.

I can try to soften the edge by increasing the Mask feathering value.

But while the transition in his neck is now softer, it’s also softer everywhere else, creating a faded border around his face. So rather than adjusting the Mask feathering slider, I recommend leaving it at the default of 10. I’ll show you a better way to clean up problem areas next.

How to remove an area from the Smart Portrait effect
A better way to clean up an edge or remove an area from the Smart Portrait effect is to simply paint over the area you want to remove.
To show you how it works, I’ll bring back that goofy smile by dragging the Happiness slider all the way to the right.

The Subtract from selection brush
Let’s say I want to keep the effect everywhere except for his mouth. I can do that by painting over it using the Subtract from selection brush. You’ll find it in the toolbar along the left of the workspace.

Adjust the size of the brush using the left and right bracket keys ( [ and ] ) on your keyboard. Then simply paint over an area to remove it from the effect and restore the original image.
Here I’m painting over his mouth, and we can see the original mouth showing through. If you are seeing transparency instead of the original image, I'll explain why in a moment.

Show mask overlay
By default, a red overlay appears as you paint, which can make it difficult to see what’s happening. You can turn off the overlay by unchecking Show mask overlay in the Options Bar.

With the overlay turned off, I’ll continue painting over the rest of his mouth until the original is restored.

I can also paint along his neck with the Subtract from selection brush to soften the transition area.

The Add to selection brush
If you paint away too much of the effect, switch to the Add to selection brush in the toolbar and then paint over the area to restore the effect. To quickly switch between the two brushes, press E on your keyboard for the Subtract from selection brush and B for the Add to selection brush.
To see which areas were removed with the Subtract from selection brush, turn Show mask overlay back on.

And the red overlay reappears.

Why am I seeing transparency where I painted?
Back at the beginning of the tutorial, I suggested that you first make a copy of the image layer and then apply Smart Portrait to the copy. This brings us to the reason why. If the original image is not below the effect as you paint some of it away with the Subtract from selection brush, you won’t see the original image in those areas. Instead, you’ll see transparency.

You will also see transparency if you click the Layer preview icon (next to the effect preview icon} and Show selected layer is active. So make sure that Show all layers is selected.
For comparison, here once again is my original image on the left. And on the right is the Happiness effect after removing some areas, like his mouth, using the Subtract from selection brush. This time the result looks much better.

How to output the Smart Portrait result
When you are ready to output the result, click the Output options box which is set to New layer by default.

Then choose from several options. I recommend choosing Smart Filter which will keep the Smart Portrait effect editable in case you want to go back and make changes.

Then click OK to close the Neural Filters workspace.

Back in the Layers panel, the layer on which we applied Smart Portrait is converted to a smart object. And the filter is applied as a smart filter. Notice its layer mask showing the area (in black) where we painted away some of the effect.
You can reopen Smart Portrait and make changes by double-clicking on the words Neural Filters below the layer mask.

And there we have it! Along with Smart Portrait, another of Photoshop's Neural Filters that was recently upgraded to an official release is Colorize which can add color to black and white photos automatically!
Check out my other Photo Editing tutorials for more topics. And don't forget, all of my tutorials are now available to download as PDFs!