
How to Keep Photoshop Always Up to Date

Learn how to keep Adobe Photoshop up to date with the latest features, improvements and fixes using the Creative Cloud desktop app! Now updated for Photoshop 2021.
As an Adobe Creative Cloud subscriber, you always have access to the latest and greatest version of Photoshop. Major Photoshop updates are released every six months or so, and minor updates and bug fixes are released all the time. So in this first tutorial in my Getting Started with Photoshop series, you'll learn how easy it is to update Photoshop using the Adobe Creative Cloud desktop app.
I show you how to check for Photoshop updates and install them, and how to set up the Creative Cloud app to update Photoshop automatically. You'll also learn how to avoid losing your custom settings when updating to a new version, and how to keep the previous version of Photoshop in case you still need it.
Let's get started!
Step 1: Open the Creative Cloud desktop app
Photoshop is updated using the Creative Cloud desktop app. If you have downloaded and installed Photoshop on your computer, the Creative Cloud app is most likely running in the background. And if it is, the app can be opened just by clicking its icon.
Windows
On a Windows PC, the Creative Cloud icon is found in the system tray in the bottom right of your screen:
Mac
On a Mac, the icon appears in the Menu Bar in the upper right of your screen:
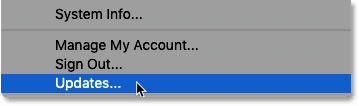
From Photoshop
If the Creative Cloud app is not running in the background, open it from within Photoshop by going up to the Help menu in Photoshop's Menu Bar and choosing Updates:
The Creative Cloud app opens showing the Adobe apps currently installed on your computer. I keep several recent versions of Photoshop installed for comparison, but in most cases, you'll have just the one:

Step 2: Choose the Updates category
To view only the apps that have an update available, choose Updates in the column along the left:

Step 3: Click the Update button
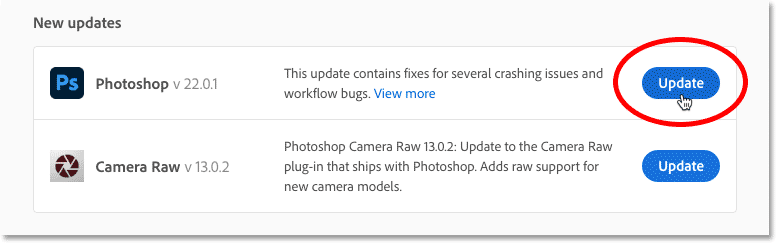
If an update is available for Photoshop, it appears in the New updates section, along with a brief description of what's included in the update. And note the version number next to Photoshop's name. Once the update is complete, we'll confirm that we are in fact running the latest version.
An update may also be available for Photoshop's Camera Raw plugin. But there's no need to update the plugin separately because it updates automatically with Photoshop:

To update Photoshop to the latest version, click the Update button:
Closing Photoshop before updating
If Photoshop is open in the background, a warning message tells you that it needs to be closed before the update can continue. And if Adobe Bridge is open, it needs to be closed as well.
In that case, click the Cancel button, save your work, close Photoshop (and Adobe Bridge), and then try again:

Viewing the update's progress
The update usually takes a few minutes, so the Creative Cloud app displays the progress:

Step 4: Open the updated version of Photoshop
Once completed, the Update button changes to an Open button. Click the button to open Photoshop:

How to confirm that Photoshop has been updated
You can confirm that Photoshop has been updated to the latest version by checking its version number.
On a Windows PC, go up to the Help menu in the Menu Bar. On a Mac, go up to the Photoshop menu. From there, choose About Photoshop:

Photoshop's current version number appears in the upper left of the About Photoshop info box. This number should match the number displayed earlier in the Creative Cloud app:

How to keep Photoshop updated automatically
So that's how to update Photoshop manually. Next I show you how to set up the Creative Cloud app to keep Photoshop up to date automatically, and how to avoid losing your current settings when Photoshop updates to a new version.
Step 1: Open the Creative Cloud app's Preferences
Back in the Creative Cloud app, go up to the File menu on a Windows PC, or the Creative Cloud menu on a Mac, and choose Preferences:

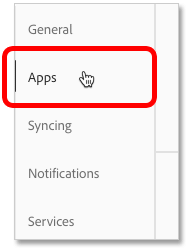
Step 2: Select the Apps category
In the Preferences dialog box, choose the Apps category on the left:
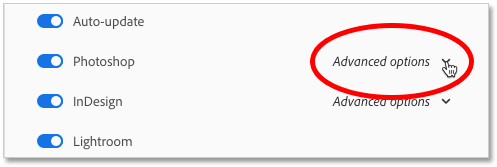
Step 3: Turn on Auto-update
Then make sure the main Auto-update option and the Photoshop option below it are both enabled:

Step 4: Open the Advanced options
Finally, open the Advanced options for Photoshop:
Step 5: Choose your settings
To keep your current Photoshop settings whenever an update is applied, make sure Import previous settings and preferences is checked.
Also, it's a good idea to keep the previous version of Photoshop until you're comfortable with the new version. So I always leave Remove older versions unchecked:

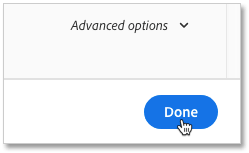
Step 6: Close the Preferences dialog box
Click Done to close the Preferences dialog box, and the next time a new version of Photoshop is released, the update will be applied automatically:
Where to go next...
And there we have it! That's how to use the Creative Cloud desktop app to make sure you're always running the latest and greatest version of Photoshop!
Visit my Getting Started in Photoshop page for the next lessons in this chapter. Or visit my Photoshop Basics section for more topics for beginners.