Save Your Own Adjustment Layer Presets in Photoshop
Photoshop now lets you save adjustment layers as presets that can be instantly applied to other images. Learn how to create, save, export and import adjustment presets with this step-by-step tutorial.
Download the PDF: Save Your Own Adjustment Layer Presets
Photoshop has a great new feature that lets you create and save your own adjustment layer presets. After adding one or more adjustment layers to give your image the desired look, you can save your adjustment layers, along with your custom settings, as a new preset that can be instantly applied to other images.
You can even export and import your adjustment presets to move them between computers or share them with other Photoshop users. Here’s how it works.
Which Photoshop version do I need?
The ability to save your own adjustment presets was added in Photoshop version 25.5.0, released in February 2024.
If you have an active Creative Cloud subscription, make sure to update Photoshop using the Creative Cloud Desktop app.
Let's get started!
How to create and save adjustment layer presets
Here are the steps to create and save your own adjustment layer presets in Photoshop. Once we’ve saved a preset, I’ll show you how to apply it to a different image, as well as how to export the preset to your computer and import it back into Photoshop.
I’ll use this image from Adobe Stock.

1. Add your adjustment layer(s)
Start by adding one or more adjustment layers to your image as you normally would.
For this tutorial, I’ll add two adjustment layers to create a quick Bleach Bypass effect which is often used in movies to give them a high contrast, low saturation look.
Adding a Brightness/Contrast adjustment layer
In the Layers panel, I’ll click the New Fill or Adjustment Layer icon.
Then I’ll choose a Brightness/Contrast adjustment layer from the list.

The adjustment layer appears above the image.
But rather than changing any settings for the adjustment in the Properties panel, I’ll simply change the blend mode of the Brightness/Contrast adjustment to Soft Light.

The Soft Light blend mode increases contrast by darkening the shadows and brightening the highlights.

Related: The top 5 Photoshop blend modes you need to know
Adding a Hue/Saturation adjustment layer
To add the second adjustment layer, I’ll again click the New Fill or Adjustment Layer icon in the Layers panel.

This time I’ll add a Hue/Saturation adjustment layer.

In the Properties panel, I’ll lower the Saturation to -40 to desaturate the color.

Then back in the Layers panel, I’ll change the blend mode of the Hue/Saturation adjustment to Color so that the adjustment affects only the colors in the image, not the brightness.

And we have our quick and easy Bleach Bypass effect.
Since I’ll want to quickly apply this same effect to other images, I’ll save it as a custom preset next.

2. Select the adjustment layers
Select all of the adjustment layers that you want to include in the preset. Note that only adjustment layers can be added to the preset. No other kind of layer will work.
I have two adjustment layers that I need to include. So since the top one (Hue/Saturation) is already selected, I’ll hold the Shift key on my keyboard and click on the bottom one (Brightness/Contrast) to select them both.

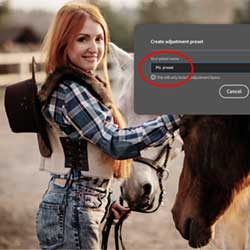
3. Save the adjustment layers as a preset
Open the Adjustments panel. The new Your presets section is where we save and select our custom presets. You’ll find it directly below Adobe's adjustments presets included with Photoshop.

Your presetssection in the Adjustments panel.
To save your new preset, click the plus sign ( + ).

Give your new preset a name. I’ll name it Bleach Bypass
.
Then click Save.

Your new preset’s name and thumbnail appear in the Your presets
section.

How to apply your adjustment preset to an image
Now that we’ve saved an adjustment preset, here’s how to quickly apply it to other images.
I’ll switch to a second image, also from Adobe Stock.

In the Adjustments panel:
- Hover your cursor over the preset to preview how it will look with your new image.
- Click on the preset to apply it.

The preset is instantly applied. In my case, it adds the same Bleach Bypass effect without needing to recreate it from scratch.

In the Layers panel, the preset is added as a layer group, with the preset’s name as the name of the group.
Inside the group are the adjustment layers that were saved with the preset, along with their custom settings and any changes that were made to the blend mode or layer opacity (which I didn’t use here).

Renaming or deleting an adjustment preset
When you hover over a preset in the Adjustments panel, an icon with three dots appears.
Click the icon to reveal the menu. From here you can rename the preset or delete it. You can also export your preset which we’ll look at next.

How to export your adjustment presets
From that same menu, you can export presets to save them to your computer, giving you an easy way to back up your presets, move them to a different computer or share them with other Photoshop users.
- Export Preset will save only the selected preset.
- Export All Custom Presets will save all of your presets as a collection.
I’ll choose Export Preset to save my single preset.

In the Save As dialog box:
- Choose a location to save the preset.
- Rename the preset (optional).
- Click Save.

How to import adjustment presets
Finally, to import a preset (or a presets collection), click the Adjustments panel menu icon.
From the menu, choose Import Presets.

In the Open dialog box, navigate to the preset on your computer, click on it to select it and click Open.

The preset will appear under Your presets
in the Adjustments panel.

And there we have it! That’s how to create, save, export and import your own adjustment layer presets in Photoshop.
Related tutorials:
- The new Adjustment Brush Tool in Photoshop
- Using the new Adjustment Layer Presets in Photoshop
- Image adjustments vs adjustment layers
Don't forget, all of my Photoshop tutorials are now available to download as PDFs!