
New Ways to Add Gradients in Photoshop
Adding gradients to images, shapes and type is now faster and easier than ever with the new Gradients panel in Photoshop CC 2020!
In the previous tutorial, we learned all about the new Gradients panel in Photoshop CC 2020 and the many new and impressive gradients now included with Photoshop. I also showed you how to create and save your own gradients using Photoshop's Gradient Editor.
Along with the new Gradients panel itself, Photoshop CC 2020 also includes new and easy ways to apply gradients, including a great feature that lets you drag and drop gradients from the Gradients panel directly into your document. But exactly how Photoshop applies the gradient depends on which kind of layer you're working with.
So in this tutorial, I'll show you how to drag and drop gradients onto Background layers, pixel layers, shape layers, and type layers. I'll also show you a few keyboard tricks that let you change how the gradient is applied. And along the way, we'll look at how to combine gradients with Photoshop's blend modes to quickly add color effects to an image!
To follow along, you'll need Photoshop CC 2020 or newer. If you're an existing Creative Cloud subscriber, make sure that your copy of Photoshop is up to date.
Let's get started!
How to apply a gradient to the Background layer
The easiest way to apply a gradient in Photoshop CC 2020 is to drag and drop it from the Gradients panel. To target a specific layer, simply drop the gradient directly onto the layer's contents. But just like with color swatches in the improved Swatches panel, Photoshop will apply the gradient in different ways depending on which kind of layer it is. So let's start with the Background layer.
The document setup
Here's an image open in Photoshop. I downloaded this one from Adobe Stock:

In the Layers panel, the image appears on the Background layer, currently the only layer in the document:

How to drag and drop a gradient
To apply a gradient to the Background layer, first choose a gradient in the Gradients panel:

And then drag the gradient's thumbnail from the Gradients panel and drop it onto the image:

The gradient fills the entire document, blocking the contents of the Background layer from view. I'll show you how to blend the gradient with the image in a moment:

Gradients are applied to backgrounds as Gradient fill layers
When applying a gradient to a Background layer, Photoshop keeps the gradient separate from the Background layer's contents by adding the gradient as a Gradient fill layer above the Background layer:

Related: How to draw gradients with the Gradient Tool
How to choose a different gradient
To try a different gradient, first make sure the Gradient fill layer is selected in the Layers panel, and then simply click on a different gradient in the Gradients panel. Photoshop instantly updates the document with the new gradient colors:

How to blend the gradient colors with the image
Obviously, blocking your image with a gradient is not very useful. But combining the Gradient fill layer with one of Photoshop's blend modes is an easy way to add color effects to the image.
For example, I'll change the blend mode of the Gradient fill layer from Normal (the default mode) to Color:

The Color blend mode combines the colors from the gradient with the brightness values of the image. And just like that, we've added an interesting color effect.
Download my Layer Blend Modes Complete Guide PDF to learn all about Photoshop's blend modes:

Lowering the gradient's opacity
If the colors in the gradient are too strong, lower the Opacity value of the Gradient fill layer:

And with the opacity lowered, the effect is now less intense:

How to apply a gradient to a pixel layer
So that's how to apply gradients to the Background layer. Next, let's look at what happens when we drag and drop a gradient from the Gradients panel onto a normal pixel layer. I'll also show you how to access some options not found in the Gradients panel that let you change the appearance of the gradient.
The document setup
For this part of the tutorial, I'll use the same image. But I've used the new Object Selection Tool in Photoshop CC 2020 to select the couple in the photo and copy them to their own layer.
The Layers panel now shows the original image on the Background layer, and a copy of the couple on a separate pixel layer above it:

How to target a specific layer
To target a specific layer when applying a gradient, simply drag and drop the gradient from the Gradients panel directly onto the layer's contents.
Since I want to apply the gradient to the couple, I'll drop the gradient onto them:
And this time, the gradient is applied only to the couple (the contents of the pixel layer). The rest of the image is not affected:
Gradients are added to pixel layers as clipped Gradient fill layers
When applying a gradient to a normal pixel layer, the gradient is added as a Gradient fill layer above the layer. And to keep the gradient from affecting all layers below it, the Gradient fill layer is clipped to the pixel layer using a clipping mask:

How to access the Gradient Fill options
Once you've applied a gradient to a layer, you can access some options that let you change the appearance of the gradient. Double-click on the fill layer's thumbnail:

This opens Photoshop's Gradient Fill dialog box. From here, you can change the gradient Style from Linear (the default) to either Radial, Angle, Reflected or Diamond. You can change the Angle of the gradient, and you can swap the colors in the gradient by checking the Reverse option:

You can also choose a different gradient from the Gradient Fill dialog box by clicking the arrow to the right of the gradient swatch and then selecting a new gradient from the list. These are the same gradients found in the Gradients panel:

Or you can edit the colors of the current gradient by clicking directly on the gradient swatch. This opens Photoshop's Gradient Editor. I covered the Gradient Editor and how to edit gradients in the previous tutorial:

Click OK when you're done to close the Gradient Fill dialog box:

Blending the gradient with the layer
Just like we saw earlier when applying a gradient to the Background layer, we can blend the colors of the gradient with the contents of the layer by changing the blend mode of the Gradient fill layer. Then use the Opacity value to fine-tune the intensity of the colors.
I'll again set the blend mode to Color, and I'll lower the opacity to 75 percent:

And here's my result:

Other ways to apply gradients to pixel layers
Before we move on to shape and type layers, here are a couple of keyboard shortcuts you can use for other ways to apply gradients to pixel layers.
To add a Gradient fill layer above a pixel layer without clipping to the pixel layer, press and hold the Alt (Win) / Option (Mac) key on your keyboard as you drag and drop the gradient onto the pixel layer's contents.
And to apply the gradient as a Gradient Overlay layer effect instead of a Gradient fill layer, press and hold Ctrl+Alt (Win) / Command+Option (Mac) as you drag and drop the gradient:
How to apply gradients to shape layers
So far, we've seen that Photoshop applies gradients as Gradient fill layers when we drag and drop them onto the Background layer or a pixel layer. But that's not what happens when we drop them onto shape layers.
The document setup
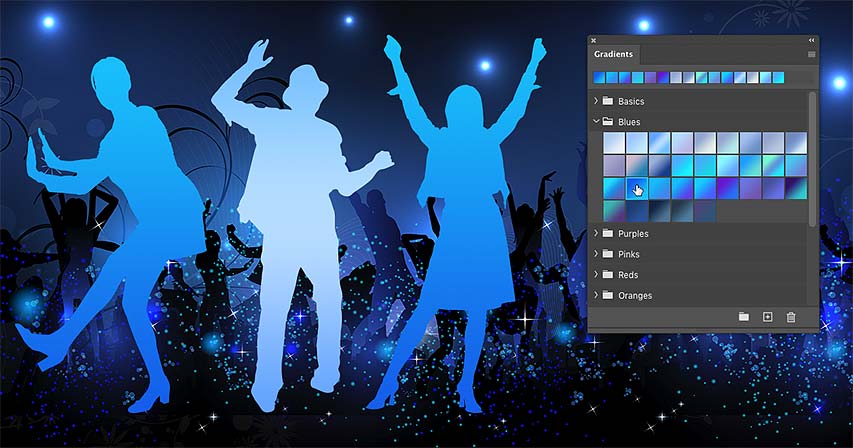
For our look at shape layers, I've created this separate document. The background image was downloaded from Adobe Stock. In front of the image, I've placed three shapes of people. These are just a few of the many new shapes included with Photoshop 2020. And along the bottom, I've added the word "GRADIENTS":

The Layers panel shows the image on the Background layer. Above that, each of the three shapes appears on its own shape layer. And at the top, we see the word "GRADIENTS" on a type layer:

Related: What makes vector shapes better than pixels?
Dragging and dropping a gradient onto a shape
Since my background image is mostly blue, I'll twirl open the Blues set in the Gradients panel. Then I'll drag and drop one of the gradients in the set onto the first shape on the left:

The shape is instantly filled with the gradient:

Gradients are applied directly to shapes
But this time in the Layers panel, notice that we don't see a Gradient fill layer. Instead, Photoshop applied the gradient directly to the shape itself. That's because unlike pixel layers, shape layers support gradient fills.
To open the Gradient Fill dialog box that we looked at earlier, double-click directly on the shape's preview thumbnail:

How to apply gradients to shapes as Gradient fill layers
Even though Photoshop applies gradients directly to shapes by default, you can apply them as Gradient fill layers. Just press and hold the Ctrl (Win) / Command (Mac) key on your keyboard as you drag and drop the gradient onto the shape:

In the document, the result looks the same as before. The second shape is filled with the gradient:

But because I held down my Ctrl (Win) / Command (Mac) key, this time Photoshop added the gradient as a Gradient fill layer that's clipped to the shape layer below it:

How to apply a gradient to a shape as a Gradient Overlay effect
And if you want to apply a gradient to a shape as a Gradient Overlay layer effect, press and hold Ctrl+Alt (Win) / Command+Option (Mac) on your keyboard as you drag and drop the gradient:

Again in the document, the gradient fills the shape:

But the gradient appears in the Layers panel as a Gradient Overlay effect below the shape layer:

The gradient options in the Layer Style dialog box
When applying gradients as Gradient Overlay effects, you can access the options we saw earlier in the Gradient Fill dialog box by double-clicking on the words "Gradient Overlay" in the Layers panel.
Instead of Gradient Fill, this opens Photoshop's Layer Style dialog box where you'll find the same options. You can change the Style of the gradient, adjust the Angle, swap the colors by checking Reverse, and more. Click OK to close the dialog box when you're done:

How to apply gradients to type layers
And finally, let's see what happens when we drag and drop a gradient onto a type layer.
I'll drag a gradient from the Gradients panel and drop it onto my text:

The text instantly updates with the gradient colors:

Gradients are applied to type as Gradient Overlay effects
But unlike shape layers, type layers in Photoshop do not support gradient fills. So in the Layers panel, we see that instead of filling the text directly, Photoshop applied the gradient as a Gradient Overlay layer effect.
You can also apply gradients to type layers as clipped Gradient fill layers by holding Ctrl (Win) / Command (Mac) on your keyboard as you drag and drop the gradient onto the text:

Where to go next
And there we have it! Those are the new ways to apply gradients to pixel layers, shape layers and type layers in Photoshop CC 2020. Check out our Photoshop Basics section for more tutorials. And don't forget, all of our Photoshop tutorials are available to download as PDFs!