
Drag and Drop Color Swatches in Photoshop
Learn how to drag and drop colors directly into your document with the improved Swatches panel in Photoshop CC 2020!
The Swatches panel in Photoshop CC 2020 has been greatly improved with a new and easy way to add colors to your document. We can now drag and drop colors from the Swatches panel directly onto a layer's contents. And we can even add the color as a Solid Color fill layer or as a Color Overlay layer effect, again just by dragging and dropping it!
In this tutorial, we'll look at the changes Adobe made to the Swatches panel in CC 2020, including the new default swatch sets and how to load legacy swatches from previous versions of Photoshop. And then I'll show you all the ways to drag and drop colors into your document, including a few new keyboard tricks!
To follow along, you'll need Photoshop 2020 or newer. If you're already using Photoshop CC, make sure that your copy is up to date.
Let's get started!
The document setup
For this tutorial, I've created a simple document with a couple of flower shapes and some text in front of a white background. The shapes and the text are currently filled with black, but I'll be adding color to them as we go along:

In the Layers panel, we see how my document is set up. The Background layer on the bottom is filled with white. And above the Background layer are the two flower shapes. But the difference between them is that the flower on the left (on the "Flower pixels" layer) is a pixel layer, while the flower on the right (on the "Flower shape" layer) is a shape layer. And finally, the word "swatches" is on a type layer at the top.
In other words, we have four different kinds of layers in this document (a Background layer, a pixel layer, a shape layer, and a type layer). And as we'll see, some layers behave differently than others when we drag and drop colors onto them from the Swatches panel:

See our complete guide to learning Photoshop layers!
A closer look at the Swatches panel in Photoshop CC 2020
But before we start dragging and dropping colors, let's look at how the Swatches panel itself has changed in Photoshop CC 2020.
Where do I find the Swatches panel
By default, the Swatches panel is grouped in with the Color panel, along with the Gradients and Patterns panels which are both new in CC 2020:

If you're not seeing the Swatches panel, you can open it by going up to the Window menu in the Menu Bar and choosing Swatches:

The new default color swatch sets
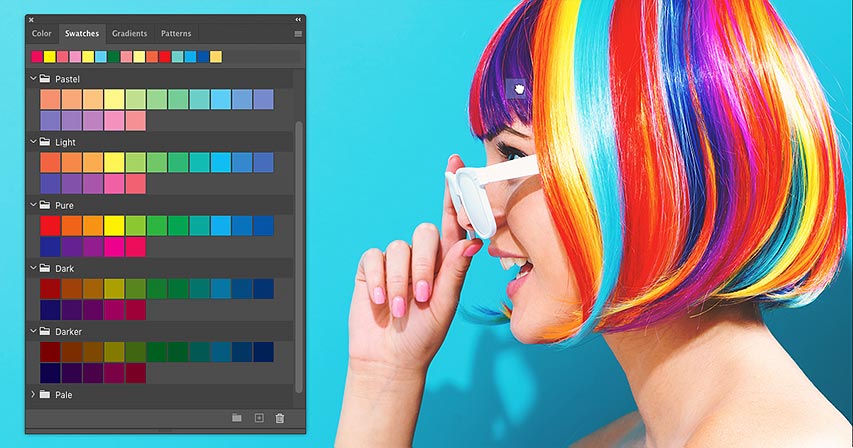
The first thing you'll notice with the Swatches panel in CC 2020 is that the default color swatches are now grouped into sets, and each set is represented by a folder. We have sets for RGB, CMYK and Grayscale colors, along with Light and Dark colors, Pure colors, Pastels, and more:

How to open and close a swatch set
To twirl a set open or closed, click the arrow to the left of the set's folder:

How to open or close all swatch sets at once
Or to open or close all sets at once, press and hold the Ctrl (Win) / Command (Mac) key on your keyboard and then click on the arrow for any of the sets:

How to change the size of the swatch thumbnails
To adjust the size of the thumbnails in the Swatches panel, click the panel's menu icon:
And then choose Tiny, Small or Large Thumbnail. Or you can view the color swatches as a Small or Large List, which includes both the thumbnail and the name of each color:

Your recently-used swatches
The row along the top of the Swatches panel lets you quickly choose from any of your recently-used swatches:

You can hide the recent swatches by clicking the Swatches panel menu icon:
And deselecting Show Recents. Select the same option again to turn the recent swatches back on:

How to load the legacy swatches from previous versions of Photoshop
And finally, along with the new swatches in CC 2020, you can also load the swatches from earlier versions of Photoshop. Click the Swatches panel menu icon:
And then choose Legacy Swatches:

A Legacy Swatches folder will appear below the default folders. Click the folder's arrow to twirl it open and view the legacy sets inside it:

In the next tutorial, I'll show you how to create your own custom swatches and swatch sets. But for now, let's learn all the ways to drag and drop colors from the Swatches panel into your document.
How to drag and drop colors from the Swatches panel
In Photoshop CC 2020, the easiest way to add colors from the Swatches panel is to simply drag and drop the color directly onto a layer's contents. There's no need to select the layer in the Layers panel first. As long as you drop the color onto the layer's contents, Photoshop will automatically select the layer for you.
But exactly how the color is applied depends on which kind of layer it is. Let's start with the Background layer.
Dragging color swatches onto the Background layer
To add a color to the Background layer, click on a color swatch in the Swatches panel and then drag and drop it onto a spot in the document where the Background layer's content is visible.
In my case, my Background layer is filled with white, so I'll drag and drop a swatch onto any area of white:

Release your mouse button to apply the color to the background:

The color is applied as a Solid Color fill layer
But in the Layers panel, notice that the Background layer is not actually filled with the new color. Instead, the color is added as a Solid Color fill layer above the Background layer:

To change the color, simply drag and drop another color from the Swatches panel onto the background. Or with the Solid Color fill layer selected in the Layers panel, just click on a different color in the Swatches panel:

Dragging color swatches onto pixel layers
So color swatches are applied to Background layers as Solid Color fill layers. And the same is true when dragging and dropping colors onto normal pixel layers, but with one important difference.
To add a color to a pixel layer, click on a color in the Swatches panel and drag and drop it directly onto the layer's contents. Again there's no need to select the layer in the Layers panel first. As long as you drop the color onto the layer's contents, Photoshop will select the layer for you.
In my case, I'll drop the color onto the flower on the left, which is on a pixel layer:
Release your mouse button to apply the color to the layer:
The color is applied as a clipped fill layer
In the Layers panel, we again see that the color was added as a Solid Color fill layer above the pixel layer. But this time, the fill layer is clipped to the pixel layer below it.
Because the fill layer is clipped to the pixel layer using a clipping mask, the new color is affecting only that one layer. The Background layer is not affected:
To change the color, drag and drop a different swatch from the Swatches panel onto the pixel layer's contents. Or with the fill layer selected in the Layers panel, just click on a different color in the Swatches panel:
Learn the difference between pixel shapes and vector shapes!
Dragging color swatches onto shape layers and type layers
While Photoshop CC 2020 applies color swatches to Background layers and pixel layers as separate fill layers, that's not the case when we drag and drop swatches onto shape layers or type layers. And since shape and type layers both behave the same way, we'll look at them together.
I'll drag and drop a color from the Swatches panel onto the flower on the right, which is on a shape layer:

And then I'll drag and drop a different color onto the text:

Learn how to choose text colors from images!
The color is applied directly to shapes and text
Notice that this time in the Layers panel, a Solid Color fill layer does not appear above either the shape layer or the type layer. Instead, the color swatches were applied directly to the shape and to the text. The reason is that shape layers and type layers both support color fills, while Background layers and pixel layers do not.
To change the color, drag and drop a different swatch onto the shape or type layer. Or select the layer in the Layers panel and click on a different color in the Swatches panel:

Place images in shapes with the Frame Tool in Photoshop CC
The new Swatches panel keyboard tricks in Photoshop CC 2020
So far, we've seen the default ways that Photoshop applies colors to different kinds of layers when we drag and drop swatches from the Swatches panel. Colors are applied to Background layers as Solid Color fill layers. They're applied to pixel layers as fill layers that are clipped to the pixel layer below them. And when we drag and drop a color onto a shape or type layer, the new color is applied directly to the layer itself.
But the Swatches panel in Photoshop CC 2020 also includes a few keyboard shortcuts that let you change the way colors are applied. So let's finish this tutorial with a quick look at how to use them.
How to apply swatches to shapes or text as fill layers
To apply a color swatch to a shape or type layer as a Solid Color fill layer, press and hold the Ctrl (Win) / Command (Mac) key on your keyboard as you drag and drop the color from the Swatches panel onto the layer's contents.
Here I'm holding Ctrl (Win) / Command (Mac) as I drag a swatch onto the shape layer:

And this time, the original color of the shape remains intact while the new color appears as a clipped Solid Color fill layer above it. Again, this same trick also works with type layers:

How to apply colors as non-clipped fill layers
To apply a color swatch above a pixel, shape or type layer as a Solid Color fill layer that is not clipped to the layer below it, hold Alt (Win) / Option (Mac) as you drag the color onto the layer's contents.
Here I'm holding Alt (Win) / Option (Mac) as I drag a swatch onto the text:

Photoshop adds the color as a Solid Color fill layer above the type layer. But because the fill layer is not clipped to the type layer, it's blocking all of the layers below it from view. This is probably not a trick you'll use very often, but it's there if you need it:

How to create a clipping mask manually
If you made a mistake and meant to apply the color as a clipped fill layer, make sure the fill layer is selected. Then click the Layers panel menu icon in the upper right:
And choose Create Clipping Mask:

And now with the fill layer clipped to the type layer, the new color is applied only to the text:

How to apply color swatches as Color Overlay layer effects
And finally, to apply a color swatch to a pixel, shape or type layer as a Color Overlay layer effect, hold Ctrl+Alt (Win) / Command+Option (Mac) as you drag and drop the color.
Here I'm holding Ctrl+Alt (Win) / Command+Option (Mac) as I drag a color onto the pixel layer's contents:
I'll release my mouse button to drop the color onto the layer:
And in the Layers panel, the new color appears as a Color Overlay layer effect below the layer. The only layer that this trick will not work with is the Background layer, since Background layers do not support layer effects:

See our complete guide to using Layer Effects in Photoshop CC 2020
Where to go next
And there we have it! That's a look at the improved Swatches panel in Photoshop CC 2020 and how easy it is to drag and drop colors into your document! In the next tutorial, I'll show you how to create your own color swatches and how to save them as custom swatch sets.
Or check out our Photoshop Basics section for more tutorials. And don't forget, all of our Photoshop tutorials are available to download as PDFs!