
Photoshop Watercolor Painting Effect
In this Photoshop effects tutorial, we'll learn how to easily make a photo look more like a watercolor painting. This photo effect works best on images where maintaining rich colors and strong contrast is more important than keeping any fine details, since you'll be losing a lot of detail with this effect.
Creating the effect is as simple as duplicating some layers, applying a few filters, and using a few different layer blend modes, and the whole thing takes only a couple of minutes from start to finish. Please note that this tutorial was written for Photoshop CS5 and earlier. Photoshop CC and CS6 users will want to follow along with my updated version which also includes a video of the steps.
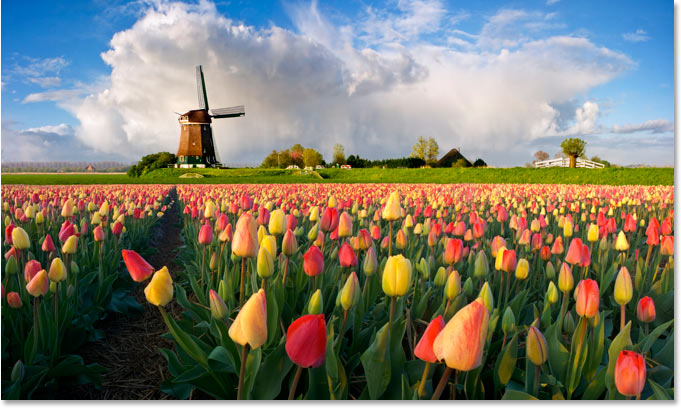
Here's the image I'll be using for this tutorial:
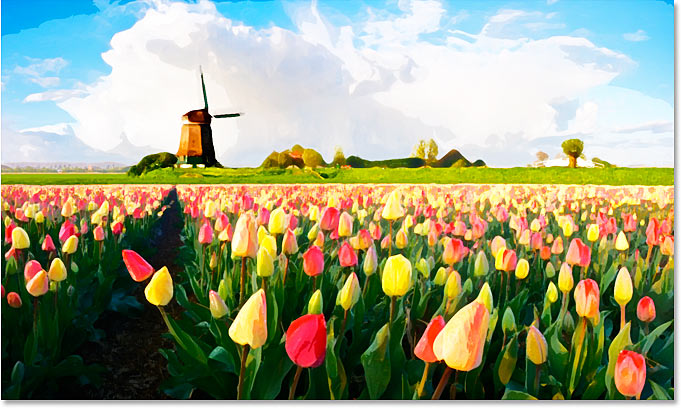
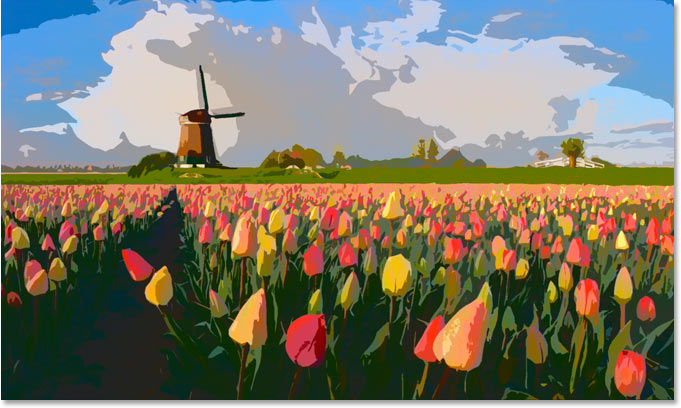
And here's how it will look after applying our watercolor painting effect:
For a video of this tutorial, check out our Photoshop Watercolor Painting Effect on YouTube. Let's get started!
Step 1: Duplicate The Background Layer Three Times
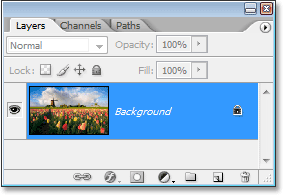
With the image newly opened in Photoshop, if we look in our Layers palette, we can see that we currently have one layer, the Background layer, which contains our image:
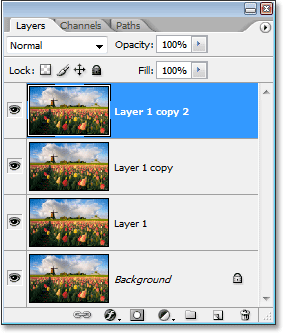
We need to create three copies of the Background layer, so use the keyboard shortcut Ctrl+J (Win) / Command+J (Mac) three times to duplicate the Background layer three times. If we look again in our Layers palette, we can see that we now have four layers, with the original Background layer on the bottom and three copies above it:
Step 2: Turn Off The Top Two Layers
On the far left of each layer in the Layers palette, you'll see a small eyeball icon. This is the Layer Visibility icon, and it determines whether or not the layer is currently visible in the Photoshop document. When the eyeball icon is visible, it means the layer itself is visible. Click on the icon for the top two layers in the Layers palette to temporarily hide them from view inside the document. When you click on the icon, it disappears, letting you know that the layer is no longer visible:
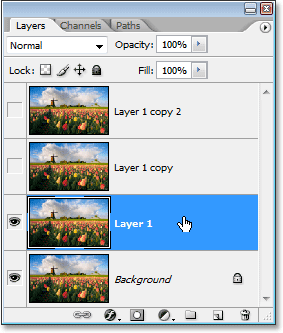
Step 3: Select "Layer 1"
With the top two layers temporarily hidden from view, click on "Layer 1" in the Layers palette to select it. You'll know which layer is selected because the currently selected layer is highlighted in blue:
Step 4: Apply The "Cutout" Filter
The first thing we're going to do is simplify our image, and we can do that using Photoshop's "Cutout" filter. With "Layer 1" selected, go up to the Filter menu at the top of the screen, choose Artistic, and then choose Cutout.
When the Cutout filter's dialog box appears, set the Number of Levels to 4, Edge Simplicity to 4, and Edge Fidelity to 2:
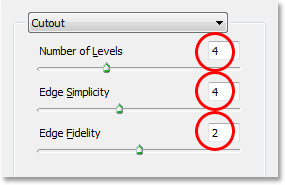
Click OK when you're done to apply the settings and exit out of the dialog box.
Step 5: Change The Blend Mode Of "Layer 1" to "Luminosity"
With "Layer 1" still selected, go up to the Blend Mode options in the top left of the Layers palette. By default, layers are set to the "Normal" blend mode. Click on the down-pointing arrow to the right of the word "Normal" and select the Luminosity blend mode from the bottom of the list:
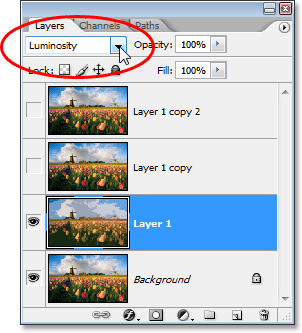
Your image should now look something like this:
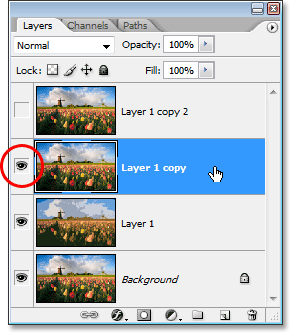
Step 6: Turn On The Layer Above "Layer 1" And Select The Layer
Still in the Layers palette, click inside the empty square where the eyeball icon used to be on the layer directly above "Layer 1" ("Layer 1 copy") to turn that layer back on, so it's visible again inside the document. Turning a layer back on doesn't actually select the layer though, and we need to have it selected as well, so once you've turned the layer back on, click anywhere else on "Layer 1 copy" to select it so it's highlighted in blue:
Step 7: Apply The "Dry Brush" Filter
We're going to add some texture to our image at this point. With "Layer 1 copy" selected and visible once again inside the document, go back up to the Filter menu at the top of the screen, choose Artistic once again, and this time, choose Dry Brush. When the Dry Brush filter's dialog box appears, set the Brush Size to 10, the Brush Detail to 10, and the Texture option to 3:
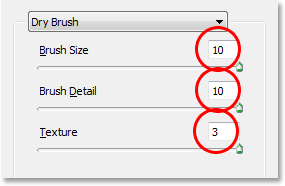
Click OK when you're done to apply the filter and exit out of the dialog box.
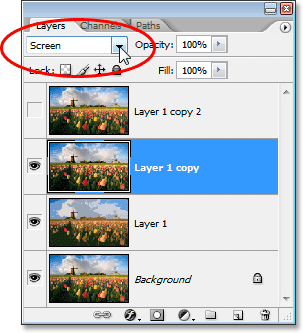
Step 8: Change The Layer Blend Mode To "Screen"
With "Layer 1 copy" still selected, go up to the Blend Mode options once again in the top left of the Layers palette, click on the down-pointing arrow to the right of the word "Normal", and change the blend mode for the layer to Screen:
Your image should now look something like this:
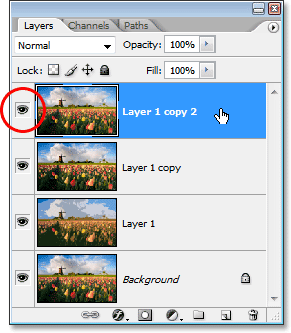
Step 9: Turn On The Top Layer And Select It
Just as we did with "Layer 1 copy" a moment ago, click inside the empty square where the eyeball icon used to be on the top layer in the Layers palette ("Layer 1 copy 2") to turn the layer back on and make it visible once again inside the document. Then click anywhere else on the layer to select it so it's highlighted in blue:
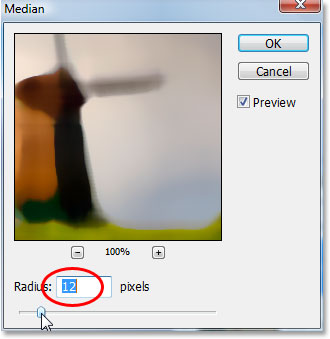
Step 10: Apply The "Median" Filter
With the top layer selected and visible again inside the document, go back up to the Filter menu at the top of the screen, this time choose Noise, and then choose Median. The Median filter will remove even more detail from the image, and the nice thing about it is that it does so without blurring the image so edges remain well defined. When the Median Filter's dialog box appears, set the Radius value at the bottom to 12 pixels:
Click OK when you're done to apply the filter and exit out of the dialog box.
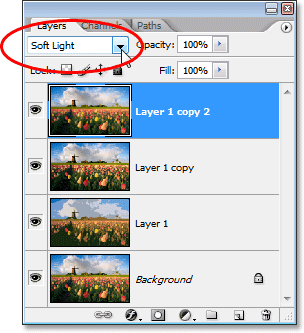
Step 11: Change The Blend Mode Of The Top Layer To "Soft Light"
To complete the effect, with the top layer still selected, go up to the Blend Mode options in the top left of the Layers palette, click again on the down-pointing arrow to the right of the word "Normal", and change the layer's blend mode to Soft Light:
Once you've changed the blend mode to "Soft Light", you're done!
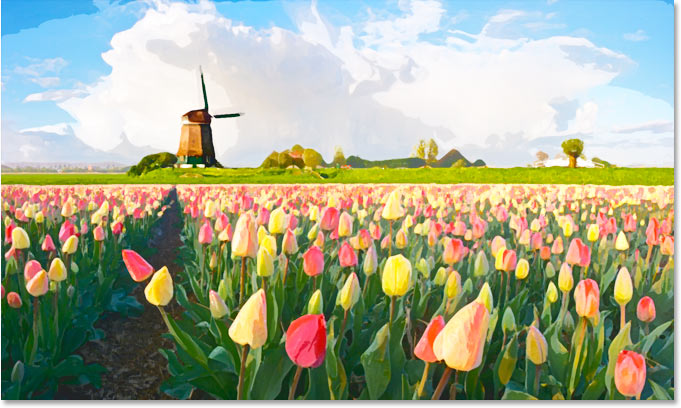
Here's my original image once again for comparison:
And here, after applying the Median filter to the top layer and changing its blend mode to "Soft Light", is my final
"watercolor painting" effect:
Where to go next...
And there we have it! That's how to turn a photo into a watercolor painting with Photoshop! Visit our Photo Effects section for more Photoshop effects tutorials!