Create A Starry Night Sky In Photoshop
Learn how easy it is to fill your night skies with a field of stars in Photoshop! You'll learn how to create stars in Photoshop, how to add a glow and color to the stars, and how to blend the stars effect with your images!
There's nothing quite as peaceful as being outdoors at night, looking up at a clear sky, and seeing an endless field of stars stretching off in all directions. And there are few things as frustrating as trying to capture those stars with your camera. Competing lights from the city or other nearby sources can throw off the exposure and push your stars into darkness. And with our planet always spinning, capturing that faint star light with long exposures often results in a blurry mess.
Thankfully, as we'll see in this tutorial, it's easy to add stars to your images with Photoshop! And since we're creating the stars ourselves, we have complete control over just how "starry" the sky appears. In fact, the techniques we'll be learning here are the same ones used to create star-filled backgrounds in movies. So while the results probably won't fool any astronomers in the family, this star effect is more than realistic enough for pretty much everyone else.
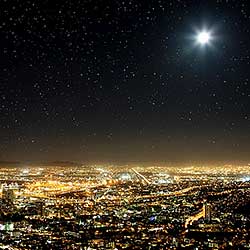
I'll use this image that I downloaded from Adobe Stock:

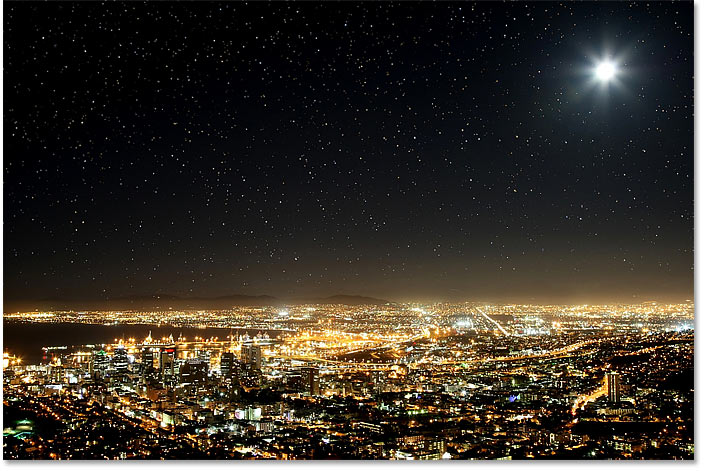
And here's what the final stars effect will look like when we're done:
Let's get started!
How to create stars in Photoshop
For this tutorial, I'm using Photoshop CC but every step is compatible with Photoshop CS6. You can also follow along with my video of this tutorial on our YouTube channel. Or download this tutorial as a print-readyPDF!
Step 1: Add a new blank layer above the image
First, we'll learn how to create stars in Photoshop, and then we'll learn how to blend the stars with your image.
Let's start in the Layers panel where we see our image sitting on the Background layer:

We'll create the stars on a separate layer above the image. To add a new layer, press and hold the Alt (Win) / Option (Mac) key on your keyboard and click the Add New Layer icon:

In the New Layer dialog box, name the layer "Stars", and then click OK:

And back in the Layers panel, the new "Stars" layer appears:

Step 2: Fill the layer with black
We need to fill the "Stars" layer with black. Go up to the Edit menu in the Menu Bar and choose Fill:

In the Fill dialog box, change the Contents option to Black, and then click OK:

And Photoshop fills the layer with black, temporarily blocking the image from view:

Step 3: Add some noise with the Add Noise Filter
To create the stars, we'll add noise using Photoshop's Add Noise filter. Go up to the Filter menu, choose Noise, and then choose Add Noise:

In the Add Noise dialog box, set the Amount to 50%, and make sure that Gaussian and Monochromatic are both selected:

Then click OK to close the dialog box, and Photoshop fills the layer with random noise:

Step 4: Blur the noise with the Gaussian Blur filter
Next, we need to blur the noise, and we can do that using the Gaussian Blur filter. Go up to the Filter menu, choose Blur, and then choose Gaussian Blur:

In the Gaussian Blur dialog box, set the Radius value to 1.5 pixels, and then click OK:

Step 5: Turn the noise into stars with a Levels image adjustment
To turn the noise into stars, we'll use a Levels image adjustment. Go up to the Image menu, choose Adjustments, and then choose Levels:

Dragging the white point slider
In the Levels dialog box, click and drag the white point slider all the way to the left until you reach the right edge of the histogram:

This brightens the noise and makes the brightest areas white:

Dragging the black point slider
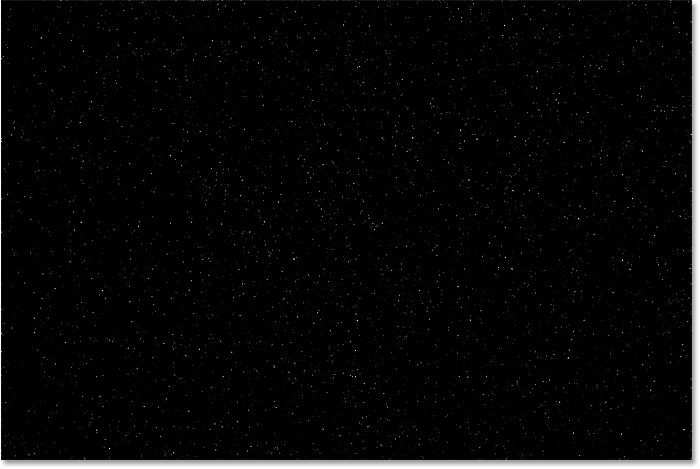
Then click and drag the black point slider towards the right. The further you drag, the more you'll darken the darkest areas of noise, eventually pushing those areas to pure black. Continue dragging to the right until most the noise has disappeared. The remaining noise becomes our stars:

You may need to go back and forth a few times with the white and black sliders until you're happy with the stars effect. I ended up using a white point value of 94 and a black point value of 90. When you're done, click OK to close the Levels dialog box. And here's my result:
Adding a glow to the stars
At the moment, our stars just look like white dots. Let's help them look more like stars by adding a faint glow. Then once we've added the glow, we'll add some color.
Step 6: Make a copy of the "Stars" layer and name it "Glow"
In the Layers panel, make a copy of the "Stars" layer by dragging it down onto the Add New Layer icon:

Photoshop adds the copy above the original and names it "Stars copy":

Double-click on the name "Stars copy" and rename the layer "Glow". Press Enter (Win) / Return (Mac) to accept it:

Step 7: Add more blurring with the Gaussian Blur filter
With the "Glow" layer selected, go back up to the Filter menu, choose Blur, and once again choose Gaussian Blur:
This time in the Gaussian Blur dialog box, increase the Radius value to 4 pixels. This will blur the stars and they'll look too faint, but we'll fix that next:
Step 8: Brighten the stars with Auto Contrast
To brighten the stars, go up to the Image menu and choose Auto Contrast:

This makes the blurred stars too bright:

Step 9: Lower the opacity of the "Glow" layer
So to darken the effect, simply lower the opacity of the "Glow" layer in the Layers panel until you see just a faint glow around the stars. An opacity value of 20-25% should work:

Here's a closer view of my stars showing the faint glow around them:

Adding color to the stars
Next, let's add some color to the stars, and we'll do that using a Hue/Saturation adjustment layer. Stars often appear as either blue or a reddish-orange, so we'll start by adding blue.
Step 10: Add a Hue/Saturation adjustment layer
In the Layers panel, click the New Fill or Adjustment Layer icon:
And then choose Hue/Saturation from the list:

Step 11: Select "Colorize" and set the Hue to 220
The options for the Hue/Saturation adjustment layer appear in Photoshop's Properties panel. First, select the Colorize option, and then set the Hue value to 220 for a light blue. You can also increase the intensity of the color by raising the Saturation value, but I'll leave mine set to 25:

Step 12: Change the adjustment layer's blend mode to Color
Back in the Layers panel, the Hue/Saturation adjustment layer appears above the "Glow" layer. To change the color of the stars without affecting their brightness, change the blend mode of the adjustment layer from Normal to Color:

And here's my stars now colored in blue:

Step 13: Make a copy of the Hue/Saturation adjustment layer
Along with blue, we'll also add some orange to the stars. In the Layers panel, make a copy of the Hue/Saturation adjustment layer by dragging it down onto the Add New Layer icon:

Step 14: Change the Hue value to 40
And in the Properties panel, change the Hue value for the second Hue/Saturation adjustment layer to 40. Leave the other options the same:

Back in the Layers panel, we see the second adjustment layer sitting above the original. Notice that the blend mode is already set to Color:

And here we see my stars, now colored in orange. The problem is, they're all colored in orange, and we've lost all of our blue stars. So we'll fix that next:

Step 15: Apply the Clouds filter to the layer mask
A nice feature of adjustment layers in Photoshop is that they include a built-in layer mask. To add randomness to the color of the stars, so some appear blue and others orange, we'll apply Photoshop's Clouds filter to the second adjustment layer's mask.
In the Layers panel, make sure the layer mask for the top adjustment layer is selected by clicking the layer mask thumbnail:

The Foreground and Background colors
Before we apply the Clouds filter, also make sure that Photoshop's Foreground and Background colors are set to the defaults, with white as the Foreground color and black as the Background color. If they're not, press the letter D on your keyboard to reset them:

Tip: How to apply a more intense Clouds filter
The Clouds filter will fill the layer mask with random areas of white, black and gray. But by default, the result is more gray than anything else. To push more of the effect to pure white and pure black, press and hold the Alt (Win) / Option (Mac) key on your keyboard. Then with the key held down, go up to the Filter menu, choose Render, and then choose Clouds.
Note that on a Windows PC, you'll need to keep your mouse button held down from the moment you click on the Filter menu until you reach the Clouds filter, otherwise the menu will keep disappearing on you:

With the Clouds filter applied to the layer mask, we now have a nice mix of blue and orange stars:

How to view the layer mask in the document
To view the layer mask itself in the document so you can see what the Clouds filter has done, press and hold the Alt (Win) / Option (Mac) key on your keyboard and click the layer mask thumbnail:

And here we see the random pattern that the Clouds filter created. The white areas on the mask are where the orange color from the top Hue/Saturation adjustment layer is visible, and the black areas are where the blue color from the bottom adjustment layer is showing through:

To switch back to viewing the stars, hold Alt (Win) / Option (Mac) and click again on the layer mask thumbnail:
This hides the mask and brings back the stars:
Related: Photoshop's layer mask tips and tricks!
How to blend the stars with the image
So now that we've created the stars, let's learn how to blend the stars in with the image.
Step 16: Place all four layers into a layer group
The first thing we need to do is take all four layers that make up our stars effect (the "Stars" and "Glow" layers, plus the two Hue/Saturation adjustment layers) and place them into a layer group.
With the top Hue/Saturation adjustment layer selected in the Layers panel, press and hold your Shift key and click on the "Stars" layer. This selects all four layers at once:

Then click on the menu icon in the top right corner of the Layers panel:
And choose New Group from Layers:

Name the group "Stars", and then click OK:

And the new layer group appears above the image on the Background layer:

Step 17: Change the blend mode to Lighten or Screen
To blend the stars in with the image, change the blend mode of the layer group from Pass Through to either Lighten or Screen. Depending on the image, Screen may give you a brighter result. If it's too bright, go with Lighten:

Lighten vs Screen - What's the difference?
The difference between the Lighten and Screen blend modes is that Screen combines the brightness of both the stars and the image to create an even brighter effect, while Lighten only reveals the stars in areas where the stars are brighter than the image. In my case, the Lighten blend mode helps to blend the stars more naturally with the light from the city and from the moon:

Related: The Top 5 blend modes you need to know!
Step 18: Add a layer mask to the "Stars" group
To finish off the effect, all we need to do is hide the stars in the areas where we don't want them to appear, which is everywhere except the sky. And to do that, we'll paint those areas away using a layer mask.
With the "Stars" layer group selected in the Layers panel, click the Add Layer Mask icon:

A layer mask thumbnail appears, letting us know that the mask has been added. And since the layer mask is filled with white, the stars remain visible throughout the image:

Step 19: Select the Brush Tool
Select the Brush Tool from the Toolbar:

Step 20: Set your Foreground color to black
Then press the letter X on your keyboard to swap your Foreground and Background colors, making your Foreground color (your brush color) black:

Step 21: Paint with black to hide the stars
In the Options Bar, make sure that the Mode (your brush's blend mode) is set to Normal, and that Opacity and Flow are both set to 100%:

Then simply paint over the areas in the image where you want to hide the stars. To change your brush size from the keyboard, use the left and right bracket keys ( [ and ] ). The left bracket key makes the brush smaller, and the right bracket key makes it larger.
Here I'm painting over the city along the bottom of the image to hide the stars from that area:

Viewing your layer mask
To view your layer mask and see exactly where you've painted, press and hold Alt (Win) / Option (Mac) on your keyboard and click on the layer mask thumbnail:

And here we see the areas on the mask where I've painted with black. The black is where the stars are now hidden, and the white is where they remain visible. To switch back to viewing the image, hold Alt (Win) / Option (Mac) and click again on the layer mask thumbnail:

How to fix a mistake
If you make a mistake and paint away the stars in an area where you meant to keep them, press X on your keyboard to set your brush color to white and paint over the area to bring the stars back. Then press X again to set your brush color to black and continuing painting over other areas.
Step 22: Clean up the edges
Finally, if you look around the edges of your image, you may see a few rough spots where it looks like there's too many stars clumped together:

To clean up those areas, make your brush smaller by pressing the left bracket key ( [ ) a few times on your keyboard. And then, with black still as your brush color, paint along the edges to hide those stars:

The Stars effect - Before and after
To see a "before and after" comparison of the Stars effect, you can toggle the "Stars" layer group on and off by clicking its visibility icon in the Layers panel:
With the layer group turned off, we see the original image without the stars:
And with the layer group turned on, we see my final Photoshop stars effect:
And there we have it! That's how to add stars to your images with Photoshop! Check out our Photo Effects section for more tutorials! And don't forget, all of our tutorials are now available to download as PDFs!