Snowflakes Photo Border In Photoshop
In this Photoshop photo effects tutorial, we'll learn how to create a simple snowflakes photo border, which can be a fun finishing touch for photos of family and friends during the holidays or of any snowy winter scene.
I'll be using Photoshop CS5 here, but any recent version of Photoshop will work.
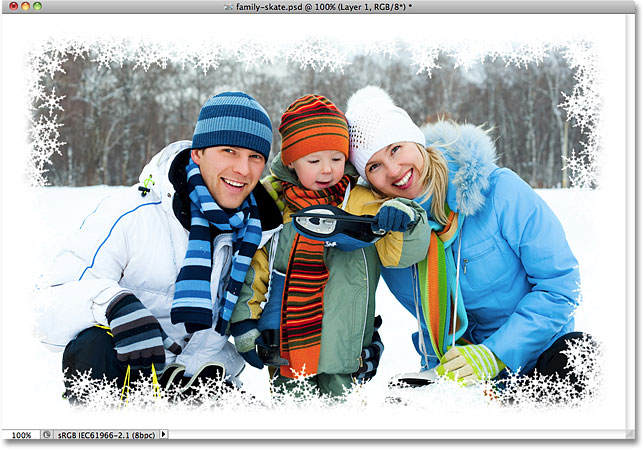
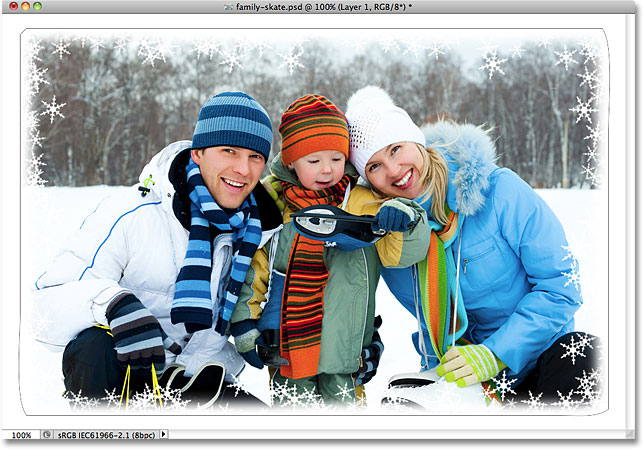
Here's what the final result will look like:

How To Create A Snowflakes Photo Border In Photoshop CS5
Step 1: Create A New Photoshop Document
Photoshop ships with a ready-made snowflake brush that we could use for our effect, but its default size is a little too small for our purposes here, and increasing a brush beyond its default size makes it look soft and dull. Since we want everything to look nice and sharp, we'll quickly create our own, larger snowflake brush using one of Photoshop's built-in custom shapes (if you've already completed our Holiday Photo Border tutorial, you may already have a custom snowflake brush ready to use, in which case you can skip to Step 8).
First, we'll need a document to create the brush in, so go up to the File menu in the Menu Bar along the top of the screen and choose New:
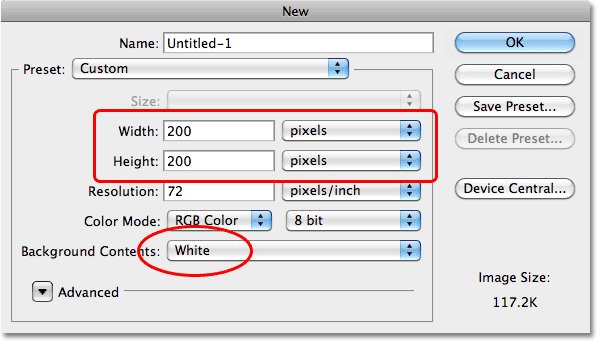
This opens the New Document dialog box. Enter 200 pixels for both the Width and Height, and make sure the Background Contents option is set to White, then click OK to exit out of the dialog box. A new 200x200 pixel document, filled with white, will appear on your screen:
Step 2: Select The Custom Shape Tool
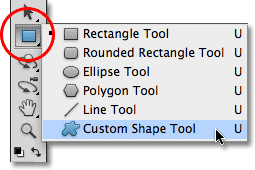
Select the Custom Shape Tool from Photoshop's Tools panel. By default, it's nested behind the Rectangle Tool, so click on the Rectangle Tool and hold your mouse button down for a second or two until a fly-out menu appears, then select the Custom Shape Tool from the list:
Step 3: Load The Nature Shape Set
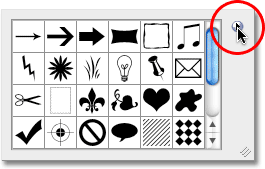
Not only does Photoshop ship with a ready-made snowflake brush, it also ships with a few snowflake custom shapes that we can choose from. We just need to load in the set that contains these shapes. To do that, with the Custom Shape Tool selected, right-click (Win) / Control-click (Mac) anywhere inside the new document to quickly access the Shape Picker, then click on the small arrow in the top right corner:
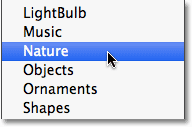
Clicking on the arrow opens a menu with lots of additional shape sets ready to be loaded in to Photoshop. The one we're looking for is the Nature set. Click on it to select it:
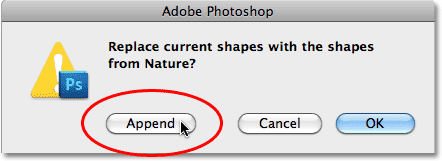
Photoshop will ask if you want to replace the current shapes with the Nature shapes or if you'd rather just append them to the list, which will add them below the original shapes. Click the Append button:
Step 4: Select One Of The Snowflake Shapes
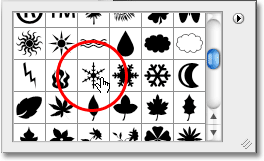
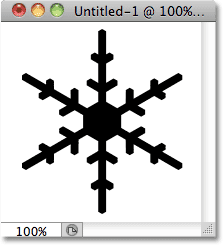
Scroll through the list of thumbnails until you see the snowflake shapes (there's three of them in a row). If you have Tool Tips enabled in Photoshop's Preferences, the name of each shape will appear when you hover your mouse over its thumbnail. We only need one of the snowflake shapes for our photo border, so pick your favorite of the three by clicking on its thumbnail to select it, then press Enter (Win) / Return (Mac) to close out of the Shape Picker. I'm going to choose the first snowflake (the one on the left):
Step 5: Select The Fill Pixels Option
Photoshop gives us three different types of shapes that we can draw - vector shapes, paths and pixel-based shapes. We can switch between the types by selecting them in the Options Bar. Since we're going to create a brush out of the snowflake shape, and brushes are made of pixels, we'll draw pixel-based shapes. Click on the Fill Pixels icon in the Options Bar (the one on the right) to select it:
Step 6: Drag Out A Snowflake
Make sure your Foreground color is set to black by pressing the letter D on your keyboard, which resets Photoshop's Foreground and Background colors to their defaults (black is the default Foreground color). Then, click near the top left corner inside the document, hold down your Shift key, then drag out a snowflake shape. Holding down the Shift key as you drag constrains the aspect ratio of the shape so it doesn't look distorted. If you need to reposition the shape as you're drawing it, hold down your spacebar, move the shape into position with your mouse, then release your spacebar and continue dragging:
Step 7: Create A Brush From The Shape
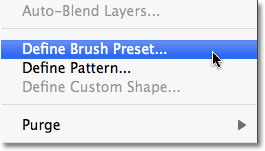
Go up to the Edit menu at the top of the screen and choose Define Brush Preset:
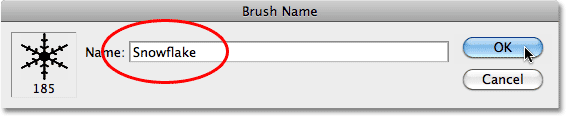
Name the new brush "Snowflake" when the Brush Name dialog box appears, then click OK to close out of it. You can also close out of the snowflake shape's document window at this point since we no longer need it (there's no need to save it if Photoshop asks):
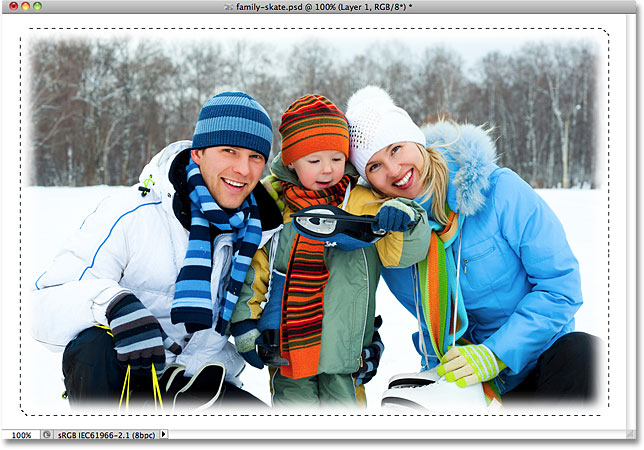
Step 8: Open Your Photo
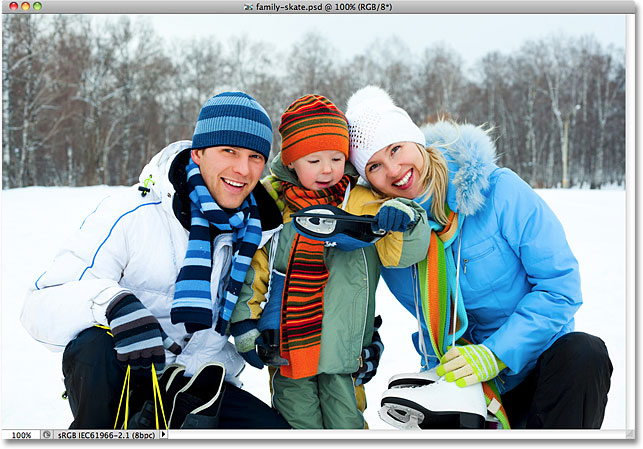
With the snowflake brush created, open the photo you want to add the border to. Here's the image I'll be using:
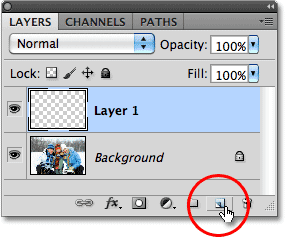
Step 9: Add A New Blank Layer
Click on the New Layer icon at the bottom of the Layers panel to add a new blank layer above the Background layer. Photoshop names the new layer "Layer 1":
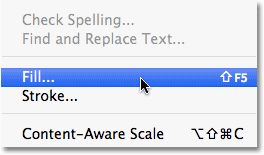
Step 10: Fill The New Layer With White
Go up to the Edit menu at the top of the screen and choose Fill:
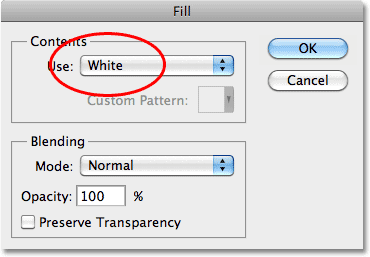
This opens the Fill dialog box. Change the Use option to White, then click OK to close out of the dialog box. The document will appear filled with white:
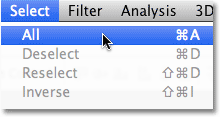
Step 11: Select The Area Where The Photo Will Appear
Go up to the Select menu and choose All. This selects the entire document, placing a selection outline around the edges:
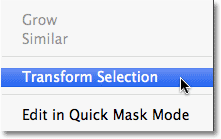
With the document now selected, go back up to the Select menu and this time, choose Transform Selection:
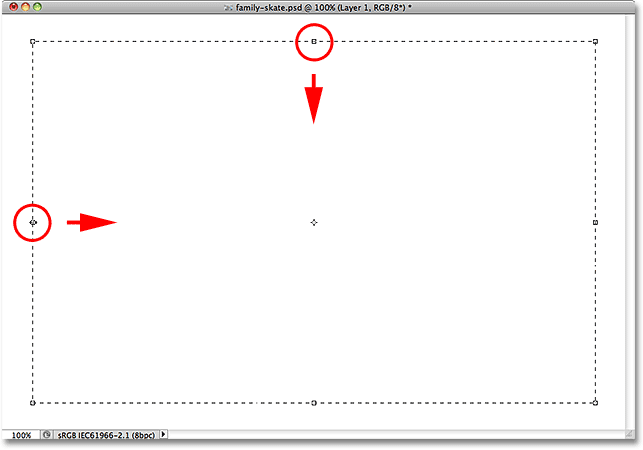
The Transform Selection command lets us resize or reshape the selection outline itself without affecting whatever is inside the selection. Click on the top transform handle (the little square), hold down your Alt (Win) / Option (Mac) key, then drag the handle a short distance inward towards the center of the document so there's roughly a half inch between the selection outline and the document's outer edge. By holding down the Alt / Option key as you drag, you'll resize the selection outline from its center, causing the bottom transform handle to move at the same time. Then, do the same thing with the left transform handle, holding down Alt / Option and dragging it inward, leaving the same amount of space between the selection outline and the edge of the document. The right handle will move in at the same time. Press Enter (Win) / Return (Mac) when you're done to accept the change:
Step 12: Delete The Area Inside The Selection
Press Backspace (Win) / Delete (Mac) on your keyboard to delete the white area inside the selection, revealing the photo underneath. Leave the selection outline active:

Step 13: Expand The Selection
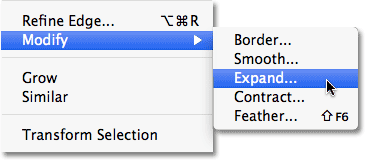
We need to make the selection outline a little bigger. We could use the Transform Selection command again, but there's an even easier way. Go back up to the Select menu, choose Modify, then choose Expand:
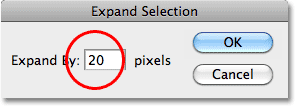
When the Expand Selection dialog box appears, enter a value of around 20 pixels, then click OK:
The edges of the selection will expand outward by 20 pixels. Notice that the corners of the selection outline, which were sharp a moment ago, have become rounded. This is a drawback to using the Expand Selection command and why it's not always the best choice for making selection outlines larger, but for our purposes here, the rounded corners won't cause us any problems:

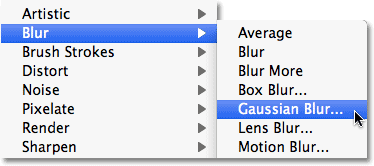
Step 14: Apply The Gaussian Blur Filter
Next, we need to soften the edges of the photo border, creating a smooth transition between the border and the image in the center, and we can do that by blurring it (the border, not the image). Go up to the Filter menu at the top of the screen, choose Blur, then choose Gaussian Blur:
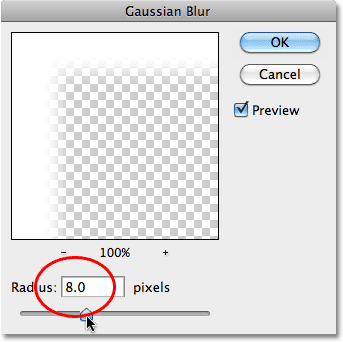
When the Gaussian Blur dialog box appears, increase the Radius value for the blur to around 8 pixels, which should soften the border edges nicely, then click OK to close out of the dialog box:
The border edges now appear softer. Once again, leave the selection outline active since we still need it. In fact, it's going to become the path for our snowflakes:
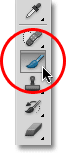
Step 15: Select The Brush Tool
Select the Brush Tool from the Tools panel:
Step 16: Select The Snowflake Brush
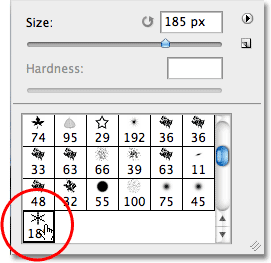
With the Brush Tool selected, right-click (Win) / Control-click (Mac) anywhere inside the document to quickly open the Brush Picker, then scroll through the thumbnails until you find the snowflake brush we just created. It should be the last one in the list. Click on it to select it, then press Enter (Win) / Return (Mac) to close out of the Brush Picker:
Step 17: Set The Brush Dynamics Options
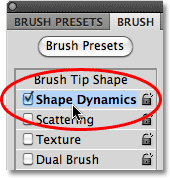
Press F5 on your keyboard to quickly open Photoshop's full Brushes panel, then click directly on the words Shape Dynamics in the left column of the panel. Make sure you click directly on the words, not just inside the checkbox, otherwise you'll turn Shape Dynamics on but won't be given access to its options:
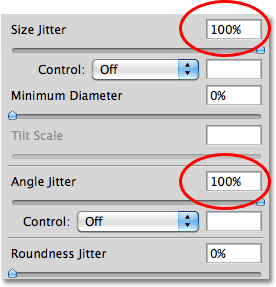
With Shape Dynamics selected, set both the Size Jitter and Angle Jitter options to 100%, which will add lots of randomness to the size and rotation angle of the snowflakes:
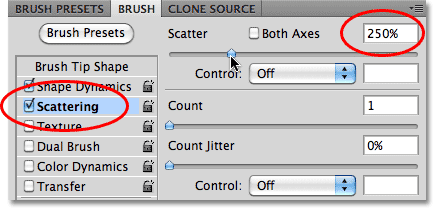
When you're done setting the Shape Dynamics options, click directly on the word Scattering in the left column of the Brushes panel, then increase the Scatter value to around 250%, which will randomly scatter the snowflakes around instead of them all appearing in a straight line. When you're done, press F5 once again to close out of the Brushes panel:
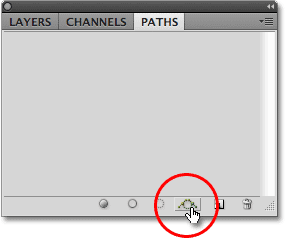
Step 18: Convert The Selection Outline Into A Path
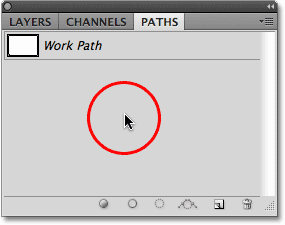
Switch over to your Paths panel, which is grouped in with the Layers and Channels panels (click on the name tabs at the top to switch between the panels). Then click on the Make Work Path From Selection icon at the bottom of the Paths panel:
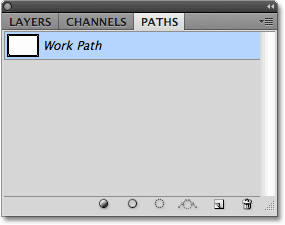
Photoshop will convert the selection outline into a path, and a Work Path will appear in the Paths panel. The term "work path" simply means it's a temporary path. We could make it permanent by saving the path, but there's no need:
If we look at the image in the document window, we see that the selection outline has been replaced by a thin, solid line, which is our path:

Step 19: Set The Foreground Color To White And Lower The Brush Size
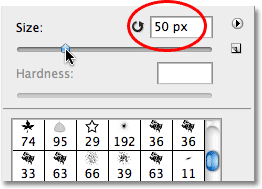
Press the letter X on your keyboard to swap Photoshop's Foreground and Background colors, which will set the Foreground color to white (Photoshop paints with the current Foreground color). Then, right-click (Win) / Control-click (Mac) anywhere inside the document to once again bring up the Brush Picker and lower the Size of the brush down to around 50 px (pixels), since the default size of our snowflake brush is too large for our photo border effect. Press Enter (Win) / Return (Mac) when you're done to close out of the Brush Picker:
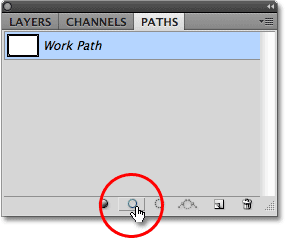
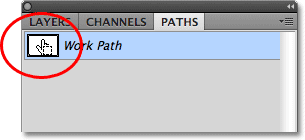
Step 20: Stroke The Path With The Snowflake Brush
Finally, click on the Stroke Path With Brush icon at the bottom of the Paths panel:
The first snowflakes appear around the image, scattered along the path:
Depending on the size of the image you're working with, you may find that the current brush size is too large or too small. If that's the case, press Ctrl+Z (Win) / Command+Z (Mac) to undo the initial snowflakes, then simply use the left and right bracket keys on your keyboard to change the brush size. Pressing the left bracket key ( [ ) makes the brush smaller while the right bracket key ( ] ) makes it larger. Once you've resized your brush, click on the Stroke Path With Brush icon to try again. It may take a few attempts with different brush sizes to get it right.
After adding your initial snowflakes, click the Stroke Path With Brush icon a few more times to add additional snowflakes to the border. When you're happy with the results, click anywhere in the empty gray area below the Work Path in the Paths panel to hide the path from view inside the document:
Note that the Stroke Path With Brush option is grayed out and unavailable when the path is not visible in the document. If you want to add more snowflakes, you'll first need to make the path visible again by clicking on the Work Path's thumbnail in the Paths panel:
Here, after clicking the Stroke Path With Brush icon three more times to add additional snowflakes, is my final result: