
Holiday Greeting Card Photo Border With Photoshop
In this Photoshop tutorial, we'll learn how to create a simple and fun holiday greeting card-style photo border! Photoshop ships with some great snowflake shapes that we can use in our design, and we'll convert them into brushes so we can add variety to our border with snowflakes of different sizes, angles and opacity levels!
We'll use a layer mask to cut out the area where the photo will appear, and a layer style to add a thin border around the photo itself. We'll finish things off by adding some traditional "Happy Holidays" text along the bottom to give our photo border more of a greeting card look to it.
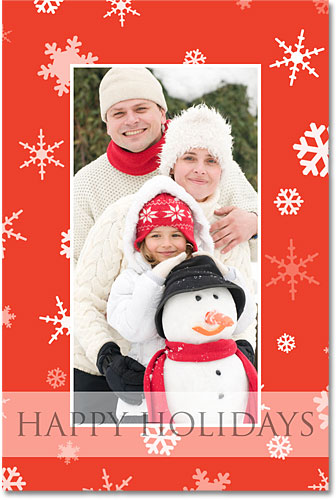
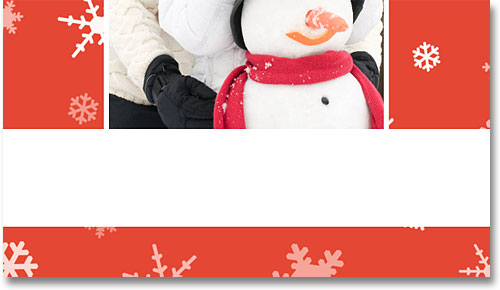
I'll be using Photoshop CS5 here, but any recent version of Photoshop will work. Here's what the final result will look like:
How To Create A Holiday Greeting Card Photo Border
Step 1: Create A New Photoshop Document
Before we begin work on the photo border itself, let's start by creating some snowflake brushes to use in our design. We'll need a new Photoshop document, so go up to the File menu in the Menu Bar along the top of the screen and choose New:

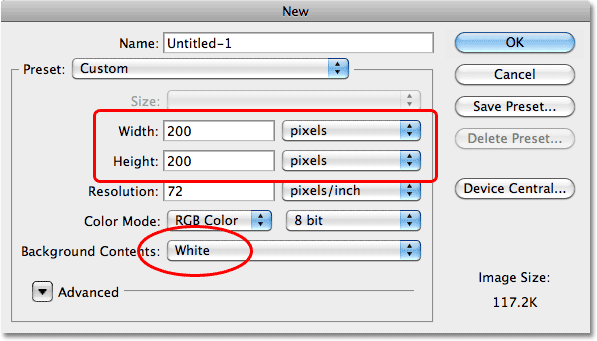
This opens the New Document dialog box. Enter 200 pixels for both the Width and Height of the new document, and make sure the Background Contents option is set to White. Click OK when you're done to close out of the dialog box. A new 200x200 pixel document, filled with white, will appear on your screen:
Step 2: Select The Custom Shape Tool
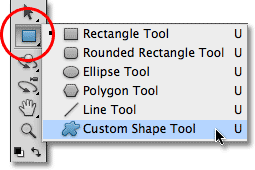
Photoshop ships with a few ready-made snowflake shapes that we can use. To access them, select the Custom Shape Tool from the Tools panel. By default, it's hiding behind the Rectangle Tool, so click on the Rectangle Tool and hold your mouse button down for a second or two until a fly-out menu appears, then select the Custom Shape Tool from the list:
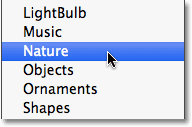
Step 3: Load The Nature Shape Set
With the Custom Shape Tool selected, right-click (Win) / Control-click (Mac) anywhere inside the document window to quickly access the Shape Picker, then click on the small arrow in the top right corner of it:
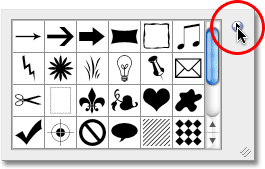
Clicking on the arrow opens a menu with various options, along with a list of additional shape sets that we can load into Photoshop. Click on the Nature shape set to select it, which is the set that contains the snowflakes:
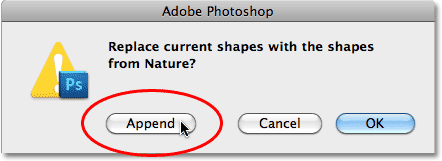
Photoshop will ask if you want to replace the current shapes with the Nature shapes or if you'd rather just append them to the list, which will add them below the original shapes. Click the Append button:
Step 4: Select The First Snowflake Shape
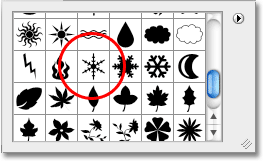
With the Nature shapes now loaded, scroll down through the small shape thumbnails until you see the snowflakes (there's three of them in a row). Click on the first snowflake's thumbnail (the one on the left) to select it. If you have Tool Tips enabled in Photoshop's Preferences, you'll see the shape's name, "Snowflake 1", appear when you hover your mouse over the thumbnail. Once you've selected the snowflake shape, press Enter (Win) / Return (Mac) to close out of the Shape Picker:
Step 5: Select The Fill Pixels Option
Photoshop gives us three different types of shapes that we can draw - vector shapes, paths and pixel-based shapes. We can switch between the types by selecting them in the Options Bar. We're going to be creating brushes out of the snowflake shapes, and since brushes are made of pixels, we'll draw pixel-based shapes. Click on the Fill Pixels icon in the Options Bar (the one on the right) to select it:
Step 6: Draw A Snowflake
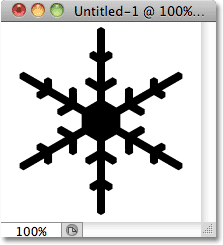
When creating a brush in Photoshop, black areas in the document become the brush itself while white areas become transparent, which means that even though snowflakes are usually white (and they'll be white in our photo border later on), we'll need to draw a black snowflake against our white background if we want to create a brush from it. Press the letter D on your keyboard to quickly reset Photoshop's Foreground and Background colors to their defaults, which sets the Foreground color to black. Then, click in the center of the document and, with your mouse button still held down, begin dragging outward to draw the snowflake shape.
As soon as you begin dragging, hold down Shift+Alt (Win) / Shift+Option (Mac), then continue dragging. Make sure you wait until after you've started dragging before holding down these keys (if you see your cursor temporarily switch to the Eyedropper Tool, it's because you held the keys down too early). Holding the Shift key down will constrain the dimensions of the snowflake so it doesn't end up looking tall and thin or short and fat, while the Alt (Win) / Option (Mac) key tells Photoshop to drag the shape out from its center. Drag out the largest snowflake you can fit inside the document window, then release your mouse button, then the keys (once again, make sure you release the keys after you release your mouse button). If you need to reposition the snowflake as you're drawing it, hold down your spacebar, drag the shape around inside the document, then release the spacebar and continue:
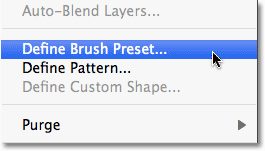
Step 7: Create A Brush From The Snowflake
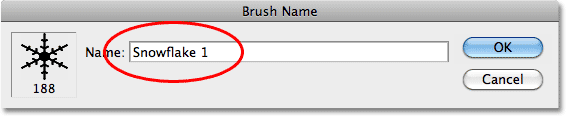
With the first snowflake in place, go up to the Edit menu at the top of the screen and choose Define Brush Preset:
Name the new brush "Snowflake 1" in the Brush Name dialog box, then click OK to exit out of the dialog box:
Step 8: Create Brushes From The Other Two Snowflake Shapes
And with that, our first snowflake brush has been created! We still need to make brushes out of the other two snowflake shapes, so first, press Ctrl+Z (Win) / Command+Z (Mac) to undo the snowflake we just drew in the document window. You should see only the solid white background. Then repeat Steps 4 - 7 for each of the other two snowflake shapes. Right-click (Win) / Control-click (Mac) inside the document window to bring up the Shape Picker and click on the next snowflake's thumbnail to select it. Make sure the Fill Pixels option is selected in the Options Bar. Click in the center of the document and begin dragging out the snowflake shape, then hold down Shift+Alt (Win) / Shift+Option (Mac) and continue dragging out the largest snowflake that will fit inside the document. Go up to the Edit menu and choose Define Brush Preset, then name the new brush either "Snowflake 2" or "Snowflake 3" depending on which one you're creating. Remember to press Ctrl+Z (Win) / Command+Z (Mac) after you've created the "Snowflake 2" brush to clear it from the document before drawing the third snowflake shape.
Once you've created the third snowflake brush, you can close out of the document window since we no longer need it. Our snowflake brushes are now ready to go. We'll be creating a brand new Photoshop document for our holiday photo border next.
Step 9: Create Another New Photoshop Document
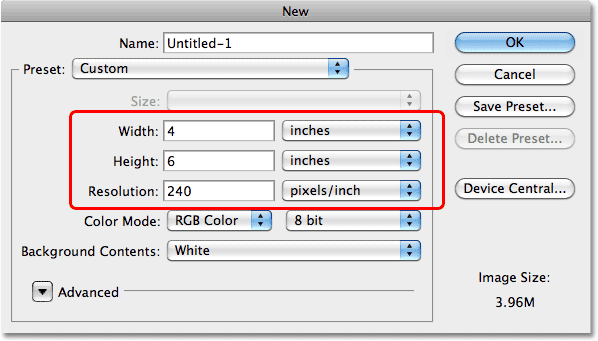
Let's create another new Photoshop document, this time for our holiday photo border. Just as we did previously, go up to the File menu at the top of the screen and choose New to bring up the New Document dialog box. I'm going to use a standard photo size of 4x6 for my document, and since the photo I'll be using is in portrait orientation, I'll enter 4 inches for the Width and 6 inches for the Height. You may need to enter a different size (5x7, 8x10, etc.) for your document, but make sure you set the measurement type to inches, not pixels. Finally, since I'll want to print my final result, I'll enter a Resolution value of 240 pixels/inch. Click OK when you're done to exit out of the dialog box. The new document will appear on your screen:
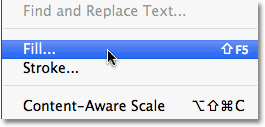
Step 10: Fill The Background Layer With Black
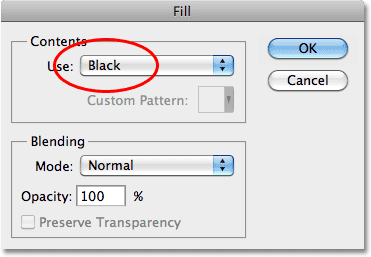
At the moment, our document background is white. Let's fill it with black, which will make it easier later on to see the area where the photo will appear. Go up to the Edit menu at the top of the screen and choose Fill:
This brings up the Fill dialog box. Change the Use option at the top of the dialog box to Black, then click okay to exit out of it. Photoshop will fill the document with solid black:
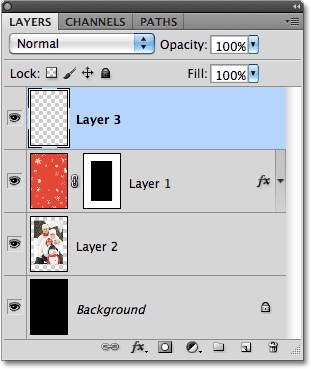
Step 11: Add A New Blank Layer
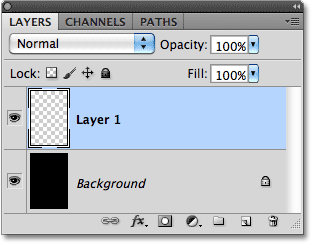
Click on the New Layer icon at the bottom of the Layers panel (second icon from the right, beside the Trash Bin):
This adds a new layer above the Background layer. Photoshop names the new layer "Layer 1":
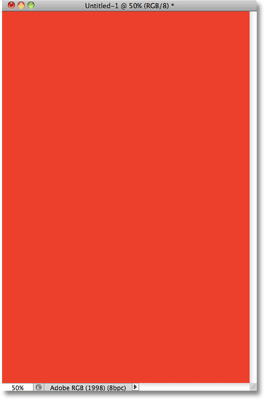
Step 12: Fill The New Layer With Red
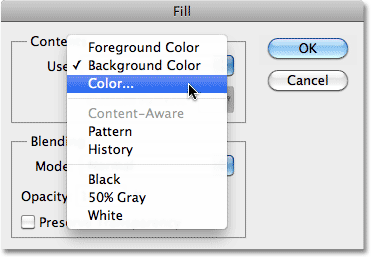
Let's fill our new layer with red, which will become the main color of our photo border. Go back up to the Edit menu and once again choose Fill. This time when the Fill dialog box appears, change the Use option to Color:
As soon as you select Color, Photoshop pops open the Color Picker where we can choose the color we want to fill the layer with. Choose a bright, holiday shade of red:
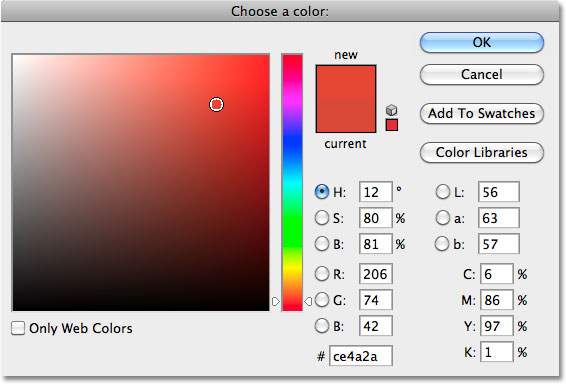
Click OK when you're done to close out of the Color Picker, then click OK to close out of the Fill dialog box. The document becomes filled with red:
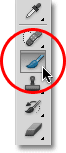
Step 13: Select The Brush Tool
We're ready to add some snowflakes to the document. Select Photoshop's Brush Tool from the Tools panel:
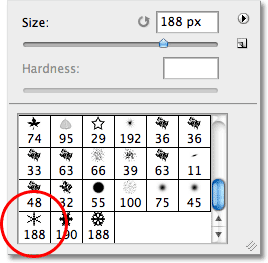
With the Brush Tool selected, right-click (Win) / Control-click (Mac) anywhere inside the document to quickly bring up the Brush Picker, just as we brought up the Shape Picker earlier when the Custom Shape Tool was selected. Scroll through the brush tip thumbnails until you see the three snowflake brushes we just created. They should be at the bottom of the list. Click on the first one, "Snowflake 1", to select it, then press Enter (Win) / Return (Mac) to close out of the Brush Picker:
Step 14: Set The Brush Dynamics Options In The Brushes Panel
The Brush Picker gives us quick access to our main brush tips, but to access everything Photoshop's brushes have to offer, we need the full size Brushes panel. Press F5 on your keyboard to bring up the Brushes panel. I'm using Photoshop CS5 here so my Brushes panel will look a little bit different than what you'll see in earlier versions of Photoshop, but most of the options are still the same. If you are using Photoshop CS5, make sure the Brush tab is selected at the top of the panel.
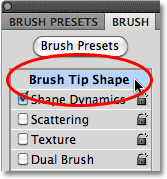
We're going to use Photoshop's Brush Dynamics to add variety to our snowflakes as we paint them onto the photo border. Click directly on the words Shape Dynamics in the left column of the panel. Make sure you click on the words themselves, not in the checkbox beside the words, otherwise you won't get access to the options:
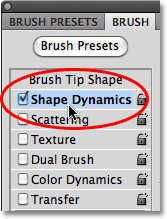
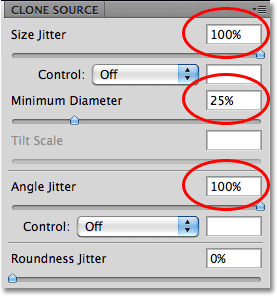
When the Shape Dynamics options appear, increase the Size Jitter and Angle Jitter to 100%, which will give us lots of variety in the size and angle of the snowflakes. Set the Minimum Diameter to 25%, which will prevent any of the snowflakes from being too small:
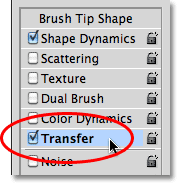
Next, if you're using Photoshop CS5, click directly on the word Transfer on the left of the dialog box. In CS4 and earlier, click on the words Other Dynamics:
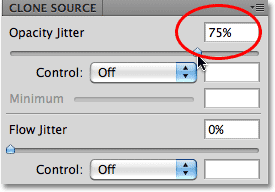
This switches the main area of the Brushes panel to show options for the opacity and flow of the brush (along with some Photoshop CS5-specific options we don't need to look at here). Increase the Opacity Jitter option to 75%, which will randomly change the transparency level of the snowflakes as we add them (without making any of them completely invisible). When you're done, press F5 once again on your keyboard to close out of the Brushes panel for now:
Step 15: Add The First Snowflakes
With the "Snowflake 1" brush selected and the various Brush Dynamics options all set, we're ready to add our first batch of snowflakes to the document. We want our snowflakes to be white this time, not black as they were earlier, so press the letter X on your keyboard to swap the Foreground and Background colors, which makes the Foreground color white (Photoshop paints with the current Foreground color). Press F on your keyboard to switch Photoshop to the first of its full screen modes, which will make it easier to add snowflakes right along the edges of the document (you can get back to the document window mode by pressing F a couple more times).
Normally when we paint with a brush, we click and drag with the mouse to add paint strokes, but that's not what we want to do here. Instead, to add snowflakes, simply click in random spots around the document. Each time you click, you'll "stamp" a snowflake in that spot. Thanks to the Brush Dynamics we set a moment ago, each snowflake will appear at a random size and angle, and with a random transparency level. Here, I've added some initial snowflakes to the document by clicking in different spots. There's no need to add any snowflakes in the center of the document since that's where the photo will be going:

To add snowflakes right along the edge of the document, move your brush into the gray area surrounding the document (assuming you pressed F to switch to full screen mode) so that only part of the brush extends over it, then click to add the snowflake.
As you hover your mouse cursor over the document, it shows an outline of the brush at the largest size a snowflake will appear. If you need it to be larger or smaller, use the left and right bracket keys on your keyboard to change the brush size. Press the left bracket key ( [ ) to make it smaller or the right bracket key ( ] ) to make it larger. If you make a mistake or don't like something about the last snowflake you added, press Ctrl+Z (Win) / Command+Z (Mac) to undo it, or press Ctrl+Alt+Z (Win) / Command+Option+Z (Mac) repeatedly to undo multiple snowflakes.
Step 16: Add The Second Type Of Snowflake To The Document
When you're ready to add the second type of snowflake, press F5 to once again bring up the main Brushes panel, then click directly on the words Brush Tip Shape at the top of the left column:
Select the second snowflake brush from the list by clicking on its thumbnail, then press F5 to close out of the Brushes panel again:
All of the Brush Dynamics options we set for the initial snowflake brush will still be active with our new brush, so click again in random spots in the document to add the second type of snowflake:

Step 17: Add The Third Type Of Snowflake
Press F5 again to bring back the Brushes panel and click on the third snowflake brush's thumbnail to select it, then press F5 to close out of the Brushes panel:
Again, all of our Brush Dynamics options will still be active, so click in random spots to add the third type of snowflake:

Step 18: Go Back And Add Additional Snowflakes If Needed
At this point, you may want to go back and add more of the first two types of snowflakes to the document (you may not have added enough the first time). Just pres F5 to bring up the Brushes panel, select the snowflake brush you want by clicking on its thumbnail, press F5 to close out of the Brushes panel, then click around the document to add more snowflakes:

Step 19: Select The Area Where The Photo Will Appear
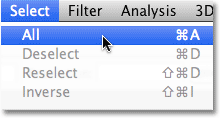
With the snowflakes now added, we're ready to cut out the area where the photo will appear. Go up to the Select menu at the top of the screen and choose All. This will select the entire document (you'll see a selection outline appear around the edges):
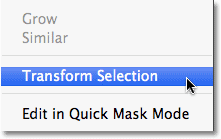
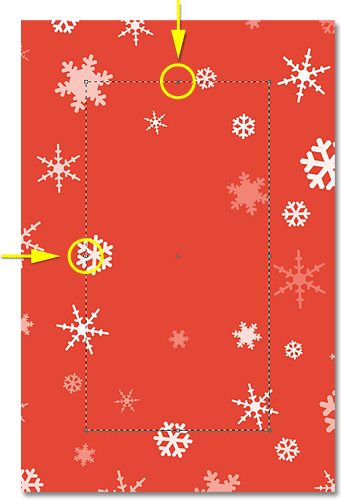
With the document selected, go back up to the Select menu and this time, choose Transform Selection:
Hold down your Alt (Win) / Option (Mac) key, then click on the top transform handle (the little square) and, with your mouse button still held down, drag the top of the selection outline down about an inch or so from the top of the document. Holding the Alt (Win) / Option (Mac) key as you drag tells Photoshop to move the bottom edge of the selection outline at the same time. Then, with Alt / Option still held down, click on either the left or right transform handle and drag it inward the same distance from the edge (the opposite side will move along with it), so that you have an equal amount of space between the selection outline and the edge of the document on all sides. This area will become the photo border, while the area inside the selection outline is where the photo will appear. Press Enter (Win) / Return (Mac) when you're done to accept the transformation:
Step 20: Add A Layer Mask
With the selection around the photo area in place, once again hold down your Alt (Win) / Option (Mac) key and click on the Layer Mask icon at the bottom of the Layers panel:
Normally when we add a layer mask with a selection active, the area inside the selection remains visible while everything outside the selection is hidden from view, but the Alt (Win) / Option (Mac) key told Photoshop to do the opposite, leaving the area outside the selection visible while hiding the area inside it. If we look in the document, we see that the area where the photo will appear has been cut out from the layer (it's still there, just not visible), revealing the solid black from the Background layer below it:

Step 21: Add A White Stroke Around The Photo Area
Click on the Layer Styles icon at the bottom of the Layers panel:
Select Stroke from the list of layer styles that appears:
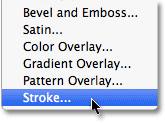
This brings up Photoshop's Layer Style dialog box set to the Stroke options in the middle column. Click on the color swatch to the right of the word Color, which opens the Color Picker, and choose white for the color of the stroke. Click OK to close out of the Color Picker when you're done. Make sure the Position option is set to Outside, then set the Size of the stroke to around 10 pixels (px). Click OK when you're done to close out of the Layer Style dialog box:
A thin white border now appears around the photo area:

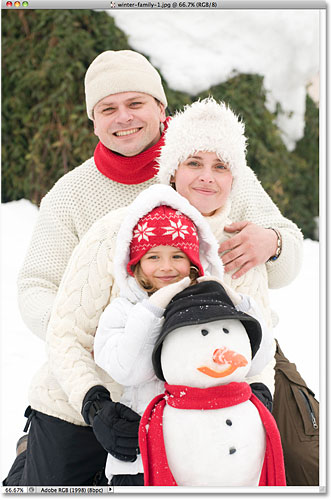
Step 22: Open The Photo To Place Inside The Border
Open the photo you want to add inside the border. Here's the image I'll be using:
Step 23: Copy And Paste It Into The Photo Border
Press Ctrl+A (Win) / Command+A (Mac) to quickly select the entire image, then press Ctrl+C (Win) / Command+C (Mac) to copy the image to the clipboard. Switch back over to the photo border document and click on the Background layer in the Layers panel to select it:
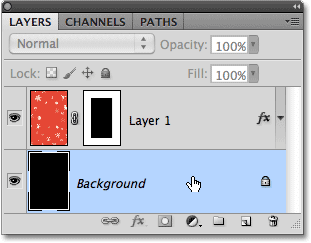
Press Ctrl+V (Win) / Command+V (Mac) to paste the photo into the document. Photoshop will place the photo on its own layer between the Background layer and the photo border layer (Layer 1) in the Layers panel, and if we look in the document, we see that the image appears inside the photo area (although it's too big at the moment but we're about to fix that):
Step 24: Resize The Photo With Free Transform
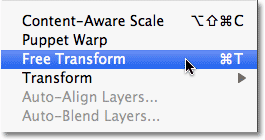
Go up to the Edit menu and choose Free Transform:
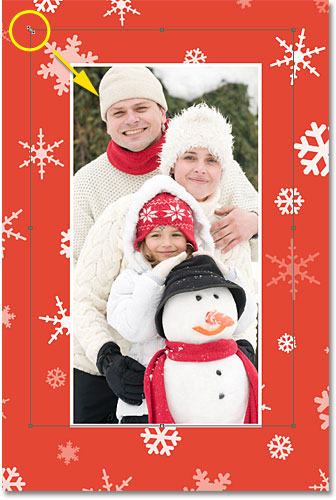
This places the Free Transform box and handles around the photo, similar to the Transform Selection handles we saw earlier, except that Free Transform resizes the image itself, not the selection outline. Hold down your Shift key, which will constrain the aspect ratio of the photo as you're resizing it, then click on any of the corner handles and drag them inward to resize the image so it fits better inside the photo area. If you can't see all of the handles because the photo is too big, press Ctrl+0 (Win) / Command+0 (Mac), which will instantly zoom the document out so that everything fits on the screen. You can also zoom in and out by pressing Ctrl+- (Win) / Command+- (Mac) to zoom out or Ctrl++ (Win) / Control++ (Mac) to zoom in.
If you need to reposition the image inside the photo area, click anywhere inside the Free Transform bounding box and drag the image around with your mouse. When you're happy with how everything looks, press Enter (Win) / Return (Mac) to accept the transformation:
Step 25: Add A New Layer Above The Others
You could stop here if all you wanted was the snowflakes border, but I'm going to finish things off by adding some traditional "Happy Holidays" text along the bottom to give it more of a holiday greeting card look. First, we need to add a new layer above the others, so click on Layer 1 in the Layers panel to select it, then click on the New Layer icon at the bottom of the Layers panel:
A new blank layer will appear above Layer 1:
Step 26: Draw A Rectangular Selection Along The Bottom And Fill It With White
Let's create a background for our text. Select the Rectangular Marquee Tool from the Tools panel:
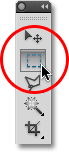
Draw a rectangular selection, about an inch or so tall, along the bottom of the photo border so that the top half of the selection extends over the bottom of the photo, like so:
With the selection in place, go up to the Edit menu and once again choose Fill. When the Fill dialog box appears, change the Use option to White:
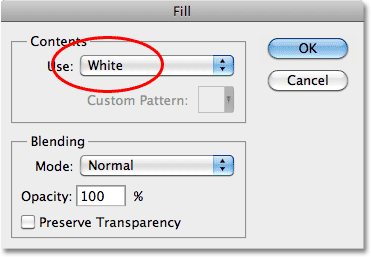
Click OK to close out of the dialog box, then press Ctrl+D (Win) / Command+D (Mac) to remove the selection outline from the document. The selected area is now filled with white:
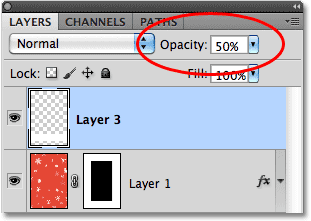
Step 27: Lower The Opacity Of The Layer
Let's lower the opacity of the white area so it blends in with the photo and border underneath it. You'll find the Opacity option in the top right corner of the Layers panel. Lower it to 50%:
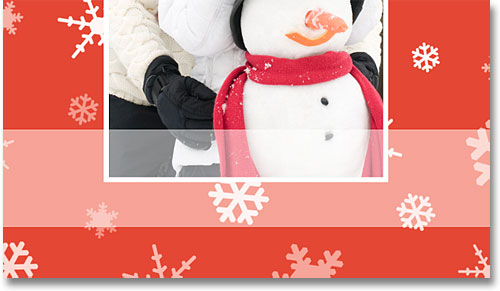
Here's what it should look like with the opacity lowered:
Step 28: Add Your Text
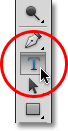
Select Photoshop's Type Tool from the Tools panel:
With the Type Tool selected, choose your font from the Options Bar along the top of the screen. I'm going to use Trajan Pro, with an initial size of 24 pt. Don't worry about getting the size right for now since we'll fix it after we've added the text:
Press the D key on your keyboard to reset the Foreground color to black, then click inside the white background area we added a moment ago and add your text. I'll type "HAPPY HOLIDAYS", all in caps:

Click on the checkmark in the Options Bar when you're done to accept the text:

Step 29: Move And Resize The Text If Needed With Free Transform
Press Ctrl+T (Win) / Command+T (Mac) to quickly bring up the Free Transform box and handles around the text, then hold down your Shift key and drag any of the corner handles to resize the text as needed, just as we did earlier with the image inside the photo area. To move the text into position, click anywhere inside the Free Transform bounding box and drag it into place with your mouse. Press Enter (Win) / Return (Mac) when you're done to exit out of Free Transform:

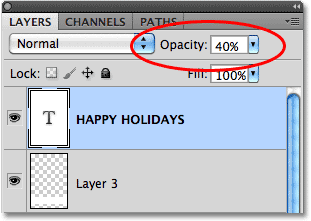
Step 30: Lower The Opacity Of The Text
Finally, lower the opacity of the text to around 40%:
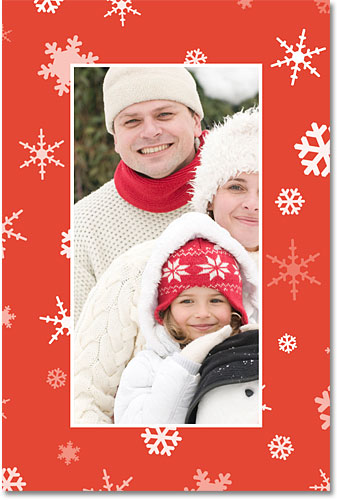
And with that, we're done! Here is the final "holiday greeting card" photo border result: