
Portrait Photo To Color Sketch With Photoshop
In this Photo Effects tutorial, we'll learn how to easily convert a portrait photo into a pencil sketch with Photoshop. The initial sketch will appear in black and white, but at the end of the tutorial, we'll learn how to colorize it with the photo's original colors! In the next tutorial, we'll learn a slightly different way to convert an image into a sketch, one that's usually better suited for objects or landscape photos.
This version of the tutorial is for Photoshop CS5 and earlier. Photoshop CS6 and CC (Creative Cloud) users will want to check out the fully updated version.
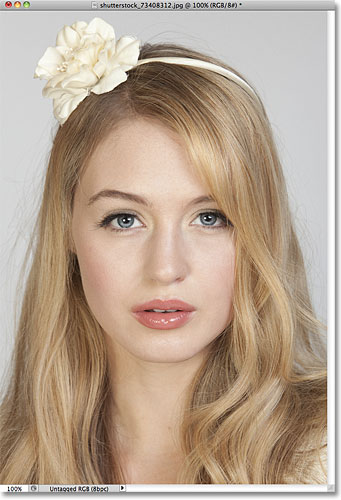
Here's the photo I'll be starting with:
Here's how it will look when we're done:
The text version of this tutorial continues below the video. Please note that the video below is from the updated Photoshop CC version of the tutorial but everything I cover in the video is fully compatible with Photoshop CS5 and earlier.
How To Turn A Photo Into A Sketch With Photoshop
Step 1: Duplicate The Background Layer
The first thing we should do before starting on the effect is make a copy of the original image so we don't harm it in case we need it later. With the photo newly opened in Photoshop, we see in the Layers panel that the image is sitting on the Background layer:

Go up to the Layer menu in the Menu Bar along the top of the screen, choose New, then choose Layer via Copy. Or, for a faster way to run the same command, press Ctrl+J (Win) / Command+J (Mac) on your keyboard:

Either way tells Photoshop to make a copy of the layer, which it names "Layer 1", and place it above the Background layer. Notice that Layer 1 is highlighted in blue, which tells us it's the active layer. Anything we do next will happen to the copy of the image on Layer 1, leaving the original on the Background layer unharmed:

Step 2: Desaturate The Image
Go up to the Image menu at the top of the screen, choose Adjustments, then choose Desaturate:

The Desaturate command instantly removes all color from the image, giving us a quick black and white version:

Step 3: Duplicate The Layer
Next, we need to make a copy of our desaturated image. Go back up to the Layer menu, choose New, then choose Layer via Copy, or press Ctrl+J (Win) / Command+J (Mac) on your keyboard, just as we did in Step 1. Photoshop makes a copy of Layer 1, names it "Layer 1 copy", and places it directly above Layer 1 in the Layers panel:

Step 4: Invert The Image
Go back up to the Image menu at the top of the screen, choose Adjustments, then choose Invert:

This inverts the colors in the image, or in our case the brightness values, making light areas dark and dark areas light, leaving us with a photo negative effect:

Step 5: Change The Blend Mode To Color Dodge
At the top of the Layers panel, you'll find the Blend Mode option. It doesn't actually say "Blend Mode" anywhere but it's the drop-down box that's set to Normal by default. Click on the word Normal, which opens a list of layer blend modes, and choose Color Dodge from the list:

The document will temporarily appear filled with white. Depending on your image, there may be some areas of black here and there, but for the most part it will be filled with white:

Step 6: Apply The Gaussian Blur Filter
This next step is where we actually create the sketch effect. Go up to the Filter menu at the top of the screen, choose Blur, then choose Gaussian Blur:

This opens the Gaussian Blur filter's dialog box. We create the sketch effect by blurring the layer. Begin dragging the Radius slider at the bottom of the dialog box towards the right to apply a slight amount of blurring. As you drag, you'll see the sketch effect appearing in the document. The further you drag the slider, the more blurring will be applied and the more intense the sketch effect will become. If you drag the slider too far, though, too much of the original photo will show through and it won't look like a sketch anymore.
There's no specific Radius value to enter since the amount of blurring you use will depend on what you think looks good for your image, so make sure you keep an eye on your document to judge the results as you drag the slider. For my image, I'll set my Radius value to around 12 pixels or so:

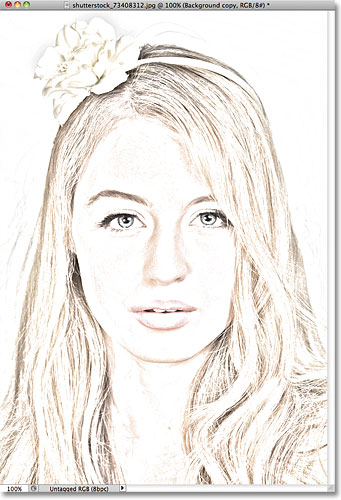
Here's what my initial sketch effect looks like:

Step 7: Merge The Layers Onto A New Layer
Hold down the Alt (Win) / Option (Mac) key on your keyboard and with the key still held down, go up to the Layer menu at the top of the screen and choose Merge Visible:

Normally, the Merge Visible command would essentially flatten our image by merging all of our existing layers down onto a single layer, but by holding down Alt (Win) / Option (Mac) while choosing Merge Visible, we told Photoshop to keep all of our initial layer intact, merging them on to a new layer (Layer 2) above the originals:

Step 8: Change The Blend Mode To Multiply And Adjust The Layer Opacity
Go up to the Blend Mode option at the top of the Layers panel and change the blend mode for the merged layer from Normal to Multiply. This will darken the lines in the sketch effect. If you find the effect is now too dark, lower the Opacity value, which is to the right of the Blend Mode option. Keep an eye on the image as you adjust the opacity to fine tune the results. I'm going to lower mine down to 50%:

Here's my result after darkening the effect:

Step 9: Duplicate The Background Layer
At this point, the sketch effect is complete and if you're happy with it in black and white, you can stop here. If you want to add color to the sketch, continue on with these last few steps. We're going to colorize the sketch using the colors from the original photo. Our original photo is on the Background layer, so we'll need to make a copy of it. Click on the Background layer in the Layers panel to select it:

With the Background layer selected, go up to the Layer menu, choose New, then choose Layer via Copy, or press Ctrl+J (Win) / Command+J (Mac). Photoshop makes a copy of the layer, names it "Background copy" and places it directly above the original:

Step 10: Move The Background Copy Above The Other Layers
To use this Background copy layer to colorize our sketch, we need to move it above the other layers. We can jump it straight to the top of the layer stack by pressing the keyboard shortcut Shift+Ctrl+] (Win) / Shift+Command+] (Mac). The ] is the right bracket key. With the Background copy layer now at the top, the original image will once again appear in the document window:

Step 11: Change The Blend Mode To Color
To mix the colors of the original image in with the sketch effect, change the blend mode for the Background copy layer from Normal to Color:

The Color blend mode mixes the colors from the current layer with the brightness values of the layers below it, giving us our colorized sketch effect:

Step 12: Lower The Opacity
Finally, if you find the color looks too intense, simply lower the Opacity value at the top of the Layers panel to fine-tune the results. I'll lower mine down to 65%:

With the opacity lowered, here is my final result: