
Portrait Photo To Pencil Sketch With Photoshop CS6
Learn how to turn any portrait image into a black and white or color pencil sketch using Photoshop CS6.
In this tutorial, we'll learn how to easily turn a portrait photo into a pencil sketch, both in black and white and in color, using Photoshop CS6. If you're using Photoshop CC, check out the updated Photoshop CC version.
This version of the tutorial, fully updated from the original version, features a more flexible, non-destructive way to create the sketch effect by taking advantage of Photoshop's Smart Filters and adjustment layers, along with some handy layer blend modes.
We'll start by learning how to convert the photo into a black and white sketch (and how to keep the effect fully editable with Smart Filters), then we'll finish things off by learning how to colorize our sketch using colors from the original image.
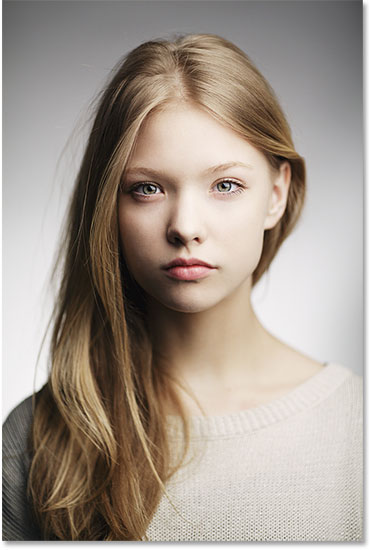
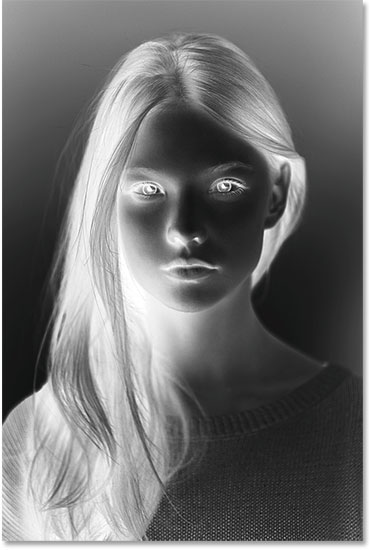
Here's the photo I'll be using (teen portrait photo from Shutterstock):
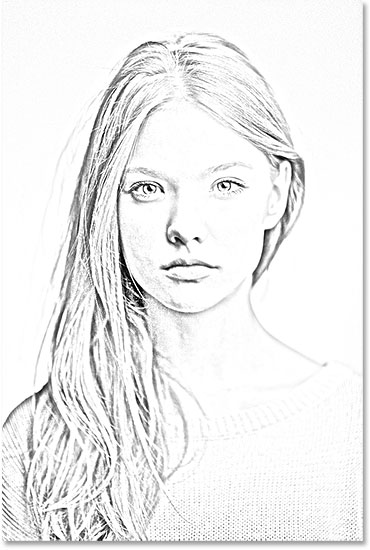
Here's what it will look like as a black and white pencil sketch:
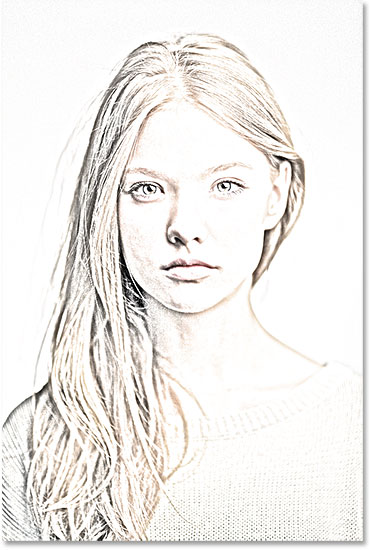
And here's the same effect after adding back the colors from the original photo:
This tutorial is from our Photo Effects series. Let's get started!
How To Turn A Photo Into A Sketch With Photoshop
Step 1: Add A Hue/Saturation Adjustment Layer
With my image newly opened in Photoshop, we see in my Layers panel that the photo is sitting all by itself on the Background layer, currently the only layer in my document:

To create our sketch effect, the first thing we need to do is remove all the color from our image, and we can do that non-destructively using a Hue/Saturation adjustment layer. In the Adjustments panel, click on the Hue/Saturation icon (first icon on the left, middle row):
Photoshop adds a Hue/Saturation adjustment layer named Hue/Saturation 1 above the Background layer:

Step 2: Drag The Saturation Slider To -100
The controls and options for the Hue/Saturation adjustment layer appear in the Properties panel. To remove the color from the image, simply drag the Saturation slider all the way to the left to a value of -100:

This removes all color from the photo, leaving it in black and white:
Step 3: Select The Background Layer
Click on the Background layer in the Layers panel to select it:

Step 4: Duplicate The Background Layer
We need to make a copy of the Background layer. To do that, go up to the Layer menu in the Menu Bar along the top of the screen, choose New, then choose Layer via Copy. Or, for a faster way to duplicate a layer, simply press Ctrl+J (Win) / Command+J (Mac) on your keyboard:

Nothing will seem to have happened with the image, but if we look in the Layers panel, we see that a copy of the Background layer has appeared between the original and the Hue/Saturation adjustment layer:

Step 5: Invert The Image
Next, we need to invert the layer. Go up to the Image menu at the top of the screen, choose Adjustments, then choose Invert. Or, press Ctrl+I (Win) / Command+I (Mac) on your keyboard for the shortcut:

This inverts the image, giving it a film negative appearance:
Step 6: Change The Layer Blend Mode To Color Dodge
In the upper left of the Layers panel, change the blend mode of the Background copy layer from Normal (the default blend mode) to Color Dodge:

This will turn the image white. As with my image, you may still see a few small areas of black remaining, but for the most part, it should now appear white (don't worry about the dark border around my image in the screenshot. It's just Photoshop's gray pasteboard area and not part of the effect):

Step 7: Convert The Layer Into A Smart Object
One thing I like to do whenever possible is take advantage of Photoshop's Smart Filters, which keep the filters we apply to an image fully editable in case we want to go back later and change some of the settings. In a moment, we're going to apply the Gaussian Blur filter, but before we do, let's make sure we'll be applying it as a Smart Filter.
For that, we first need to convert the layer to a Smart Object. With the Background copy layer still selected, click on the small menu icon in the upper right corner of the Layers panel:
Choose Convert to Smart Object from the list that appears:

Once again, nothing will seem to have happened, but a small Smart Object icon appears in the lower right corner of the layer's preview thumbnail letting us know it's been converted into a Smart Object:
Step 8: Apply The Gaussian Blur Filter
Go up to the Filter menu at the top of the screen, choose Blur, then choose Gaussian Blur:

This opens the Gaussian Blur dialog box. To create our main sketch effect, all we need to do is apply some blurring to this layer. To do that, click on the Radius slider at the bottom of the dialog box and begin slowly dragging it towards the right to apply a slight amount of blur. Keep an eye on the image as you drag and you'll see it beginning to look more and more like a sketch. Don't drag too far, though, as too much blurring will make it look like a photo again. A little blurring is all we need.
There's no specific Radius value to choose here since it will depend both on the size of your image and on what you think looks best. For me, I'll set my Radius value to around 12 pixels:

Click OK when you're done to accept your setting and close out of the Gaussian Blur dialog box. Here's my result:

As I mentioned a moment ago, one of the great benefits of applying a filter as a Smart Filter is that we can easily go back and edit its settings later if needed. If we look again in the Layers panel, we see the Gaussian Blur filter listed as a Smart Filter below its Smart Object. If at any point you feel your sketch effect could use a bit more fine-tuning, simply double-click directly on the words Gaussian Blur to re-open its dialog box and re-adjust the Radius value:

Step 9: Add A Levels Adjustment Layer
We've created our main sketch effect, but it's a bit too light. Let's darken it, and we can do that using a Levels adjustment layer. In the Adjustments panel again, click on the Levels icon (second icon from the left, top row):

Photoshop adds a Levels adjustment layer named Levels 1 directly above the Background copy Smart Object (and below the Hue/Saturation adjustment layer):

Step 10: Change The Blend Mode To Multiply
The controls and options for the Levels adjustment layer appear in the Properties panel, but we don't actually need them. Instead, to darken our sketch effect, all we need to do is change the blend mode of the Levels adjustment layer from Normal to Multiply:

The Multiply blend mode is one of the five most commonly used blend modes in Photoshop, and simply by changing the Levels adjustment layer to Multiply, we've managed to darken the sketch effect quickly and easily:

Step 11: Lower The Opacity If Needed
If you find that your sketch is now too dark, you can brighten it back up by lowering the opacity of the Levels adjustment layer. You'll find the Opacity option directly across from the blend mode option at the top of the Layers panel. By default, opacity is set to 100%. I'll lower mine to around 60%:

And now my image is a little bit lighter:
Step 12: Select And Duplicate The Background Layer Again
At this point, the basic sketch effect is complete, but if you want to bring back some of the photo's original color, you'll want to continue on with these last few steps. First, click on the Background layer (the original one, not the copy) to select it and make it active once again:

Then, just as we did back in Step 4, duplicate the Background layer by going up to the Layer menu at the top of the screen, choosing New, then choosing Layer via Copy, or by pressing Ctrl+J (Win) / Command+J (Mac) on your keyboard:
A second copy of the Background layer, this one cleverly named Background copy 2, will appear directly above the original:

Step 13: Rename The Layer "Color"
We're going to use this layer to colorize our sketch, so rather than putting up with Photoshop's generic layer names like "Background copy 2", let's name the layer something more descriptive. Double-click directly on the words Background copy 2, which will select and highlight the name, then rename it Color. Press Enter (Win) / Return (Mac) when you're done to accept the new layer name:

Step 14: Drag The Layer Above The Others
We need to move our Color layer to the top of the layer stack. To do that, click on it and, with your mouse button held down, drag the layer upward until you see a white horizontal bar appear directly above the Hue/Saturation layer:

When the white bar appears, release your mouse button to drop the Color layer into place:

Step 15: Change The Blend Mode Of The Layer To Color
To colorize the sketch with the colors from the original image, change the blend mode of the Color layer from Normal to Color:

The Color blend mode hides all the tonal information (the brightness values) on the layer and allows only the colors to show through, creating our colorizing effect:

Step 16: Lower The Color Layer's Opacity
Finally, if the color looks too intense, you can reduce it by lowering the Opacity value of the Color layer. I'll lower mine down to 65%:

And here, with more subtle colors, is my final “portrait to sketch” result:
Where to go next...
And there we have it! That's how to turn a portrait photo into either a black and white or color pencil sketch using Smart Filters, adjustments layers and blend modes in Photoshop CS6! Visit our Photo Effects section for more Photoshop effects tutorials!