
Brighten Underexposed Photos With The Screen Blend Mode In Photoshop
Before we begin... This version of our Brighten Underexposed Photos tutorial is for Photoshop CS5 and earlier. Photoshop CC and CS6 users will want to follow along with our fully updated How To Instantly Brighten Underexposed Images tutorial.
Let's face it, today's digital cameras make snapping photos of family, friends or anything that happens to catch our eye both easy and enjoyable. No need to worry about wasting film since there isn't any to waste, and that means as long as there's still space left on the camera's memory card, we're free to point the lens and press the shutter button as often as we like. We can get out there and take photos simply for the pure enjoyment of it.
What do you do, though, when these photos you took for fun didn't turn out quite as well as you had hoped? What if, at the end of the day, you end up with a photo you really like but it suffers from a rather unfortunate exposure problem? It may be too dark and dull (underexposed) or too bright with colors and image detail washed out (overexposed). Being the Photoshop savvy person you are, you know that you could use a Levels or Curves image adjustment to do a professional-level tonal correction, but come on, this is just a photo you took for fun! You don't care if it looks professional, you just want it to look better. There must be a way to fix simple exposure problems without going through a lot of hassle, right?
Right you are! In fact, as we'll learn in this tutorial and the next, Photoshop makes it easy to fix minor exposure problems in a matter of seconds thanks to adjustment layers and layer blend modes! In this first tutorial, we'll learn how to quickly brighten underexposed images using the Screen blend mode. Then in the next tutorial, we'll learn a similar way to darken overexposed photos using the Multiply blend mode.
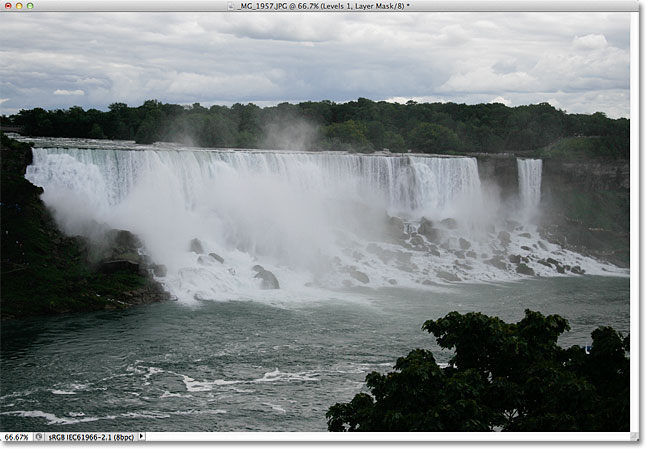
First, let's see how to quickly fix an underexposed image. Here's a photo I shot during a trip to Niagara Falls. It was a dark, cloudy day to begin with, but the underexposed image makes it look even darker than it actually was:

Again, if this photo had some greater importance to me, I'd put in the effort to do a proper tonal correction with Levels or Curves, but I just want this image to look brighter with as little effort as possible and as quickly as possible. Let's get started!
Step 1: Add A Levels Adjustment Layer
With the image newly opened in Photoshop, click on the New Fill or Adjustment Layer icon at the bottom of the Layers panel:
Choose a Levels adjustment layer from the list that appears. Technically you could choose any of the adjustment layers for this technique, but we'll use Levels because it's one of the most popular and commonly used image adjustments:
If you're using Photoshop CS3 or earlier, Photoshop will open the Levels dialog box, displaying the image histogram and other options. Don't worry about any of it. Simply click OK to close out of the dialog box because we don't need to make any changes. All we need is the adjustment layer itself. For Photoshop CS4 and CS5 users (I'm using CS5 here), the histogram and other options for the Levels adjustment layer will appear in the Adjustments panel. You can leave the Adjustments panel open on your screen but again, just ignore it because there's no need to make any changes.
If we look in the Layers panel, we see that we now have a Levels adjustment layer, which Photoshop named "Levels 1", sitting above our image on the Background layer:
Step 2: Change The Blend Mode Of The Adjustment Layer To Screen
To brighten the image at this point, all we need to do is change the blend mode of the adjustment layer from Normal to Screen. You'll find the blend mode option in the top left corner of the Layers panel:
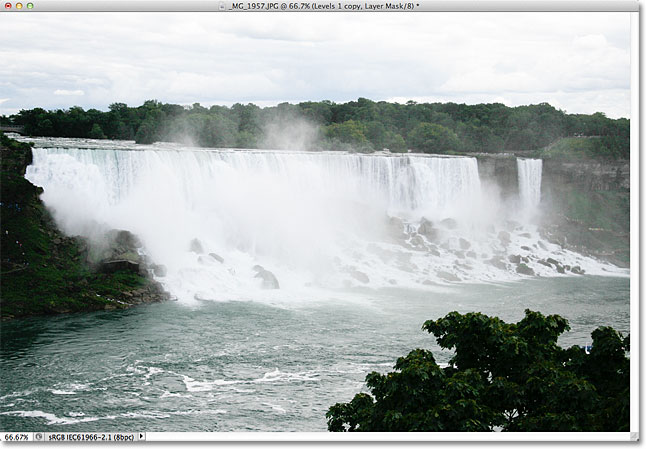
The Screen blend mode is one of several layer blend modes that lighten an image, and simply by adding a Levels adjustment layer and changing its blend mode to Screen, the underexposed photo now appears brighter. We can start to see more detail in the darker areas, especially in the trees which appeared almost black initially:
Step 3: Duplicate The Levels Adjustment Layer (Optional)
If you find that your photo still isn't bright enough, simply duplicate the Levels adjustment layer by clicking on it and, with your mouse button held down, dragging it down onto the New Layer icon at the bottom of the Layers panel (it's the icon directly to the left of the Trash Bin):
Release your mouse button when the hand cursor is over the New Layer icon. Photoshop makes a copy of the Levels adjustment layer and places it directly above the original. Notice that the newly added copy is already set to the Screen blend mode for us, so there's no need to change it ourselves:

With two adjustment layers now added, both set to the Screen blend mode, the image appears even brighter, with much more detail visible in the darker areas:
Step 4: Lower The Opacity Of The Adjustment Layer If Needed
With two Levels adjustment layers added, you may find that the image now appears a little too bright. To dial back some of the brightness and fine-tune the results, lower the opacity of the top adjustment layer. You'll find the Opacity option directly across from the blend mode option at the top of the Layers panel. By default, opacity is set to 100%. I'm going to lower mine down to around 70% but you'll want to keep an eye on your image as you lower the opacity value to judge the results:
And with that, we're done! By adding just a couple of Levels adjustment layers, both set to the Screen blend mode, we were able to quickly and easily brighten an underexposed image. Keep in mind, however, that this technique will only bring out detail in the darker areas of the photo if there is actual image detail there to restore. If your image is so badly underexposed that the shadows are nothing but areas of solid black, you can still use this technique to make the image brighter overall but it won't magically bring out detail that wasn't there to begin with.
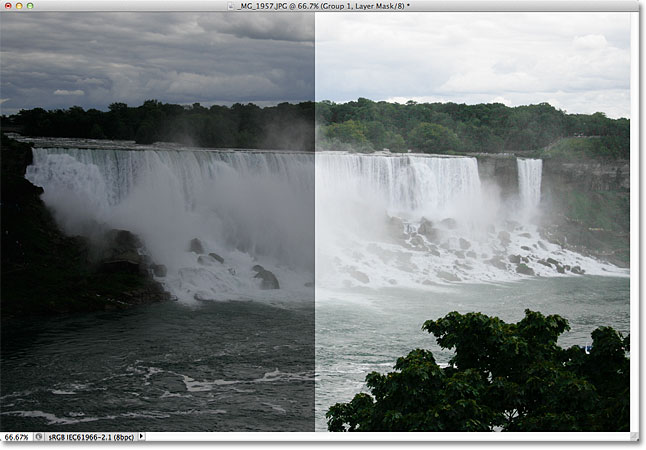
Here's a "before and after" view of the results, with the original underexposed photo on the left and the brightened version on the right:
And there we have it! In the next tutorial, we'll learn how we can just as easily darken an overexposed image using the Multiply screen mode! To learn more about the Screen blend mode, be sure to check out our Five Essential Blend Modes For Photo Editing tutorial. Or check out our Photo Retouching section for more Photoshop image editing tutorials!