
How To Instantly Brighten Underexposed Images With Photoshop
In this tutorial, we'll learn how to instantly brighten an underexposed image with Photoshop using nothing more than a simple adjustment layer and a layer blend mode! I'll be using Photoshop CC here but this tutorial is also compatible with Photoshop CS6. If you're using CS5 or earlier, you'll want to check out the original version of this tutorial.
Today's digital cameras, smart phones and other devices make snapping photos of family, friends and anything that catches our eye both easy and enjoyable. As long as there's room left on the camera's memory card or on the device's internal storage, we're free to keep snapping as many photos as we like, purely for the fun of it!
But what do we do when these photos we took for fun don't turn out quite as well as we had hoped? What if, at the end of the day, we end up with an image we really like but it suffers from an unfortunate exposure problem? It may appear too dark (underexposed) or too bright (overexposed).
If you're a Photoshop-savvy person, you know that you could use a Levels or Curves image adjustment to do a professional-level tonal correction. But if it's just a photo you took for fun, you may not care that it looks professional. You may just want it to look better. There must be a way to fix simple exposure problems in Photoshop without a lot of hassle, right?
Right you are! In fact, as we'll learn in this tutorial and the next, Photoshop makes it easy to fix minor exposure problems in a matter of seconds! All we need is an adjustment layer and a layer blend mode. In this first tutorial, we'll learn how to quickly brighten an underexposed image. In the next tutorial, we'll learn how to darken an overexposed image. The great thing is that the steps in both tutorials are almost exactly the same. In fact, as we'll see, the only real difference is which blend mode we need!
First, let's learn how to quickly brighten an underexposed image. Here's a photo I shot during a trip to Niagara Falls. It was a cloudy, gloomy day to begin with, but because this image is underexposed, it looks even darker than it actually was:
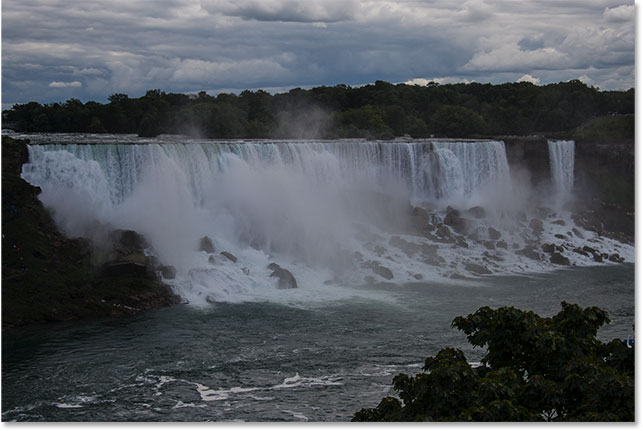
Again, if this photo had some greater importance to me, I'd put in the effort to do a proper tonal correction with Levels, Curves or even Camera Raw. But since this is just a tourist shot, I just want it to look brighter with as little effort as possible. So, let's get started!
How To Fix An Underexposed Photo
Step 1: Add A Levels Adjustment Layer
With the image newly-opened in Photoshop, if we look in our Layers panel, we see the image sitting on the Background layer, currently the only layer in the document:

To quickly brighten the image, we'll add a Levels adjustment layer. Click on the New Fill or Adjustment Layer icon at the bottom of the Layers panel:
Then, choose Levels from the list that appears:

Nothing will happen yet to the image, but if we look again in the Layers panel, we now see our Levels adjustment layer, named "Levels 1", sitting above the photo on the Background layer:

Step 2: Change The Adjustment Layer's Blend Mode To "Screen"
The controls and options for the Levels adjustment layer appear in Photoshop's Properties panel. But for this technique, you don't need to know anything about how a Levels image adjustment works, so we won't be using any of those options.
Instead, to brighten the image, all we need to do is change the blend mode for the Levels adjustment layer. You'll find the Blend Mode option in the upper left of the Layers panel. By default, the blend mode is set to Normal. Click on the word "Normal" and change the blend mode to Screen:

You can learn all about the Screen blend mode, as well as Photoshop's other blend modes, in our Five Essential Blend Modes For Photo Editing tutorial. But in short, the Screen blend mode is one a group of blend modes that lighten an image, and simply by changing the adjustment layer's blend mode to Screen, the dark photo now appears brighter:

To make the difference easier to see, here's a split view of the image. The original version is on the left; the brightened version is on the right:

Step 3: Duplicate The Levels Adjustment Layer (Optional)
If you find that your photo still isn't bright enough, you can easily brighten it even more simply by duplicating the Levels adjustment layer. To duplicate it, click on the Levels adjustment layer and, with your mouse button still held down, drag the adjustment layer down onto the New Layer icon at the bottom of the Layers panel (it's the icon directly to the left of the Trash Bin):

When you release your mouse button, Photoshop creates a copy of the Levels adjustment layer and places it above the original. Notice that the copy is already set to the Screen blend mode, so there's no need to change it ourselves:

We now have two Levels adjustment layers, both set to the Screen blend mode, joining forces to brighten our image. With so much brightening going on, my image is now looking too bright. Parts of the sky and the waterfalls now look washed out:

Step 4: Lower The Opacity Of The Adjustment Layer If Needed
To dial back some of the brightness, all we need to do is lower the opacity of the top adjustment layer. You'll find the Opacity option in the upper right of the Layers panel, directly across from the Blend Mode option.
By default, the opacity is set to 100%. Keep an eye on your image as you lower the opacity value until the brightness level looks good. In my case, I'll lower it all the way down to 25%. My original Levels adjustment layer is still set to 100% opacity, but now my second adjustment layer is adding only an additional 25% brightness:

And here's what my image looks like after lowering the opacity. Notice that most of the washed out detail in the sky and in the falls has been restored:

Step 5: Add A Vibrance Adjustment Layer (Optional)
At this point, we're done brightening the image. But one thing you may want to do as a final step is boost the color saturation. The reason is that increasing the brightness can sometimes leave colors looking dull and in need of a little help.
To quickly boost the colors, we can use one of Photoshop's Vibrance adjustment layers. Click once again on the New Fill or Adjustment Layer icon at the bottom of the Layers panel:
Then, choose a Vibrance adjustment layer from the list:

Photoshop adds the Vibrance adjustment layer, named "Vibrance 1", above the other layers in the Layers panel:

Just like with the Levels adjustment layer, the controls for the Vibrance adjustment layer appear in Photoshop's Properties panel, and this time, we actually need to use them. That's okay, though, because the controls are very simple.
There's two sliders; a Vibrance slider at the top and a Saturation slider below it. Both sliders affect the color saturation. The difference between them is that the Vibrance slider will boost less-saturated colors more than colors that are already saturated. The Saturation slider, on the other hand, doesn't care how saturated the colors are. It will boost them all equally.
In most cases, the Vibrance slider is the one you'll want, but the Saturation slider can also be used along with it to help out. Start by dragging the Vibrance slider towards the right to boost color in the less saturated areas. Then, if the image is still looking dull, drag the Saturation slider to the right to boost the overall color saturation.
The exact values you need will depend on your image, so as always, keep an eye on it as you experiment with the sliders. In my case, the image has lots of gray in it, but to bring out more of the green in the leaves, as well as some blue in the water and in the clouds, I'll start by increasing my Vibrance amount to +40. Then I'll increase the Saturation value to +20:

And here's the result. With this image, the difference is subtle, and pushing the saturation much further would make things look unnatural. Yet the Vibrance adjustment layer was still able to bring out more of what little color there was to begin with:

Before And After
Finally, let's compare our results with the original version of the image. We'll need a way to turn off all of our adjustment layers so we can view just the original image on the Background layer. To do that, we'll use a handy little trick.
Press and hold the Alt (Win) / Option (Mac) key on your keyboard and click on the Background layer's visibility icon (the eyeball) in the Layers panel:
This temporarily turns off every layer except the Background layer, letting us see our original image:
You'll notice when you look in the Layers panel that all of the visibility icons for the adjustment layers are turned off. To turn them back on, once again press and hold your Alt (Win) / Option (Mac) key and click on the same visibility icon for the Background layer:

This instantly turns all of the adjustment layers back on, letting us view the brightened version of our image:
And there we have it! By adding just a couple of Levels adjustment layers, both set to the Screen blend mode, we were able to quickly and easily brighten an underexposed image. And, to compensate for the increased brightness, we used a Vibrance adjustment layer to bring out more of the image's original color.
In the next tutorial, we'll learn how we can use almost exactly the same steps to instantly darken an overexposed image! Or, check out our Photo Retouching section for more image editing topics! And don't forget, all of our tutorials are available for download as convenient, high quality PDFs!