
How To Apply A Smart Filter In Photoshop CS3
In this Photoshop CS3 tutorial, we'll look at the basics of how to apply smart filters to an image, which are not only a brand new feature inside Adobe Photoshop CS3, but also one of the best things to happen to Photoshop in a long time. Whether you're restoring or retouching a photo or going after a creative effect, once you've seen how much freedom smart filters give you, you'll be using them in your Photoshop work all the time.
In other tutorials, we'll take things further and show how to really start using the power of this incredible new feature, including how to edit the settings of a smart filter in Photoshop CS3 after you've already applied it, and how to change its blend mode and opacity settings independently of the smart object's settings. For now, a quick look at the basics.
Photoshop CS2 introduced us to smart objects, and one of the goals the folks at Adobe had with smart objects was to one day give us the ability to add dynamic filters to images which were non-destructive, meaning they didn't physically alter the image pixels in any way, much like how adjustment layers work in Photoshop. Photoshop CS3 brings that goal into reality with smart filters.
With smart filters and Photoshop CS3, we can now apply Gaussian Blur or Unsharp Mask, or any of Photoshop's many other filters, and go back at any time and change the settings we've applied without harming the image quality in any way! We can stack them on top of each other and then re-arrange their order to create different results, we can change the blend mode and opacity of each one independently of the others and of the layer itself, and we can even mask their effects so they only apply to a specific area inside the image. Smart filters are truly a huge step forward for Photoshop and for working with digital images.
Having said all that, how do you use them? Is it complicated? Nope, not at all, as we shall see.
Step 1 : Convert The Image Into A 'Smart Object'
Think of smart filters in Photoshop CS3 as an extension of the abilities of smart objects, and since they're an extension of smart objects, it would seem to make sense that in order to be able to use them, we first need a smart object, and that's exactly what we need. We need to convert our image into a smart object.

As you can see in the screenshot above, I have an image open inside Photoshop CS3, which currently has only one layer, the Background layer. I need to convert this layer into a smart object, and there's a few different ways to go about it in Photoshop, but in Photoshop CS3, there's yet another way. I can go up to the Filter menu at the top of the screen and select the new option, Convert For Smart Filters:
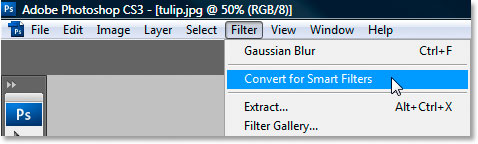
This may seem like a brand new option, but all it does is converts the layer into a smart object, the same as if you had gone, for example, to the Layer menu and chosen Smart Objects - Convert To Smart Object. There's more than one way to convert a layer to a smart object in Photoshop, and this is just a new way of doing it. In fact, when you select this option for the first time, you'll see this warning box appear:

All this is telling you is that Photoshop is about to convert the layer into a smart object. There's no need to see this message every time you choose the option, so go ahead and click the "Don't show again" option in the bottom left corner and then click OK.
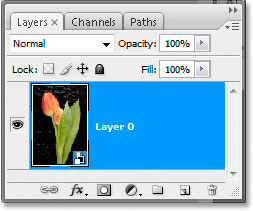
We now have our layer converted into a smart object, which we can tell by the little smart object icon in the bottom right corner of the layer's thumbnail preview:
So now what? We've converted our layer into a smart object. How do we go about adding these smart filters to it? The answer is - the same way you'd normally apply a filter to a layer! It's that easy!
Step 2: Apply A Filter To The Smart Object
Since this is just a quick look at the basics of applying smart filters in Photoshop CS3, I'll limit myself to adding only one filter here. I'll add the good old Unsharp Mask to my smart object. To do that, I'll go up to the Filter menu once again, choose Sharpen, and then choose Unsharp Mask:

This will bring up Photoshop's Unsharp Mask dialog box as usual, and I'll make some quick changes to the settings:
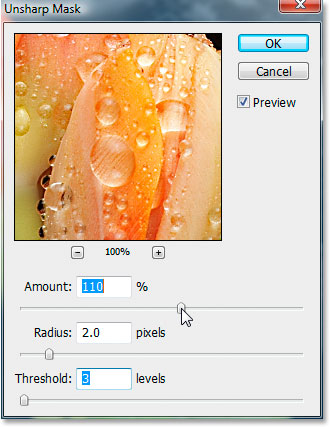
And when I'm happy with my settings, I'll click OK to apply them. And as easy as that was, we've just applied our first smart filter!
Look what we have now in the Layers palette:
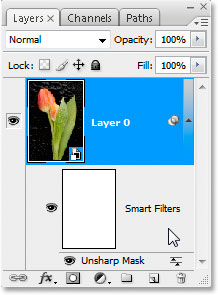
Directly beneath our smart object layer, we now have an area that says "Smart Filters", indicating that we have at least one smart filter applied to the object.
The white rectangular area to the left of the words "Smart Filters" is a mask, just like a standard layer mask, allowing us to select a specific area of the smart object to apply the filter(s) to. We'll look more closely at applying masks to smart filters in another tutorial.
And directly beneath the mask, we can see the Unsharp Mask filter that I've applied. Since we applied it to a smart object rather than to a normal layer, it automatically becomes a smart filter. There's nothing more you need to do to create a smart filter. Simply apply a filter to a smart object the way you'd normally apply a filter to a layer, and it becomes a smart filter!
Okay, so right now you may be thinking, "Gee, that's great. I can apply a filter to a smart object and it automatically becomes one of these new smart filters, and okay, I can see that along with my filter, Photoshop also gives me a mask so I can limit where the filter is applied. But that's it? That's the big thing about smart filters? They have a cool name and I get a mask with them?"
Of course not! That would be kind of lame, wouldn't it? How about having the ability to go back and edit the settings on that filter any time you want, even if you're 50, 100, or 500 steps further into your work? How about being able to change those settings over and over and over again without losing any image quality? How about being able to apply not just one, but any number of filters to the same smart object, and being able to go back and change any of those filter settings any time you want, as many times as you want? How about being able to change the opacity and blend mode of each and every one of those filters independently of all the other filters and of the smart object itself? Or re-arranging the stacking order of the filters as often as you want to create new results or effects? Or nesting filters inside other filters for even more control?
The possibilities with smart filters are practically endless. This was just a quick look at how easy it is to apply a smart filter to an image. In our next tutorials, we'll see how to maximize the benefits of this great new feature inside Photoshop CS3. To start with, our very next tutorial shows us how to go back and edit our smart filter settings after we've already applied the filter, and after that, we look at how to change the smart filter's blend mode and opacity settings!