
The Color Blend Mode In Photoshop
Every layer blend mode we've seen so far in our look at the essential blend modes for photo editing in Photoshop has been about darkening images, lightening images, or both. The Multiply blend mode ignores white areas and makes everything else darker. The Screen blend mode ignores black areas and makes everything else lighter, while the Overlay blend mode ignores areas that are 50% gray and makes dark areas darker and light areas lighter, improving image contrast.
Our fourth essential blend mode in Photoshop has nothing to do with shadows, highlights or image contrast and everything to do with color. In fact, by no sheer coincidence, it's named the Color blend mode, and if you recall from the first page, it's found in the Composite group of blend modes along with the Hue, Saturation and Luminosity modes.
The Color blend mode is actually a combination of the first two modes in the Composite group, Hue and Saturation. When you change a layer's blend mode to Color, only the color (that is, all of the hues and their saturation values) from the layer is blended in with the layer or layers below it. The luminosity (lightness) values of the layer are completely ignored. The Color blend mode is perfect for when you want to add or change the colors in an image without changing the brightness values. As we'll see on the next page, Color is actually the exact opposite of our fifth and final essential blend mode, Luminosity, which ignores all color in the layer and blends only the lightness values.
Real World Example of the Color Blend Mode
One of the most popular uses for the Color blend mode is to colorize black and white images. This allows you to add color to the image without affecting the lightness values. Simply add a new blank layer above your image and set the blend mode of the layer to Color. Select your Brush Tool from the Tools palette, choose the color you want to paint with, and begin painting on the layer to add your color.
Here I have another old photo, this time of a wedding couple:
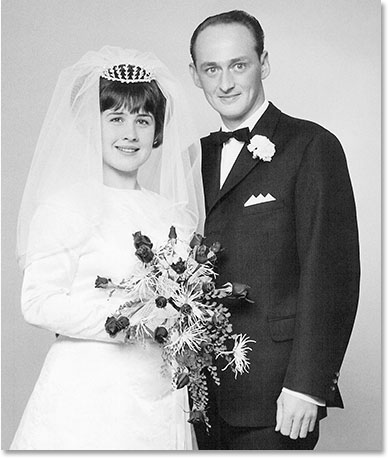
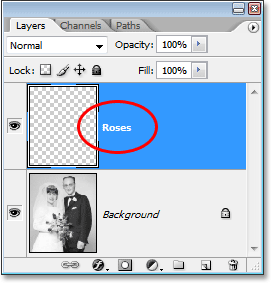
Let's say we want to keep the overall image black and white but to add more interest to the photo, we want to make the roses in the bride's bouquet red. The Color blend mode makes it easy. First, we'll need to add a new blank layer above our photo, so I'll add one by clicking on the New Layer icon at the bottom of the Layers palette:
This adds a new blank layer above the Background layer. By default, Photoshop names the new layer "Layer 1", but since we'll be using this layer to colorize the roses, I'll double-click on the layer name in the Layers palette and rename it to "Roses":
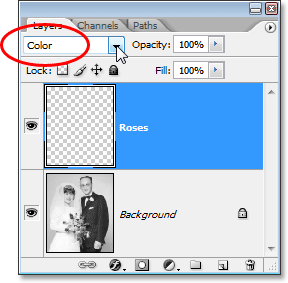
If we were to simply begin painting on this layer with the Brush Tool, we'd be covering up the photo underneath, and that's because the new layer's blend mode is currently set to Normal. Since we want to add color to the image without affecting the tonal information, we need to change the layer's blend mode to Color:
Now I'll choose my Brush Tool from the Tools palette, and with red as my Foreground color, I'll zoom in on the roses and begin painting over them. Notice how we can still see the light and dark areas of the roses underneath the color we're painting thanks to the Color blend mode's ability to blend our new color with the image below:
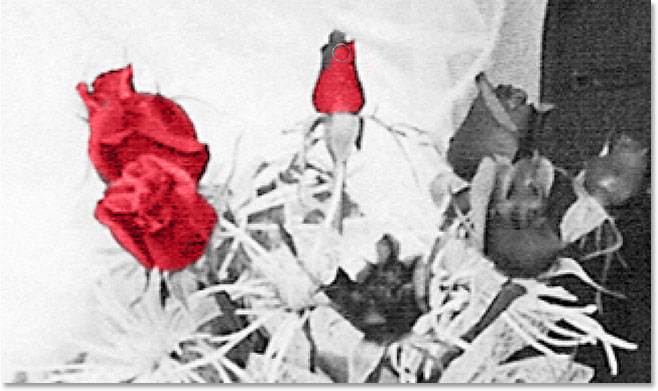
I'll continue painting over the rest of the roses. Here's the image after painting all the roses with red:

The color is a bit too intense, so I'll simply lower the Opacity of the "Roses" layer down to about 60%:

Now the color is much more subdued and the red seems to blend in nicely with the rest of the photo:

If we wanted to, we could continue colorizing the rest of the image, but I like the effect of having just the roses in color. Of course, this is just one example of how useful the Color blend mode is, and it's certainly not limited to restoring old photos. The Color mode is just as handy for changing colors in your new digital photos. To change someone's eye color, for example, simply select the person's eyes, add a Hue/Saturation adjustment layer, drag the Hue slider left or right to select the color you want, and then change the blend mode of the Hue/Saturation layer to Color.
We've now looked at four of the five essential blend modes for photo editing in Photoshop. Up next is our fifth and final blend mode, the Luminosity blend mode, which is the exact opposite of the Color mode! Or jump back to the main page to choose a different blend mode!