
Top 5 Photoshop Blend Modes You Need To Know
Feeling overwhelmed by Photoshop's 27 layer blend modes? There's really only 5 you need to know! Learn the essential Photoshop blend modes - Multiply, Screen, Overlay, Color, and Luminosity - and how to use them to quickly improve your images!
When it comes to learning Photoshop, believe it or not, there's really only a handful of things you absolutely need to know. Sure, Photoshop is a huge program with lots of great features. But do you need to know everything about Photoshop to complete most day-to-day image editing tasks?
The simple answer is no. With just a little knowledge and a few basic Photoshop skills, you can usually accomplish most of what you need to do. What are these basic skills? If you know how to crop images, how to make selections, how to work with layers and how to use layer masks, you can accomplish a lot. And if you know how to use blend modes to blend layers together, you can accomplish a whole lot more!
The five blend modes we'll be learning
In this tutorial, we'll focus on Photoshop's five most important blend modes, which are Multiply, Screen, Overlay, Color, and Luminosity. Even though Photoshop includes 22 others, these five blend modes are the ones you'll use the most. The Multiply blend mode darkens images, the Screen blend mode lightens them, and the Overlay blend mode increases contrast. The Color blend mode blends only the color of a layer, and Luminosity blends only the brightness! As we'll learn, Photoshop blend modes are grouped together based on what they do (lighten, darken, increase contrast, and so on) and these five are the stars of their groups.
If you're new to blend modes, you'll want to continue reading to learn more about what blend modes are, where to find them, and how they're organized. If you'd rather jump to a specific blend mode to learn how it works, use the links below.
- Multiply - Darkens an image
- Screen - Lightens an image
- Overlay - Boosts contrast
- Color - Blends only the color
- Luminosity - Blends only the brightness
What are Photoshop blend modes?
Blend modes in Photoshop offer different ways for a layer to blend, or interact, with the layer(s) below it. Without blend modes, the only way to blend layers is by lowering a layer's opacity, which doesn't produce very interesting results. Blend modes unlock a world of creative possibilities, and they're extremely useful when it comes to editing, retouching and restoring photos. They're easy to use, and they save us a whole lot of time!
As of Photoshop CC, there are 27 blend modes to choose from, but you don't need to know all 27 to start using blend modes in your daily work. And let's face it, names like 'Dissolve", "Color Dodge", "Linear Burn", "Difference", and "Exclusion" are enough to leave anyone scratching their head wondering what the heck these things do.
But here's the secret. For most day-to-day image editing work, there are only five blend modes you need to know. Not 27, just 5! What are they? Multiply, Screen, Overlay, Color, and Luminosity. Learn how and when to use these five blend modes and life with Photoshop becomes a whole lot easier!
Where are Photoshop's blend modes?
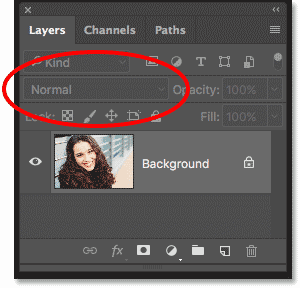
Before we look at each of these five blend modes in more detail, let's learn where to find blend modes in Photoshop. Since blend modes are used with layers, you may think they're listed under the Layer menu in the Menu Bar. Good guess, but no. And actually, that would be a bad thing, since you'd have to drag your mouse up to the Menu Bar every time you wanted to change the blend mode. Adobe realized we're all too lazy for that, so they made things easy for us. All of Photoshop's blend modes can be selected from the Blend Mode option in the top left corner of the Layers panel. By default, the "Normal" blend mode is selected.
Why is the Blend Mode option grayed out?
But notice that the Blend Mode option is grayed out. That's because at the moment, my document contains only one layer, the Background layer. Photoshop does not allow us to use blend modes with the Background layer, so the Blend Mode option is currently unavailable:
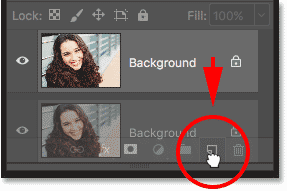
To fix that, I'll make a copy of the Background layer by dragging it down onto the New Layer icon at the bottom of the Layers panel:
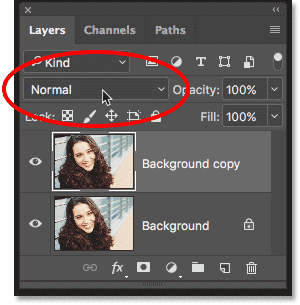
And now that we have a second layer above the Background layer, the Blend Mode option is no longer grayed out:
How Photoshop blend modes are organized
Click the Blend Mode option in the Layers panel to view a list of all the blend modes we can choose from. If you're new to blend modes, it may seem like there's no rhyme or reason to how the list is organized. But if you look closely, you'll see that the blend modes are actually divided into groups.
The first two blend modes at the top, Normal and Dissolve, make up the first group. Below them, Darken, Multiply, Color Burn, Linear Burn and Darker Color make up the second group, and so on. There's six groups in total, and if you think the blend modes in each group must have something in common, you'd be right!
Well, you'd be mostly right. The blend modes in the first group, Normal and Dissolve, have nothing to do with each other. In fact, while the Normal blend mode is Photoshop's default blend mode, you could go your whole life without ever using Dissolve, as it has very limited uses. So think of the first group as the "Nothing To Do With Each Other" group. The rest of the blend modes, though, are grouped together because they most definitely have something in common. Here's a breakdown of the various groups:
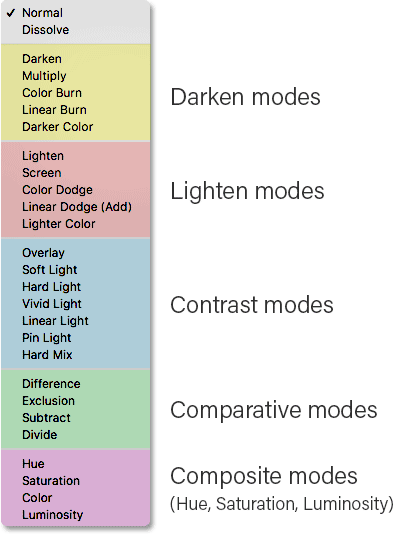
The Darken blend modes
As we can see, the Darken, Multiply, Color Burn, Linear Burn and Darker Color blend modes make up the Darken group. Why? Because each one makes the image darker. Notice that the Multiply blend mode is included in the Darken group. If you remember, Multiply is one of Photoshop's five blend modes you need to know, and one we'll be taking a closer look at in a moment.
The Lighten blend modes
Next, the Lighten, Screen, Color Dodge, Linear Dodge (Add) and Lighter Color blend modes make up the Lighten group. Each of these blend modes lightens the image. Notice that the Screen blend mode is included in the Lighten group, another of Photoshop's five blend modes you need to know and one we'll be learning more about.
The Contrast blend modes
Below that, the Overlay, Soft Light, Hard Light, Vivid Light, Linear Light, Pin Light, and Hard Mix modes make up the Contrast group. Each of these blend modes both darkens and lightens the image, which increases contrast. The Overlay blend mode, another one you need to know and one we'll be looking at, is the main star of the Contrast group.
The Comparative blend modes
Next up is a group we're not going to be looking at in this tutorial, the Comparative group, made up of the Difference, Exclusion, Subtract and Divide blend modes. These blend modes compare pixels between layers, and none are used very often, especially in day-to-day tasks. However, they can result in some pretty interesting effects, as you can see in our popular Flip, Mirror and Rotate Image - Designs and Patterns tutorial.
The Composite blend modes
Last but certainly not least, we have the Composite group, also known as the HSL group. HSL stands for "Hue, Saturation and Luminosity", which happen to be the names of three of the four blend modes included in this group, along with the Color mode. The blend modes in this group all have something to do with blending the color or luminosity (lightness) of a layer. And in fact, Color and Luminosity are the two blend modes you need to know from this final group.
How to use Photoshop blend modes
So far, we've seen that while the number of blend modes in Photoshop can seem overwhelming, they can easily be divided into groups. There's a group that darkens the image, another that lightens the image, one that increases contrast, one that compares pixels between layers, and one that blends only a layer's color or luminosity. And, we've seen that with the exception of the Comparative group, each group only has one or two blend modes we really need to know.
Let's begin learning how to use Photoshop's five essential blend modes with the first one in the list, Multiply. It's found in the Darken group, so right away, we know it has something to do with darkening an image. But not only is Multiply one of the essential blend modes, it also happens to be the most widely used blend mode of all. So, let's learn how to use the Multiply blend mode!
Or, jump straight to one of the other blend modes we'll be looking at:
- The Screen blend mode
- The Overlay blend mode
- The Color blend mode
- The Luminosity blend mode