
Fast, High Quality Black and White Conversions In Photoshop
In this Photoshop tutorial, we'll look at an easy way to get fast yet high quality black and white conversions out of our color photos. Normally, for high quality black and white results, we'd use something like the Lab color mode, the Channel Mixer, or a Hue/Saturation adjustment layer, and if all we cared about was quickly removing the color from a photo regardless of image quality, we'd simply desaturate the color or convert the image to the Grayscale color mode.
In this tutorial, we're going to combine that same desaturation technique, which normally gives us less than stellar results, with a couple of short extra steps to give us much better results with our black and white conversions while adding only a few extra seconds to the time it takes!
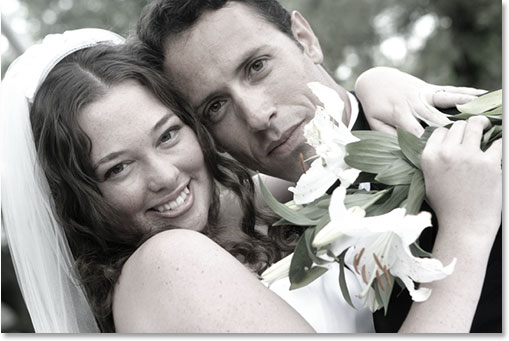
Here's the image I'll be using for this tutorial:
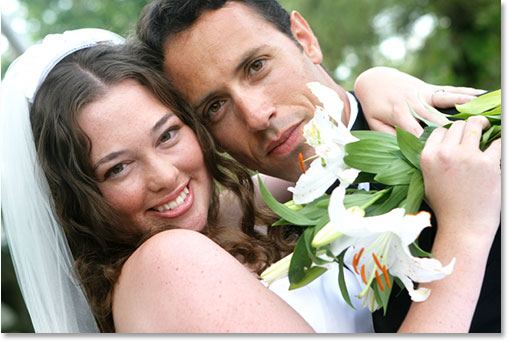
Let's convert it to black and white. For even more black and white conversion techniques, be sure to check out our complete Converting Color Photos To Black And White In Photoshop series.
Step 1: Duplicate The Background Layer
Your first step when working on your photos and images in Photoshop should always be to duplicate your Background layer, since your Background layer contains all of your original pixel information and you don't want to lose it. So let's duplicate our Background layer the easiest way there is, and that's by using the keyboard shortcut Ctrl+J (Win) or Command+J (Mac):
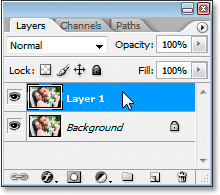
I now have a copy of my Background layer, which Photoshop has automatically named "Layer 1", that I can safely work on.
Step 2: Image > Adjustments > Desaturate
With "Layer 1" selected in Photoshop's Layers palette, go up to the Image menu at the top of the screen, choose Adjustments, and then choose Desaturate, or you can use the keyboard shortcut, Shift+Ctrl+U (Win) or Shift+Command+U (Mac ) to save time, since saving time is what this tutorial is all about. This will instantly desaturate all the colors in the image, leaving us with a quick and dirty black and white version:

Normally, if all we wanted was the color removed from our image, we could stop here, but these next couple of steps will give us better results while only taking up a few extra seconds of our time.
Step 3: Edit > Fade Desaturate
In order for this next step to work, you can't do anything else in Photoshop after that last step where we desaturated the image. We're going to bring up the Fade command, which allows us to fade the last adjustment we applied to the image, but only as long as we haven't gone and done anything else first. If we have, the Fade command will be grayed out and unavailable to us. So now that we've desaturated the photo, we need to go immediately up to the Edit menu at the top of the screen and choose Fade Desaturate from the list of options, or use the quick keyboard shortcut, Shift+Ctrl+F (Win) or Shift+Command+F (Mac):

This option is really just called "Fade". It says "Fade Desaturate" because we just desaturated the image. If we had just applied the Unsharp Mask filter, for example, it would say "Fade Unsharp Mask".
If the Fade command is grayed out when you go to select it, it's because you've gone and done something else after desaturating the image before you went up to the Edit menu, so you'll need to undo your steps by pressing Ctrl+Alt+Z (Win) or Command+Option+Z (Mac) until you get to the step just before desaturating the image and then desaturate it again. Then, without doing anything after that, go up to the Edit menu and select the Fade option.
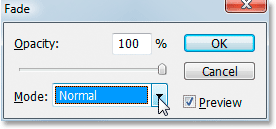
Step 4: Change The Blend Mode To "Color"
When you select "Fade Desaturate", the Fade dialog box appears. The Fade dialog box gives us two options - changing the opacity of the adjustment we just applied to the image and changing the blend mode of the adjustment. For now, we'll leave the opacity at 100% and only concern ourselves with the blend mode (see the 'Bonus Step' at the end of this tutorial for a look at how and why you may want to lower the opacity value).
Click the down-pointing arrow beside the word Normal to bring up a list of blend modes. These are the exact same blend modes we'd normally find in the Layers palette, but here, rather than affecting layers, they're affecting how the last adjustment we applied is going to interact with the image. Select Color way down near the very bottom of the drop down list.
This will cause our desaturation adjustment to affect only the colors in the image, not the brightness values, giving us a higher quality black and white conversion with more detail remaining in the image than if we had simply desaturated the image and left it at that.
Here's the result:

Using these quick and easy steps, getting a fast black and white conversion of a color photo doesn't have to mean poor quality. If you use the keyboard shortcuts, it's simply a matter of pressing:
Ctrl+J (Win) / Command + J (Mac) to duplicate the Background layer
Shift+Ctrl+U (Win) / Shift+Command+U (Mac) to desaturate the image
Shift+Ctrl+F (Win) / Shift+Command+F (Mac) to bring up the Fade command
Then simply change the blend mode from Normal to Color, click OK, and you're done!
Bonus Step: Bring Back A Hint Of Color
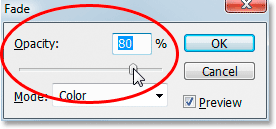
This "bonus step" as I call it is completely optional but it only takes an extra second or two and is a nice effect. With my Fade dialog box still open (before clicking OK to close it after changing the blend mode to Color) I'm going to bring back just a hint of color to my photo by reducing the opacity value of the desaturation adjustment using the Opacity option in the Fade dialog box.
I'll just click on the slider bar below where it says "Opacity" and drag it to the left with my mouse to lower the opacity value to about 80%:
Again, this is the same as if I was lowering the opacity value of a layer in the Layers palette, but here, I'm lowering the opacity of the Desaturate adjustment which will allow a little bit of the photo's original color to show through. And here's the result:
And there we have it! Check out our Photo Retouching section for more great image retouching and editing tutorials, or see below for tutorials you may be interested in!