
Black & White Adjustment in Photoshop CS3
For most of Photoshop's lifetime, converting color photos to black and white has left many people feeling blue. Sure, there's been quick and easy ways to go about it, like simply desaturating the image or converting it to Grayscale, but these methods gave us no control over the process, leaving Photoshop to throw away color information any way it saw fit, and the results were usually less than spectacular.
We've had slightly better and more impressive sounding ways of converting to black and white, like switching over to the Lab color mode to separate the color from the lightness values in the image, but even then, we had no control over the results. In fact, up until recently, the only way to gain control over the conversion was to use Photoshop's Channel Mixer, which was fine as long as you understood a thing or two about how Channels work. Even then, using the Channel Mixer never really seemed natural because it forced us to think like Photoshop rather than asking Photoshop to think like us. For something as common as converting color photos to black and white, there had to be a better way.
Fortunately, the folks at Adobe agreed, and in Photoshop CS3, they introduced the only tool you'll ever need to convert your color images to black and white. It's called the Black & White adjustment, and it's easy, it's totally natural, and it's even lots of fun! In fact, it's so simple that anyone can use it regardless of their skill level!
With the Black & White adjustment, you can easily emphasize certain areas of an image and de-emphasize other areas based on their original colors, without having to know anything about Channels or what Photoshop is doing behind the scenes to display color. Want the sky to be darker in the black and white version of your photo? Just drag the Blues slider towards the left. Need skin tones to appear lighter? Drag the Reds slider towards the right. Does the brightness of the grass or the trees need a little fine tuning? Drag the Greens slider left or right until you get it just the way you want it. It's really that simple!
As with most image adjustments in Photoshop, the new Black & White converter comes in two flavors. There's the standard pixel-based version found by going up to the Image menu and choosing Adjustments, and there's the adjustment layer version. We're going to focus entirely on the adjustment layer version, since as we saw in the Non-Destructive Photo Editing with Adjustment Layers tutorial, adjustment layers allow us to work flexibly and non-destructively on our images. Since the Black & White adjustment was introduced in Photoshop CS3, I'll be using CS3 for this tutorial. Of course, you'll need at least Photoshop CS3 as well if you want to follow along.
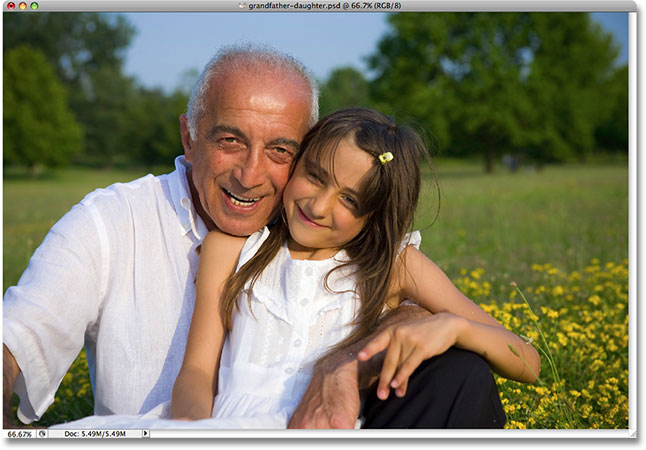
Here's a photo I have open in Photoshop. I want to convert this photo to black and white using the Black & White adjustment:
I want to use the adjustment layer version of the Black & White converter, so I'll click on the New Adjustment Layer icon at the bottom of the Layers palette and choose Black & White from the list of adjustment layers that appears:
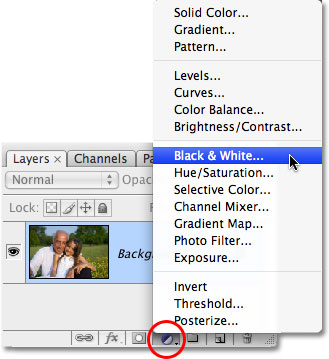
This brings up the Black and White dialog box. The main features in the dialog box are the six color sliders, each one controlling one of six primary colors in the image starting with Reds at the top followed in order by Yellows, Greens, Cyans, Blues, and finally Magentas at the bottom:

These sliders adjust how bright or dark each color will appear in the black and white version, and we can use them to emphasize or de-emphasize certain objects or areas in the image, brightening areas we want to bring attention to and darkening less important areas, based entirely on the original color of those areas. Dragging a slider towards the right will brighten areas that contained that color, while dragging a slider to the left will darken areas that contained the color. There's really nothing more to it than that!
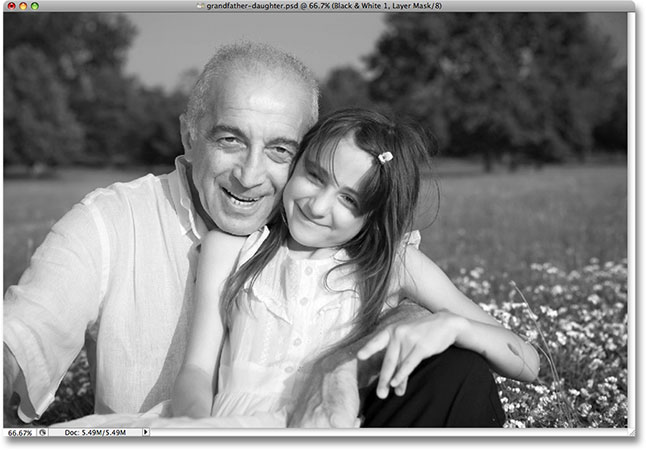
Notice how, when you bring up the Black & White dialog box, each slider is already set to a certain value, with Reds set to 40%, Yellows set to 60%, and so on? These are the default values that Photoshop uses as a starting point for the black and white conversion. You'll also notice that as soon as you choose the Black & White adjustment from the Layers palette, Photoshop instantly converts your photo to black and white using those default settings. Here's my image as it appears so far with the default slider values:

The default settings for my black and white conversion are perfect! Or at least, they would be perfect if I wanted the man's shirt and the girl's dress to be the main focus of the image. Unfortunately, that's not really the result I'm going for, but that's okay because this is just a starting point. I can simply adjust the sliders to make whatever changes I need. To start with, I want the sky above the man's head to appear a little darker. Now, since I'm looking at the image already converted to black and white, I can't see what the original color of the sky was, but I know from memory and common sense that the sky was probably blue. So to darken the sky, I simply need to drag the Blues slider in the dialog box towards the left. The further I drag to the left, the darker the sky, as well as anything else in the image that contains blue, will appear. There's usually a lot of cyan in the sky as well, so I'll also drag the Cyans slider towards the left. There are no specific values to use here. It depends entirely on your image and the look you're trying to achieve, so as I drag the sliders, I'll keep an eye on my image in the document window to make sure I don't darken the sky too much. Making changes that are too drastic could also introduce banding, giving you ugly, harsh transitions between colors or brightness levels:

After dragging the Blues and Cyans sliders towards the left, the sky in the black and white version of my photo is now a little darker, which helps bring more attention to the main subjects in the foreground. To make it easier to see the changes, I've divided the photo into a "Before and After" view, with the default brightness of the sky on the right and the new, slightly darker version on the left:

Depending on the image you're working with, you may be able to get away with darkening the sky even more. In my case though, if I had tried to darken it any further, I would have ended up with the ugly banding problem I mentioned. Here's what the sky would have looked like. Notice all the harsh transitions between brightness values, especially where the trees and sky meet? That's banding. You definitely want to avoid it, so make sure you keep an eye on your image as you drag the sliders:

If you did go too far with a slider, you can undo the last change you made either by going up to the Edit menu at the top of the screen and choosing Undo or, for a faster way, use the keyboard shortcut Ctrl+Z (Win) / Command+Z (Mac). Of course, you can also simply drag the slider itself to undo the change.
Next, I want to make the skin tones in the image brighter. Again, since I'm looking at the black and white version, I can't see what the original colors in the photo were, but I know that skin tones always contain lots of red. So to make the man and the girl's skin lighter in my black and white version, I simply need to drag the Reds slider towards the right. The further I drag to the right, the lighter their skin, as well as anything else in the photo that contains red, will appear. Once again, there are no specific values to use since all photos are different, so I'll keep an eye on my image in the document window as I drag the slider to make sure I don't lighten their skin too much:

There's usually lots of yellow in skin tones as well, so you may find that you also need to drag the Yellows slider when adjusting how light or dark someone's skin appears. In my case, dragging the Reds slider alone did the trick. Here's my image after lightening the skin tones:

The man and the little girl are now clearly the main focus of the image, but they seem to stand out a little too much. They're too bright in front of the background. To fix that, I'll brighten the grass and the trees behind them to blend everything in more naturally. Now, so far we've been lucky. We knew that skies are usually a combination of blue and cyan, and we knew that skin tones contain lots of red, so when we wanted to darken the sky or lighten the skin, we knew which color sliders needed to be moved. But what if we don't know which sliders to move? What if we don't remember what the original colors in the image were? I want to brighten the grass and the trees, but let's pretend for a moment that I fell on my head and can't remember what color grass and trees are. There's a couple of things I can do, besides seek medical attention.
First, since I'm using the adjustment layer version of the Black & White converter, if I ever need to view the original colors of the photo, all I need to do is turn the adjustment layer off temporarily by clicking on its eyeball icon (the Layer Visibility icon) on the far left of the layer in the Layers palette:

With the adjustment layer turned off, the full color version of the photo appears once again in the document window:
I can easily see now that the grass and the trees were green (yes, I really did know that already, just work with me here), so to switch back to the black and white version, I'll click on the Layer Visibility icon once again to turn the Black & White adjustment layer back on:

At this point, since I know that I need to adjust the green colors in the image, I could simply drag the Greens slider towards the right to brighten the grass and trees. However, I'm not going to do that because there's an even easier way to do this. If you ever need to adjust the brightness of something in the photo and you don't know what the original colors were, simply click on the area in the photo and, while still holding down your mouse button, drag your mouse left or right! This has the exact same effect as dragging the color sliders in the dialog box but without having to actually drag the sliders or even know which slider to drag! As you drag your mouse to the left, the area you clicked on, as well as any other areas in the image that contain the same color, will appear darker. Drag to the right and you'll lighten the area, as well as any other areas with the same color.
I'm going to click on an area of the grass to the right of the girl, which selects the green color of the grass, and then I'll simply drag my mouse towards the right to brighten both the grass and the trees, since the trees are also the same color:

Notice how brightening the grass and trees also brightened the flowers in the bottom right corner of the photo. You may have noticed as well that the skin tones have become a bit lighter. Even though it doesn't seem obvious, there's actually more yellow than green in plants, so when I clicked on an area of the grass to brighten it, Photoshop selected both greens and yellows. Since the flowers in the original photo were yellow, brightening the grass also brightened the flowers. And since skin tones often contain yellow, as they do in this photo, they were also brightened when I brightened the grass.
To compensate for the extra lightening of the skin tones, I'll simply click on the Reds slider in the dialog box and drag it a little towards the left to bring the skin tones back down to where I want them. I'm also going to drag the Yellows slider a little to the left to darken the flowers ever so slightly:

And with that, I'm done! Here is my final black and white conversion that I was able to easily create and customize using the new Black & White adjustment:
Keeping An Eye On Things With The Histogram
Photoshop's Black & White converter gives us so much freedom with the sliders that it's easy to go too far when lightening or darkening different areas. We've already seen an example of how banding can become an issue, but a more common problem is that we'll lighten an area so much that it becomes pure white. When that happens, we lose all of the image detail in that part of the photo. Likewise, we can make an area so dark that it becomes pure black, and again we lose all of the image detail. To keep an eye on things as we're working with the Black & White adjustment to make sure we don't drag any sliders too far, it's a good idea to leave your Histogram palette open. You'll find the Histogram palette grouped in by default with the Navigator and Info palettes:

The histogram gives us an easy way to view the current tonal range of the image, with pure black on the far left, pure white on the far right, and all of the other brightness levels in between. It's the exact same histogram you may have seen in the Levels dialog box. The black graph that looks like a mountain shows us how much of our image falls within the various brightness values between black and white. What we want to avoid is seeing anything on either the far left or far right of the histogram. A spike on the far left means that we've darkened an area too much and it's become pure black. A spike on the far right means we've lightened an area too much and it's become pure white. The screenshots below show examples of the histogram displaying areas of pure black (left) and pure white (right):

Notice the small warning icon in the top right corner of the histogram? That means Photoshop is currently displaying cached image data and you're not seeing the most accurate results. To update the histogram, simply click directly on the warning icon:

Each time you make a change with a slider in the Black & White dialog box, or each time you click and drag directly inside the image, you'll want to update the histogram and check to make sure you don't see any spikes on the far left or right. If you do go too far, simply press Ctrl+Z (Win) / Command+Z (Mac) to undo the last change you made, then update the histogram again. Using the Histogram palette along with the Black & White adjustment is an easy way to make sure you get the best possible black and white results without losing any image detail.
And there we have it! That's our look at the new Black & White image adjustment in Photoshop CS3! Check out our Photo Retouching section for more Photoshop image editing tutorials!