
Using A Photo As Its Own Background With Photoshop
Learn how to easily turn any photo into its own decorative background or border with Photoshop! This effect is great for wedding or engagement photos and takes very little time from start to finish.
To create the effect, we'll use two separate copies of the photo; one for the main image and one for the background. We'll colorize the background using a color sampled directly from the image, then we'll flip it and fade it into more of a watermark-style effect.
We'll then take our main photo, scale it down in size, give it a nice border and shadow, and finally, reposition it into the perfect spot in front of the background.
I'll be using Photoshop CC here but this tutorial is also fully compatible with Photoshop CS6. If you're using an earlier version of Photoshop, you'll want to follow along with our original Using A Photo As Its Own Background tutorial.
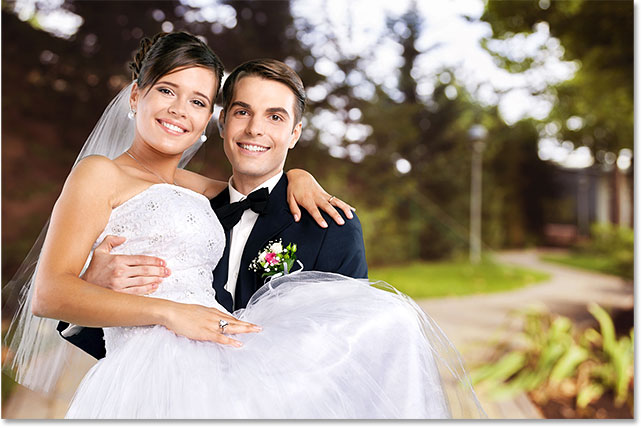
Here's the image I'll be using (wedding photo from Adobe Stock):
And here's what the final effect will look like:

Turn A Photo Into Its Own Background
Step 1: Duplicate The Background Layer
With the image newly-opened in Photoshop, if we look in the Layers panel, we see the photo sitting on the Background layer, currently the only layer in the document:

The first thing we need to do is make a couple of copies of the photo. We'll use the first copy for the background and the second copy for the main image.
To make the first copy, go up to the Layer menu in the Menu Bar along the top of the screen, choose New, then choose Layer Via Copy. Or, a faster way is to press the keyboard shortcut, Ctrl+J (Win) / Command+J (Mac):

Photoshop makes a copy of the Background layer, names the copy "Layer 1" and places it above the original:

Step 2: Duplicate "Layer 1"
To make the second copy, once again go up to the Layer menu, choose New, then choose Layer Via Copy, or press the keyboard shortcut, Ctrl+J (Win) / Command+J (Mac):
The second copy, named "Layer 1 copy", appears above the other two layers:

You may be wondering why we need three layers here when it seems like all we should really need is two; one for the main photo and one for the background. The reason is that the Background layer on the bottom contains our original image information. By leaving the Background layer untouched, we can safely create our effect while keeping the original photo intact in case we ever need it.
Step 3: Rename The New Layers
Before we go any further, let's quickly rename the two layers we just added so we're not working with Photoshop's generic layer names. We'll start with the layer at the top. Double-click on the name "Layer 1 copy" to highlight it. Then enter "Main Photo" on your keyboard for the new name:

Press the Tab key on your keyboard to jump down and highlight the name of the layer below it ("Layer 1"):

Type in "Background Photo" as the new name for the layer. Then, press Enter (Win) / Return (Mac) on your keyboard to accept the name change:

Step 4: Hide The "Main Photo" Layer
We'll create the background effect first. To see what we're doing, we'll need to hide the top layer ("Main Photo") from view. To do that, click on the visibility icon (the eyeball icon) on the left of the "Main Photo" layer:
Step 5: Select The Eyedropper Tool
With the "Main Photo" layer now hidden, let's colorize the background using a color sampled directly from the image. For that, we'll need Photoshop's Eyedropper Tool. Select it from the Toolbar:

Step 6: Set The Sample Size To "5 x 5 Average"
With the Eyedropper Tool selected, look up in the Options Bar along the top of the screen and you'll find the Sample Size option. By default, Sample Size is set to Point Sample, which means that when we click on the image to sample a color with the Eyedropper Tool, we'll sample the color only from the specific pixel we clicked on.
That's usually too exact for what we need. Rather than sampling the color only from that one specific pixel, it's often better to sample the average color of the spot where we click.
To do that, change the Sample Size to 5 x 5 Average. This tells Photoshop to look at all of the pixels within a 5 pixel by 5 pixel box surrounding the pixel we click on, and then choose the average color of those pixels:

Step 7: Sample A Color From The Image
Click on an area in your image containing the color you want to use for your background. I'll sample a color from the woman's cheek, which should work nicely:

The color you've sampled will appear as your new Foreground color in the Toolbar:

Step 8: Colorize The Background Using A Hue/Saturation Adjustment Layer
Now that we've sampled a color, let's use it to colorize the background. For that, we'll use one of Photoshop's Hue/Saturation adjustment layers. Click on the New Fill or Adjustment Layer icon at the bottom of the Layers panel:

Then choose Hue/Saturation from the list:

The options and controls for the Hue/Saturation adjustment layer appear in the Properties panel. There's no need to fumble around with any sliders here trying to pick a color because we've already chosen the color we want to use. Instead, all we need to do is turn on the Colorize option by clicking inside its checkbox:

Photoshop instantly colorizes the image using the color we sampled:

Increase the saturation of the color by dragging the Saturation slider in the Properties panel towards the right. A value of 50 should work nicely. Then, to fade out the background, drag the Lightness slider towards the right to a value of around +75:

Here's what my background now looks like:

Step 9: Flip The Image Horizontally
Let's flip the background photo horizontally so it appears as a mirror image of our main photo. To do that, click on the "Background Photo" layer in the Layers panel to select it:

Go up to the Edit menu at the top of the screen, choose Transform, then choose Flip Horizontal:

The photo will flip sideways, giving us our "mirror image" effect and completing our work on the background:

Create A Mirror Image Effect With Photoshop
Step 10: Select And Turn On The "Main Photo" Layer
We're done with our background for now, so let's work on our main image. Click on the "Main Photo" layer in the Layers panel to select it:

Then, turn the "Main Photo" layer back on in the document by clicking once again on its visibility icon (the empty square where the eyeball used to be):

With the "Main Photo" layer back on, the original image is now blocking the background photo from view. We'll fix that next:
Step 11: Resize The Main Photo With Free Transform
Let's resize the main photo so it appears smaller in front of the background. Go up to the Edit menu at the top of the screen and choose Free Transform. Or, a faster way to select Free Transform is by pressing the keyboard shortcut, Ctrl+T (Win) / Command+T (Mac):

This places Photoshop's Free Transform box and handles around the image. Press and hold Shift+Alt (Win) / Shift+Option (Mac) on your keyboard as you drag any of the corner handles inward to reduce the size of the photo. Holding Shift as you drag keeps the original aspect ratio of the image locked in place, while the Alt / Option key tells Photoshop to resize the image from its center rather than from the corner.
It's a judgment call on your part how small you want to make your image. I'm going to make mine roughly 50-60% of its original size:

When you're happy with the size of your image, release your mouse button, then release your Shift key and your Alt / Option key. Make sure you release your mouse button first, then the keys, or you'll lose the effect that the keys were having.
Press Enter (Win) / Return (Mac) on your keyboard to accept the new image size and exit out of the Free Transform command:

Step 12: Add A Stroke Around The Main Photo
Let's add a thin border around our main image. For that, we'll use a Stroke layer style. Click on the Layer Styles icon (the "fx" icon) at the bottom of the Layers panel:
Then choose Stroke from the list that appears:

This opens the Layer Style dialog box set to the Stroke options in the middle column. Let's choose a color for our stroke by once again sampling a color from the image. To change the stroke color, click the color swatch:

This opens Photoshop's Color Picker. Rather than choosing a color from the Color Picker like we would normally do, move your mouse cursor over the image. Your cursor will change into an eyedropper icon, just like we saw earlier with the Eyedropper Tool.
Click on a color in the image that you want to use for your stroke so Photoshop can sample it. I'll click on a light gray from the bride's dress:

Once you've sampled your color, click OK in the Color Picker to close it:

Next, back in the Layer Style dialog box, make sure the Position option is set to Inside, which will give our stroke sharp corners. Then, increase the thickness of the stroke by dragging the Size slider towards the right. The exact size you choose will depend on the size of your image, but keep in mind that we're not going for a Polaroid look here. We want something more elegant, especially if you're doing this with a wedding photo, so try to keep your stroke fairly thin. For my image, a stroke size of around 16 px works well:

Don't close out of the Layer Style dialog box just yet because we have one more layer style to add. Here's what my main image looks like so far with the stroke applied. As we can see, the stroke is thin and just barely visible:

Step 13: Add A Drop Shadow
Next, let's add a drop shadow to the main image. Click directly on the words Drop Shadow on the left of the Layer Style dialog box:

This will bring up the Drop Shadow options in the middle column (where the Stroke options were a moment ago). By default, Photoshop sets the shadow color to black, but that's too harsh for this effect. Let's once again sample a color from the image. To change the shadow color, click on the color swatch:

This again pops open the Color Picker. Just as we did before, move your mouse cursor over the image. Your cursor will change into an eyedropper icon. Look for a color in the image that's roughly the same as the color you used to colorize the background. Only this time, you'll want a darker version of the color (since it's a shadow, after all). I'll click on the area just below the woman's chin:

Click OK in the Color Picker to close out of it and accept your new shadow color:

Back in the Layer Style dialog box, leave the Opacity option set to 35% (the default value), but change the Angle to 135° so that the light source appears to be from the upper left. Drag the Distance slider to control how far the shadow extends outward from behind the image. The amount you need will depend on the size of your image, so keep an eye on the document as you drag the slider. For me, a Distance value of around 60 px looks good.
Finally, drag the Size slider to adjust the softness of the shadow. Again, this will depend on your image. I'll go with a Size value of 30 px:

Click OK when you're done to close out of the Layer Style dialog box. Your effect should now look something like this:

Step 14: Reposition The Main Photo
Things are looking good, except for one problem. My main image in front is blocking the people from view in the background. I'll fix the problem by moving the main image into a better spot. First, I'll select Photoshop's Move Tool from the Toolbar. I could also select the Move Tool by pressing the letter V on my keyboard:

Then, with my "Main Photo" layer still selected in the Layers panel, I'll click inside the document and drag the main photo into its new location. Again, this will depend on the specific image you're working on, and you may not need to move your image at all. In my case, I'll move the image down into the lower left of the document:

Step 15: Resize And Reposition The Background Photo
The only remaining problem is that the right side of my main photo is still blocking too much of the couple from view in the background. I need to move the couple in the background further to the right, and I can do that by increasing the size of my background photo. Normally we try to avoid making images larger than their original size because it tends to make them look soft and dull. But since this image is being used simply as a background, we can get away with it.
First, I'll click on the "Background Photo" layer in the Layers panel to select it:

Then, I'll once again go up to the Edit menu at the top of the screen and choose Free Transform. Or, I could press the keyboard shortcut, Ctrl+T (Win) / Command+T (Mac):
This places the Free Transform box and handles around the background photo. To give myself more room to work, I'll zoom out from the image a little bit by pressing and holding my Ctrl (Win) / Command (Mac) key and pressing the minus key ( - ) on my keyboard a couple of times. This lets me see more of the empty work area (the dark area) around the image:

To resize the background photo, I'll press and hold my Shift key to lock the original aspect ratio of the image in place as I drag the handle in the top right corner outward until the two people appear more centered between the main photo and the right side of the document. When I'm happy with the new size, I'll release my mouse button, then I'll release my Shift key (in that order):

We can also reposition an image inside the document using Free Transform. Now that I've resized the background photo, I'm going to move it down a bit by clicking inside the Free Transform box and dragging downward with my mouse until the top of the woman's head is no longer being cut off by the top of the document. When you're happy with the size and position of your background photo, press Enter (Win) / Return (Mac) on your keyboard to accept it and exit out of Free Transform:

And with that, we're done! Here, after resizing and repositioning the background photo, is my final result:
And there we have it! That's how to easily turn a photo into its own decorative background or border with Photoshop! For similar tutorials, check out our Photoshop Borders and Frames section. Or, visit our main Photo Effects section for more Photoshop effects tutorials!