
Surreal Motionscape Effect With Photoshop CS6
In this Photo Effects tutorial, we'll learn how to add a more surreal, otherwordly look to an image with an easy-to-create vertical motionscape effect using Photoshop CS6. This effect often works great with landscape photos, especially ones with lots of detail from top to bottom.
As we'll see, all it takes is the Motion Blur filter and a layer mask, and we'll be using a Smart Object and Smart Filter to keep the effect fully editable for some final tweaking at the end.
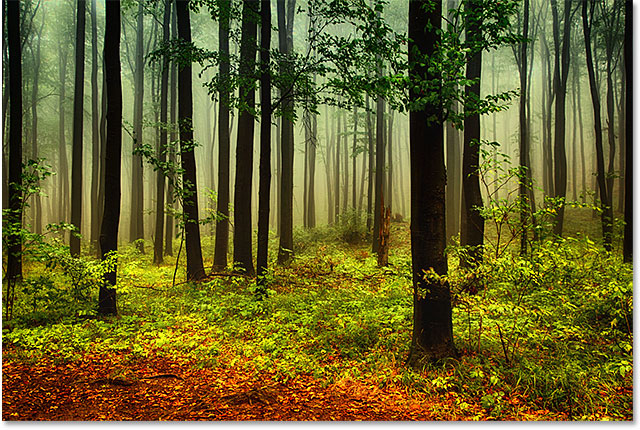
Here's the photo I'll be starting with (autumn forest photo from Shutterstock):
And here's what the final motionscape effect will look like:

How To Create A Surreal Motionscape Effect
Step 1: Convert The Background Layer To A Smart Object
Let's start by converting our Background layer into a Smart Object which will allow us to apply the Motion Blur filter as a Smart Filter, keeping our motionscape effect fully editable. If we look in my Layers panel, we see the photo I've opened sitting all by itself on the Background layer:

To convert it into a Smart Object, go up to the Layer menu in the Menu Bar along the top of the screen, choose Smart Objects, then choose Convert to Smart Object:

Nothing will seem to have happened to the image in the document window, but if we look again in the Layers panel, we see that Photoshop has renamed the layer from Background to Layer 0, and a small Smart Object icon now appears in the bottom right corner of the preview thumbnail, letting us know the layer is now a Smart Object:
Step 2: Apply The Motion Blur Filter
Next, we'll create the initial motionscape effect using Photoshop's Motion Blur filter. Go up to the Filter menu at the top of the screen, choose Blur, then choose Motion Blur:

This opens the Motion Blur dialog box. We want to create a sense of vertical motion, so first set the Angle to 90°. Then, to add the actual blurring effect, drag the slider at the bottom of the dialog box towards the right to increase the Distance value, in pixels. As you drag the slider, you'll see a live preview of the results in the document window. The goal here is to add enough blurring to create a good sense of motion but not so much that you've blurred everything beyond recognition. The nice thing is that because we're applying the filter to a Smart Object, it will become a Smart Filter which will allow us to go back and change the setting later, so don't worry too much about this initial setting. I'm going to set my Distance value to around 90 pixels, but your value may be different depending on the size of your image:

Click OK to close out of the dialog box. Here's my image with the initial motion blur applied:

If we look in the Layers panel, we see the Motion Blur filter listed as a Smart Filter below the image:

Step 3: Select The Smart Filter's Layer Mask
Applying the Motion Blur filter evenly to the entire image isn't the most interesting effect, so let's limit the blurring to just the lower parts of the photo. We can do that easily using a layer mask. In fact, Photoshop automatically adds a Smart Filter layer mask for us, which we can select by clicking on the mask's thumbnail in the Layers panel. A white highlight border will appear around the thumbnail letting you know the mask is now selected:

Step 4: Select The Gradient Tool
Next, select Photoshop's Gradient Tool from the Tools panel along the left of the screen:

Step 5: Choose The Black, White Gradient
With the Gradient Tool selected, click on the gradient preview bar in the Options Bar along the top of the screen:

This opens the Gradient Editor, with a selection of preset gradients to choose from at the top. Select the Black, White gradient by clicking on its thumbnail (third from the left, top row), then click OK to close out of the Gradient Editor:

Step 6: Drag Out A Gradient From Top To Bottom
With the Gradient Tool in hand, the Black, White gradient selected and the Smart Filter layer mask also selected, click near the top of the image to set a starting point for the gradient, then with your mouse button still held down, drag down towards the bottom of the image. Press and hold the Shift key on your keyboard as you're dragging to make it easier to drag in a straight vertical line. When you get near the bottom of the image, release your mouse button to set the end point for the gradient, then release your Shift key:

When you release your mouse button, Photoshop goes ahead and draws the gradient on the layer mask. The area along the top of the image now has no blurring applied to it at all, while the area along the bottom has the blur applied at full strength. The area in between is the transition area where the blur effect gradually increases as it moves towards the bottom of the image:

Even though we can't see the black to white gradient in the document window, we can see it in the layer mask's thumbnail in the Layers panel:

Step 7: Re-Adjust The Motion Blur Amount If Needed
Thanks to the power of Smart Filters in Photoshop, it's easy to go back at this point and change the amount of motion blur if needed. Simply double-click on the filter's name (Motion Blur) in the Layers panel:

This will re-open the Motion Blur dialog box, allowing you to adjust and fine-tune the blurring amount by again dragging the slider at the bottom. I think I'll increase my Distance value quite a bit, from its original setting of 90 pixels up to 158 pixels, giving me a much more pronounced blurring effect. Again, your amount may be different depending on the size of your image:

Click OK when you're done to close out of the Motion Blur dialog box. We can also adjust the opacity (the transparency level) of the Motion Blur Smart Filter. Double-click on the Blending Options icon to the right of the filter's name in the Layers panel:
This opens the Blending Options dialog box. Here, we can change the filter's blend mode and it's opacity level. I'm going to leave the blend mode set to Normal, but I'll lower its Opacity value down to 80%, which will allow some of the original image to show through the blur (this is completely optional - feel free to leave these blending options alone if you're already happy with your effect):

Click OK when you're done to close out of the Blending Options dialog box. Here's my effect after increasing the motion blur and lowering its opacity:

Step 8: Crop Away The Edges
The only remaining problem is that the Motion Blur filter tends to leave rather ugly artifacts around the edges of an image. In our case here, if you look along the very bottom of your effect, you'll most likely see that it doesn't look quite right. Exactly how "not quite right" it looks depends on how much blurring you've applied, but in any case, let's quickly crop away the edges of the image to clean things up.
Select the Crop Tool from the Tools panel:

With the Crop Tool selected, change the Aspect Ratio option on the far left of the Options Bar to Original Ratio so we keep the photo's original aspect ratio when we crop it:

Then, click on any of the corner crop handles and, with your mouse button held down, drag it in a short ways towards the center of the image to resize the cropping border. Press and hold the Alt (Win) / Option (Mac) key on your keyboard as you're dragging a crop handle to resize the cropping border from its center so all four sides of the border move at the same time. Continue dragging the corner handle inward only until the unwanted area along the bottom of the image falls outside the cropping border:

When you're ready, press Enter (Win) / Return (Mac) to crop the image, then press the letter V on your keyboard to quickly select the Move Tool, which will remove the cropping border from around the image (as long as the Crop Tool is active, the cropping border will remain visible). And with that, we're done! Here, after cropping the image, is my final motionscape result: