Add Photo Mounts To A Photo With Photoshop – Part 1
In this Photoshop Effects tutorial, we'll learn how to create and add simple photo mounts to an image, a nice finishing touch for displaying wedding or engagement photos, family portraits, travel photos and more! Since there's quite a few steps involved (all of them easy), and most of them will only ever need to be completed once, I've divided the tutorial into two parts.
In this first part, we'll create the actual photo mount itself and save it. Then in part two, we'll add multiple copies of the photo mount to our image! After you've completed this first part of the tutorial, you can jump straight to part two any time you need a refresher on how to add the photo mounts to your photos. I'll be using Photoshop CS5 throughout this tutorial, but any recent version will do.
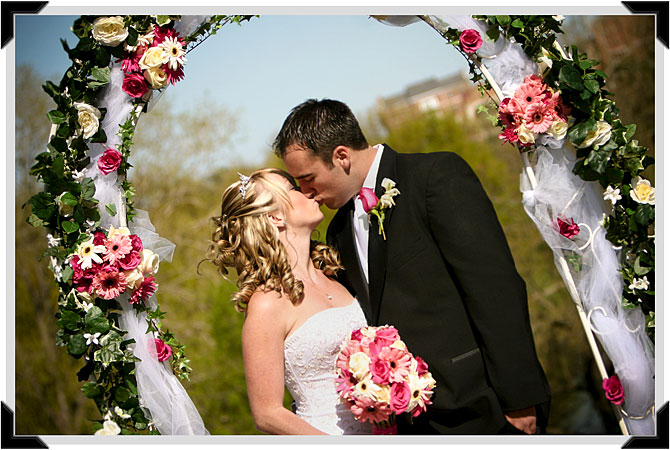
Here's the final result we'll be working towards. The photo mounts are displayed in each corner of the image:

How To Create Photo Mounts In Photoshop
Step 1: Create A New Document
Let's begin by creating a new Photoshop document for our photo mount. Go up to the File menu in the Menu Bar along the top of the screen and choose New:

This opens Photoshop's New Document dialog box. There's no specific size we need for the document, but to keep us on the same page, enter 800 pixels for the Width, 600 pixels for the Height and 72 pixels/inch for the Resolution. Also, make sure the Background Contents option is set to White. Click OK when you're done to exit out of the dialog box. Your new document will appear on your screen:

Step 2: Add A New Blank Layer
Click on the New Layer icon at the bottom of the Layers panel:
Nothing will happen in the document window, but we can see in the Layers panel that Photoshop has added a new blank layer named "Layer 1" above the Background layer, which is the layer that contains our white background:

Step 3: Draw A Rectangular Selection
Select the Rectangular Marquee Tool from the top section of the Tools panel:

With the Rectangular Marquee Tool selected, hold down your Shift key, then click and drag out a square selection outline in the center of the document. Holding the Shift key down as you drag is what forces the shape of the selection into a perfect square:

Step 4: Fill The Selection With Black
With the selection in place, go up to the Edit menu at the top of the screen and choose Fill:

When the Fill dialog box appears, set the Use option at the top to Black:

Click OK to exit out of the dialog box, and Photoshop fills the square selection with black:

Step 5: Reduce The Selection Size By 50%
Notice that the selection outline around the black square is still visible and active in the document, which means we can still work with it. We need to shrink it down in size, and we can do that using Photoshop's Transform Selection command. Go up to the Select menu at the top of the screen and choose Transform Selection:

This places transform handles (little squares) around the selection outline in the document window, similar to what we'd see if we had chosen the Free Transform command from the Edit menu. The difference is that Free Transform would alter the pixels inside the selection outline, while Transform Selection affects only the selection outline itself, not the pixels inside it. We need to shrink the size of the selection outline by 50%, so go up to the Options Bar along the top of the screen and enter 50% for both the Width (W) and Height (H):

Press Enter (Win) / Return (Mac) once to accept the changes in the Options Bar, then press it a second time to accept the transformation. The selection outline will appear at half its original size inside the square:

Step 6: Delete The Center Of The Square
Press Backspace (Win) / Delete (Mac) on your keyboard to delete the center of the square, then press Ctrl+D (Win) / Command+D (Mac) to remove the selection outline. With the center of the square deleted, we can see the white background from the Background layer showing through it:

Step 7: Draw A Diagonal Selection Through The Center Of The Square
Select the Polygonal Lasso Tool from the Tools panel. By default, it's hiding behind the standard Lasso Tool, so click on the Lasso Tool, then keep holding your mouse button down until a fly-out menu appears. Choose the Polygonal Lasso Tool from the menu:

With the Polygonal Lasso Tool selected, click below and to the left of the bottom left corner of the square to set a starting point for the selection, then click above and to the right of the top right corner of the square. This draws a diagonal line through the square's center. Click above and to the left of the top left corner of the square, then back on the original point below and to the left of the square to complete the selection:

Step 8: Delete The Selected Area
Once again press Backspace (Win) / Delete (Mac) to delete the selected area of the square. Then press Ctrl+D (Win) / Command+D (Mac) to remove the selection outline:

Step 9: Select The Remaining Part Of The Square
Hold down your Ctrl (Win) / Command (Mac) key and click directly on Layer 1's preview thumbnail in the Layers panel:

This instantly loads a selection outline around the contents of the layer, which in our case is the remaining part of the square:

Step 10: Contract The Selection Outline
Just as we did earlier, we need to make this new selection outline smaller. Rather than using Transform Selection though, go up to the Select menu, choose Modify, and then choose Contract:

When the Contract Selection dialog box appears, enter 8 pixels (which will contract the edges of the selection outline by 8 pixels), then click OK to exit out of the dialog box:

The selection outline now appears smaller inside the shape. We're going to copy this smaller area to a new layer:

Step 11: Copy The Selection To A New Layer
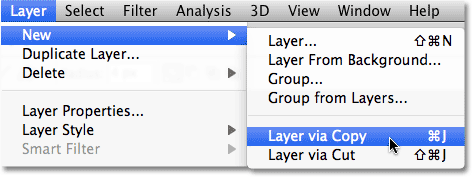
Go up to the Layer menu at the top of the screen, choose New, then choose Layer via Copy:

You can also press the keyboard shortcut Ctrl+J (Win) / Command+J (Mac). Either way copies the selected area to a new layer which Photoshop names "Layer 2":

Step 12: Add A Bevel And Emboss Layer Style
The basic shapes for our photo mount are in place, so let's give them a little detail and definition. With Layer 2 selected, click on the Layer Styles icon at the bottom of the Layers panel:
Choose Bevel and Emboss from the list of layer styles that appears:

This opens Photoshop's Layer Style dialog box set to the Bevel and Emboss options in the middle column. Change the Style option to Pillow Emboss, then set the Size to 3 px and the Soften amount to 5 px:

Click OK when you're done to close out of the dialog box. The smaller shape now has some subtle highlights around the edges as if it's embedded within the larger shape:

Step 13: Copy And Paste The Layer Style Onto Layer 1
Go up to the Layer menu at the top of the screen, choose Layer Style, and then choose Copy Layer Style:

Click on Layer 1 in the Layers panel to select it:

With Layer 1 selected, go back up to the Layer menu, choose Layer Style once again, and this time, choose Paste Layer Style:

Step 14: Edit The Layer Style
This adds the exact same Bevel and Emboss layer style from Layer 2 onto Layer 1, complete with all of the same options we set in the Layer Style dialog box. Problem is, we need to make a couple of changes to the settings. Fortunately, Photoshop lets us edit layer styles any time we want. If you look directly below Layer 1 in the Layers panel, you'll see the Bevel and Emboss style we pasted a moment ago. Double-click directly on its name to re-open the dialog box:

When the Layer Style dialog box re-appears, change the Style option from Pillow Emboss to Inner Bevel, then increase the Soften amount to 7 px:

The larger shape now has subtle highlights similar to the smaller shape. Don't exit out of the Layer Style dialog box yet. We still have one more to add:

Step 15: Add A Drop Shadow
With the Layer Style dialog box still open, click directly on the words Drop Shadow at the top of the list of layer styles in the left column. Make sure you click on the words themselves and not in the checkbox to the left of the words, otherwise you won't get access to the Drop Shadow options:

The Layer Style dialog box will change to show options for the Drop Shadow in the middle column. Uncheck the Use Global Light option and change the Angle of the shadow to -30°. Increase the Distance of the shadow to 5 px, then increase the Size to 10 px:

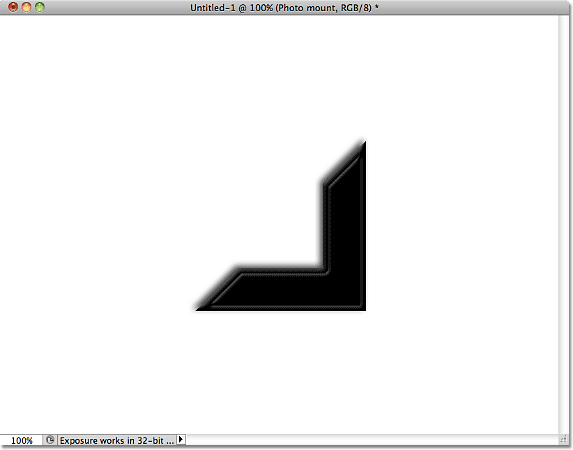
Click OK to exit out of the dialog box. With the drop shadow added, the photo mount is now complete:

Step 16: Merge The Two Shapes Onto A New Layer
With Layer 1 selected, hold down your Ctrl (Win) / Command (Mac) key and click on Layer 2 in the Layers panel. This will select both layers at once (you'll see them both highlighted in blue):

With both layers selected, go up to the Layer menu and choose Merge Layers, or press Ctrl+E (Win) / Command+E (Mac) for the keyboard shortcut:

This merges both layers into a single layer above the Background layer in the Layers panel. Photoshop names the merged layer "Layer 2", but let's rename it by double-clicking directly on the layer's name and changing it to "Photo mount". Press Enter (Win) / Return (Mac) when you're done to accept the name change:

Step 17: Save The Photo Mount
Before we move on to part two of the tutorial, let's save our photo mount so we can open and use it any time it's needed. Go up to the File menu at the top of the screen and choose Save As:

When the Save As dialog box appears, navigate to the location on your computer where you want to save the file. I'm going to save mine into a folder I have on my desktop named "photoshop files". Give the file a descriptive name like "photo mount". Choose Photoshop for the Format option so the document is saved as a Photoshop PSD file and make sure Layers is selected so the individual layers in the document are saved. Click Save when you're done:
