
Add Photo Mounts To A Photo With Photoshop – Part 2
In part 1 of this Photoshop tutorial, we learned how to create and save a simple photo mount. In this part, we'll take the photo mount and add multiple copies of it to the corners of an image! This part of the tutorial assumes you've already completed the first part and have your photo mount ready to go, so be sure to work your way through part 1 first if you haven't already.
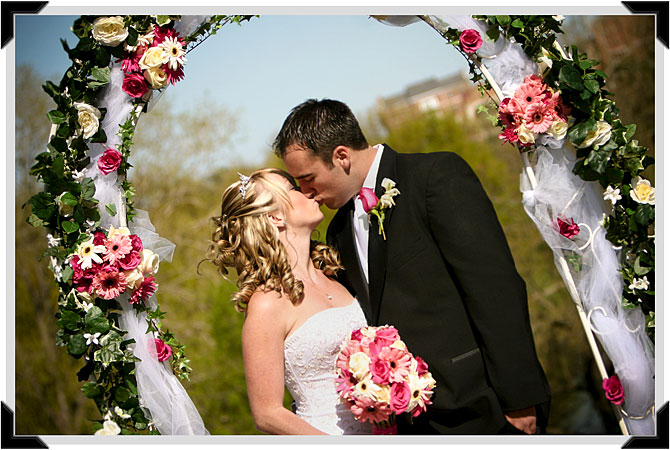
Here, once again, is the final result we're working towards, with the mounts displayed in the corners of the photo:
How To Add Photo Mounts To An Image
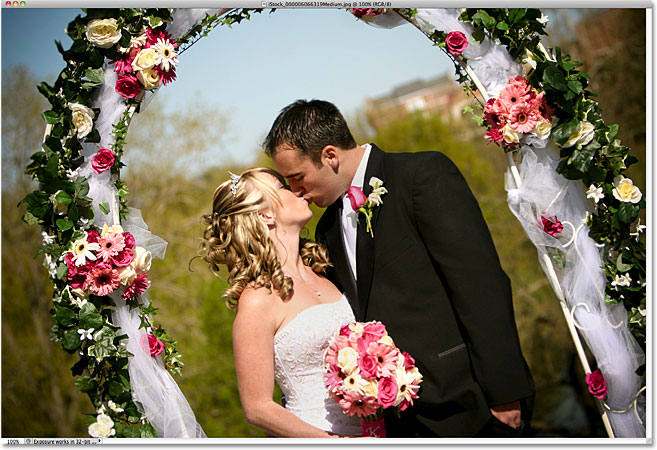
Step 1: Open Your Image
Open the image you want to add the photo mounts to. Here's the photo I'll be using (be sure to save a copy of the image before continuing in case you need access to the original in the future). If you still have the photo mount open from part 1 of the tutorial, the image will open in a separate document window:
Step 2: Duplicate The Background Layer
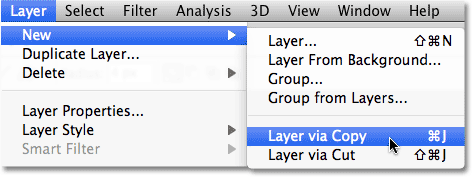
With the photo newly opened, if we look in the Layers panel, we see that we currently have one layer, the Background layer, which is the layer the photo is sitting on. We need to make a copy of the layer, so go up to the Layer menu at the top of the screen, choose New, and then choose Layer via Copy. Or, for a faster way to access the same command, press Ctrl+J (Win) / Command+J (Mac) on your keyboard:
Either way adds a copy of the layer, which Photoshop names "Layer 1", above the original Background layer:

Step 3: Add Extra Canvas Space
Let's add some extra white canvas space around the photo. Go up to the Image menu at the top of the screen and choose Canvas Size:

When the Canvas Size dialog box appears, enter 1 inch for both the Width and Height and make sure the Relative option is checked so we add to the existing canvas. Also, make sure the center square in the Anchor grid is selected so the extra space is added around the image equally. Finally, set the canvas color at the bottom of the dialog box to White:

Click OK when you're done, and the extra white canvas space appears around the edges of the image:

Step 4: Add A Border Around The Photo
Before we add our photo mounts to the corners, let's add a thin border around the edges of the photo. With Layer 1 selected, click on the Layer Styles icon at the bottom of the Layers panel:
Choose Stroke from the bottom of the list of layer styles:

This opens the Layer Style dialog box set to the Stroke options in the middle column. First, click on the color swatch to the right of the word Color and choose a light gray from the Color Picker. Click OK to exit out of the Color Picker when you're done. Change the Position of the stroke to Inside, then increase the size of the stroke by dragging the Size slider towards the right. The actual size you use for your stroke will depend on the size and resolution of your image so keep an eye on the document window as you drag the slider to judge the results. I'm going to set my stroke size to 24 px:

Click OK when you're done to close out of the dialog box. You should now have a thin light gray border around the image:

Step 5: Copy The Photo Mount
Open your photo mount document that you created in part 1 of the tutorial if it's not open already. Select the Photo mount layer in the Layers panel, then press Ctrl+A (Win) / Command+A (Mac) to select the entire layer. Press Ctrl+C (Win) / Command+C (Mac) to copy the layer to the clipboard:

Step 6: Paste The Photo Mount Into The Image
Switch back over to the document window that contains your image, then press Ctrl+V (Win) / Command+V (Mac) to paste the photo mount into the document. The photo mount will appear in the center of the image, which obviously isn't where we need it, and it will probably appear too large, but we'll fix both of these problems in a moment:

Step 7: Move And Resize The Photo Mount With Free Transform
Go up to the Edit menu at the top of the screen and choose Free Transform, or press Ctrl+T (Win) / Command+T (Mac) to quickly select it with the keyboard shortcut:

This places the Free Transform bounding box and handles around the photo mount. Move the photo mount into the bottom right corner of the image by clicking anywhere inside the bounding box, keeping your mouse button held down, and dragging it with your mouse into position. To resize the photo mount, hold down your Shift key and drag any of the corner handles. Holding the Shift key down will constrain the aspect ratio of the photo mount so you don't accidentally distort the shape of it as you're resizing it. You can also nudge the photo mount into place using the arrow keys on your keyboard. Press Enter (Win) / Return (Mac) when you're done to accept the transformation and exit out of Free Transform:

Step 8: Duplicate The Photo Mount
Press Ctrl+J (Win) / Command+J (Mac) to duplicate the photo mount. Not much will happen in the document window, but a copy of the photo mount will appear above the original in the Layers panel:

Step 9: Flip The Copy Vertically
With the top layer in the Layers panel selected, go back up to the Edit menu, choose Transform, then choose Flip Vertical. You'll see the copy of the photo mount flip vertically above the original in the document window:

Step 10: Move The Copy Into The Top Right Corner
Press the letter V on your keyboard to quickly select Photoshop's Move Tool. Hold down your Shift key, then click on the flipped photo mount and, while keeping your mouse button held down, drag it upward into the top right corner of the image. Holding down the Shift key will limit the direction you can drag in, making it easier to drag the photo mount straight up. Again, you can nudge the photo mount into place if needed with the arrow keys:

Step 11: Select Both Photo Mount Layers At Once
With the top layer still selected in the Layers panel, hold down your Ctrl (Win) / Command (Mac) key and click on the layer directly below it. This will select both photo mount layers at once (you'll see them both highlighted in blue):

Step 12: Copy And Drag The Photo Mounts Over To The Left
With both photo mount layers selected and the Move Tool still selected, hold down Shift+Alt (Win) / Shift+Option (Mac) and, again keeping your mouse button held down, drag the photo mounts over to the left edge of the image. Holding the Shift key will again limit the direction you can drag so it's easier to drag straight across, while holding the Alt (Win) / Option (Mac) key tells Photoshop to create copies of the photo mounts rather than moving the originals. You should now see four photo mounts in the document. The two on the left will be facing the wrong way, but we'll fix that next:

Step 13: Flip The Left Photo Mounts Horizontally
Go back up to the Edit menu at the top of the screen, choose Transform, and this time, choose Flip Horizontal:

The two photo mounts on the left side of the image will flip horizontally. Use the left or right arrow keys on your keyboard to nudge them into position if needed:

Step 14: Trim Away The Extra White Space
As an optional final step, if you want to trim away the extra white space around the image and photo mounts, go up to the Image menu at the top of the screen and choose Trim:

When the Trim dialog box appears, select Top Left Pixel Color, and make sure Top, Bottom, Left, and Right are all selected in the bottom half of the dialog box. This tells Photoshop to trim away everything that's the same color as the pixel in the top left of the document (which is white), and to trim it from all four sides of the document:

Click OK to exit out of the dialog box, and Photoshop trims away all of the extra white space, leaving us with our final result: