
The Screen Blend Mode In Photoshop
So far on our journey through the essential blend modes for editing, retouching and restoring photos in Photoshop, we've learned that all of Photoshop's blend modes, with the exception of "Normal" and "Dissolve", fit nicely into one of five main categories - Darken, Lighten, Contrast, Comparative, and Composite, and that in these five categories, we find five layer blend modes that are absolutely essential for working in Photoshop.
On the previous page, we looked at the first of the five, Multiply, which darkens the image and is very useful for restoring dark areas that have faded over time, as well as restoring detail in overexposed images. This time, we're going to look at our second essential blend mode, Screen.
If you recall from the first page, the Screen blend mode is found in the Lighten group, along with the Lighten, Color Dodge and Linear Dodge blend modes, so we know that it lightens the image in some way. Screen is actually the exact opposite of Multiply, and while the Multiply blend mode gets its name from the math that goes on behind the scenes when we set a layer to the Multiply mode, Screen gets its name from its real world analogy. Imagine once again that your photos are on slides. If you were to take two of them, place each slide in a separate projector and shine both projectors onto the same screen, the combined images on the screen would appear lighter than either image would appear on its own.
Let's look at how the Screen blend mode works in Photoshop. Once again, we'll start with my two-layer document that we first used on the previous page when we looked at how the Multiply mode works. On the bottom Background layer we have a solid blue color, and on the layer above it, we have a gradient going from pure black on the left to pure white on the right, along with a black square, a white square, and a square filled with 50% gray:
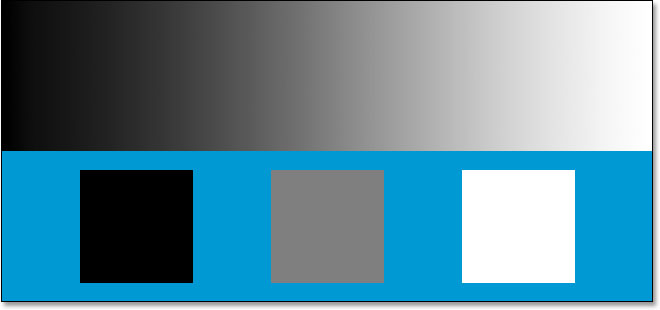
Again, If we look at my Layers palette, we can see things more clearly, with the Background layer filled with solid blue and the gradient and squares on the layer above it. The top layer, cleverly named "Gradient and Squares", is currently set to the Normal blend mode, which means that we're seeing everything exactly as we'd normally expect. The gradient and squares are completely blocking the solid blue color underneath them:

If you recall from our look at the Multiply blend mode, when we changed the "Gradient and Squares" layer to Multiply, what happened? The white square, along with the white area of the gradient on the right, completely disappeared from view, the black square, along with the black area of the gradient on the left, remained unchanged, and the 50% gray square, along with the rest of the gradient, blended with the solid blue color below them to give us a darker result. The Screen blend mode works exactly the opposite. With Screen, anything on the layer that's pure black will disappear from view. Anything that's pure white will remain unchanged, and any shade of gray between pure black and pure white will become lighter.
What should happen, then, when I change the "Gradient and Squares" layer to Screen? Based on what we just learned, the black square on the left, along with the black area of the gradient on the left, should completely disappear. The white square on the right, along with the white area of the gradient on the right, should remain unchanged, and the 50% gray square, along with the rest of the gradient, should blend in with the solid blue color below them and give us a lighter result. Let's see what happens. First, I'll change the blend mode of the "Gradient and Squares" layer from Normal to Screen:

And now if we look at my Photoshop document, we can see that everything has happened exactly as we expected, and exactly the opposite of the Multiply blend mode. The black square and black area of the gradient are now hidden from view, the white square and white area of the gradient remain unchanged, and the 50% gray square and the rest of the gradient are blending in with the blue color on the Background layer below them, giving us a lighter result:

Real World Example of the Screen Blend Mode
Since the Screen blend mode is so good at lightening images without lightening the darkest areas (areas of pure black or close to it), one of its most common uses in photo editing, retouching and restoration is to brighten images that have had their highlights fade over time, or images that suffer from underexposure. Let's look at my antique photo once again as we left it from the previous page. If you recall, we used the Multiply blend mode to darken the shadows in the image, but it left us with a photo that was lacking any highlights:

And here's our Layers palette showing what we've done so far. The original, faded image is on the Background layer. We added a Levels adjustment layer above it and set its blend mode to Multiply which instantly darkened the shadows in the image. To darken them either further, we duplicated the Levels adjustment layer, making sure it was also set to the Multiply blend mode, and then fine-tuned the amount of darkening by lowering the opacity of the duplicate layer to 50%:

We can use the Screen blend mode, along with yet another Levels adjustment layer, to easily restore the highlights in the image without affecting the shadows. With my "Levels 1 copy" layer currently selected, I'm going to press Ctrl+J (Win) / Command+J (Mac) to duplicate it. This will give me yet another copy of my Levels adjustment layer, this time named "Levels 1 copy 2". Of course, names like "Levels 1 copy 2" don't really help us much, so I'm going to rename the new layer to "Screen". While I'm at it, I'm also going to rename the original Levels adjustment layer to "Multiply", and I'll rename the one above it to "Multiply 50%" since we reduced the opacity of that layer to 50%. This makes it much easier for us to see and remember what we're doing as we work:

Whenever we duplicate a layer, the blend mode and opacity settings from the original layer are automatically copied over to the duplicate, and if we look at the Layers palette above, we can see that even though I've renamed the new layer to "Screen", it's still set to the Multiply blend mode and the opacity level is at 50%. That's because the layer I copied was set to Multiply at 50%. I'm going to increase the opacity back up to 100% and, since we want to use this layer to lighten the image and bump up the highlights, I'm going to change the blend mode to Screen:

And now, look what's happened to our image. Simply by adding another Levels adjustment layer and changing its blend mode to Screen, we've managed to brighten the highlights in the image without brightening the shadows, giving it much better contrast:

If I thought the image could use even more brightening, I could easily duplicate the adjustment layer once again, making sure the duplicate is also set to the Screen blend mode, and then I could fine-tune the brightening by lowering the opacity value, just as we did when darkening the shadows with the Multiply mode. In this case though, I think the image may be a little too bright already. I can see that some of the highlight details have been blown out, especially in the top right corner of the photo and in the woman's face, so I'm going to lower the opacity of the "Screen" layer down to about 70%:

This restores the highlight details that were being blown out a moment ago. Here, after lowering the opacity of the "Screen" layer, is the final image, now with much brighter and more visually pleasing highlights thanks to the Screen blend mode:

As I mentioned earlier, the Screen blend mode is also very useful for instantly brightening underexposed images, using the exact same techniques we just looked at. Simply add a Levels adjustment layer and change its blend mode to Screen. To brighten the photo even further, duplicate the adjustment layer, or to fine-tune the amount of brightening, simply lower the adjustment layer's opacity value.
So far, we've looked at two of the five essential blend modes for editing photos in Photoshop. We've seen how the Multiply mode darkens images and how the Screen mode lightens them. Next, we're going to look at our third essential blend mode, the Overlay blend mode, which both multiplies and screens images at the same time! Or jump back to the main page to choose a different blend mode!