
Add A Rainbow To A Photo With Photoshop
Learn step-by-step how to easily brighten those stormy skies in your photos by adding a rainbow with Photoshop!
Version note: This tutorial is for Photoshop CC 2019 or earlier. Photoshop CC 2020 (and later) users will want to check out the updated version.
In this tutorial, we'll learn how to add a rainbow to a photo! As we'll see, drawing a rainbow in Photoshop is actually easier than you might think. That's because Photoshop includes a built-in, ready-made rainbow gradient for us to use! All we need to know is where to find it and how to draw it using Photoshop's Gradient Tool.
On its own, the rainbow gradient doesn't look very realistic, but that's okay. It still gives us a great starting point. Once we've drawn the initial gradient, we'll learn how to combine it with a Smart Filter and a layer mask to blend the rainbow in perfectly with the image.
As with most photo effects, it helps if we start with the right type of image. Since we'll be adding a rainbow, a photo taken outdoors would be a good choice. If it happens to be a landscape photo with some storm clouds in the background, even better.
I'll be using Photoshop CC but everything we'll be learning is also compatible with Photoshop CS6. Please note that Photoshop CC 2020 and later users will want to check out the updated version.
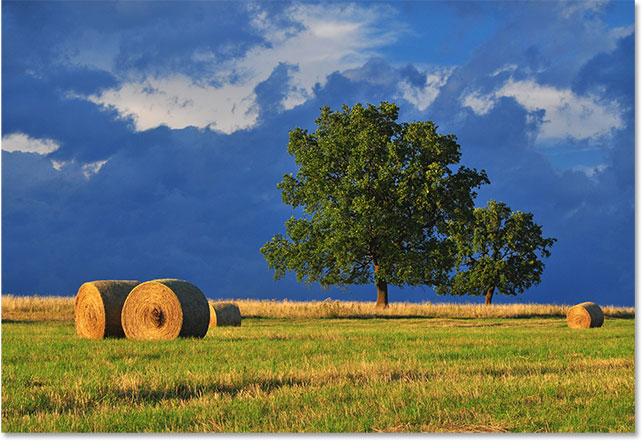
Here's the image I'll be using (landscape photo from Adobe Stock:
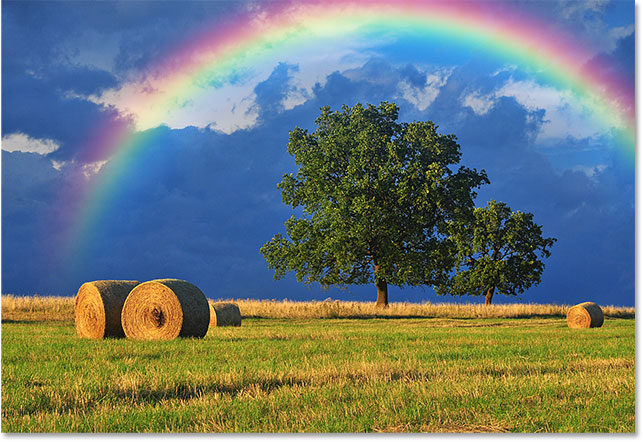
And here's how it will look after adding the rainbow. At the end of the tutorial, we'll learn how we can customize the appearance of the rainbow even further, but this is the general effect we'll be learning how to create:
How To Add A Rainbow To A Photo
Step 1: Add A New Layer
The first step in creating our rainbow is to add a new layer. This will allow us to keep the rainbow and the image separate from each other. If we look in the Layers panel, we see the original image sitting on the Background layer, currently the only layer in the document:

Let's add a new layer. We'll also name the layer at the same time. To do that, press and hold your Alt (Win) / Option (Mac) key as you click the New Layer icon at the bottom of the Layers panel:

This opens Photoshop's New Layer dialog box. Name the layer "Rainbow", then click OK:

If we look again in the Layers panel, we see our new "Rainbow" layer sitting above the image:

Step 2: Select The Gradient Tool
Select the Gradient Tool from the Tools panel:

Step 3: Open The Gradient Picker
With the Gradient Tool selected, click on the small, down-pointing arrow directly to the right of the gradient preview thumbnail in the Options Bar along the top of the screen. This will open Photoshop's Gradient Picker. Don't click on the thumbnail itself. If you do, you'll open the larger Gradient Editor. We just need the Gradient Picker, so be sure to click on the arrow, not the thumbnail:

Step 4: Load The Special Effects Gradients
When the Gradient Picker opens, you'll see small thumbnails of the various gradients we can choose from. If you haven't yet loaded any other gradients, you'll see only the default set. The rainbow gradient we need is not part of this default set, but it is included with Photoshop. It's found in the Special Effects gradient set. All we need to do is load the Special Effects set into Photoshop.
To do that, click the gear icon in the top right corner of the Gradient Picker:
This opens a menu with various gradient-related options. At the bottom of the menu is a list of additional gradient sets. Choose the Special Effects set:

Photoshop will ask if you want to replace the current gradients with the new ones or simply append the new ones to the list. We'll need one of the original, default gradients a bit later on, so click Append:

Step 5: Select The Russell's Rainbow Gradient
Back in the Gradient Picker, select the Russell's Rainbow gradient. It should be the last thumbnail in the list. If you have Tool Tips enabled in Photoshop's Preferences (they're enabled by default), you'll see the name of the gradient appear when you hover your mouse cursor over its thumbnail. Double-click the thumbnail to both select the Russell's Rainbow gradient and close the Gradient Picker:

If you're curious to see what the Russell's Rainbow gradient looks like, click on the gradient's preview thumbnail in the Options Bar. This time, you want to click the thumbnail itself, not the arrow beside it that we clicked on earlier:

This opens the Gradient Editor. The currently-selected gradient appears in the large horizontal bar in the bottom half of the editor. Notice that most of the Russell's Rainbow gradient is completely transparent. The colors for the rainbow appear only near the far right edge:

We don't want to actually edit the gradient, so click the Cancel button to close the Gradient Editor without making any changes:

Step 6: Set The Gradient Style To "Radial"
By default, Photoshop draws gradients in a straight line, known as linear style. To draw a rainbow, we need to tell Photoshop to draw a round (radial) gradient instead.
If you look directly to the right of the gradient preview thumbnail in the Options Bar, you'll see a series of five icons. Each icon selects a different gradient style. From left to right, we have Linear, Radial, Angle, Reflected, and Diamond. To draw a round gradient, select the Radial icon (second from the left):

Step 7: Draw The Rainbow Gradient
Drawing a radial gradient with Photoshop's Gradient Tool is a two-step process. First, we click somewhere on the image to set a starting point. This point will become the center of the gradient. Then, with our mouse button still held down, we drag away from the starting, center point to set the size of the gradient. The further we drag, the larger the gradient will appear.
Even though drawing a gradient in Photoshop is very simple, this is actually the trickiest part when it comes to adding a rainbow to an image. That's because the size and position of the rainbow will depend entirely on where, and how far, you've dragged.
To show you what I mean, I'll click on a random spot in the image to set my starting, center point. Then, with my mouse button still held down, I'll drag a short distance away from that spot. Since we're drawing a round gradient, the actual direction in which you drag makes no difference:

At first, we see only a thin outline showing us where we clicked and where we've dragged. When we release our mouse button, that's when Photoshop actually draws the gradient, and here, we see the result. The good news is, I've drawn a round, rainbow gradient. The bad news? It's too small, and it's not where I want the rainbow to appear:

Since that's not what I wanted, I'll undo the gradient by going up to the Edit menu at the top of the screen and choosing Undo Gradient. Or, I could undo it using the keyboard shortcut, Ctrl+Z (Win) / Command+Z (Mac). Either way works, but since you'll most likely need to undo your gradient several times before getting it right, the keyboard shortcut is really your friend:

Every image will be different, but what I want for this particular image is for the rainbow to arc over top of the trees. I'll start by clicking below the larger of the two trees to set the center point of the gradient. Then, with my mouse button held down, I'll drag away from the center point and up into the clouds:

I'll release my mouse button to let Photoshop draw the gradient, and this time, I get a much better result:

Step 8: Change The Layer Blend Mode To "Screen"
So far, so good. We have the rainbow gradient in place. Of course, it's not looking very realistic at the moment. One of the problems is that the gradient looks like it's just sitting in front of the photo. We need to blend it in with the image, and we can do that by changing the "Rainbow" layer's blend mode.
You'll find the Blend Mode option in the upper left of the Layers panel. By default, the blend mode is set to Normal. Click on the word "Normal" to bring up a list of other blend modes and choose Screen from the list:

Here's the result after changing the blend mode to Screen. The rainbow is now blending in better with the image:

Step 9: Convert The Layer Into A Smart Object
Another problem with the rainbow is that the transitions from one color to the next are too well-defined. We need to soften them, and we can do that by blurring the gradient.
We'll blur it using Photoshop's Gaussian Blur filter. But before we do, let's convert the "Rainbow" layer into a Smart Object. That way, the Gaussian Blur filter will be applied as a Smart Filter, allowing us to go back and change the settings if we need to.
To convert the "Rainbow" layer into a Smart Object, right-click (Win) / Control-click (Mac) on the layer in the Layers panel:

Then choose Convert to Smart Object from the menu that appears:

It won't seem like anything has happened, but if we look again in the Layers panel, we now see a small Smart Object icon in the lower right corner of the "Rainbow" layer's preview thumbnail. This is how Photoshop lets us know that the layer has been converted into a Smart Object:
Step 10: Apply The Gaussian Blur Filter
Now that we've converted the layer into a Smart Object, let's apply our filter. Go up to the Filter menu at the top of the screen, choose Blur, then choose Gaussian Blur:

This opens the Gaussian Blur dialog box. Keep an eye on your image as you drag the Radius slider along the bottom of the dialog box towards the right. The further you drag, the more blurring you'll apply to the rainbow and the softer the transitions between the colors will appear.
The amount of blurring you need will depend mostly on the size of your image, so there's no specific value to enter here. I'm working with a fairly large image, so in my case, a Radius value of around 50 pixels works well. A different value may work better for your image depending on its size and the overall look you're going for:

When you're happy with the effect, click OK to close out of the dialog box. Here's my result after blurring the gradient:

Since we applied the Gaussian Blur filter not to a normal layer but to a Smart Object, it was automatically converted into a Smart Filter. We can see "Gaussian Blur" listed as a Smart Filter below the "Rainbow" layer in the Layers panel.
The main benefit of using Smart Filters over regular filters in Photoshop is that even though we've already applied the filter, we can always go back and change its settings. If you want to try a different Radius value, double-click on the words "Gaussian Blur" to re-open the filter's dialog box and try again. You can do this as many times as you like with no loss in image quality:

Step 11: Add A Layer Mask
The one remaining problem with the rainbow, at least with my image, is that the bottom of it extends all the way to the bottom of the photo and across the ground. We need a way to hide the bottom part of the gradient so that the rainbow only appears in the sky. We can do that using a layer mask.
To add a layer mask, click the Layer Mask icon at the bottom of the Layers panel:
Again, nothing will seem to have happened, but we can now see a white-filled layer mask thumbnail to the right of the "Rainbow" layer's preview thumbnail. Notice that the layer mask thumbnail has a white highlight border around it. This tells us that the layer mask, not the layer itself, is now selected:

Step 12: Set Your Foreground Color To Black
In a moment, we're going to use Photoshop's Foreground to Transparent gradient to hide the parts of the rainbow we don't want to see. But for it to work, we first need to make sure that our Foreground color is set to black.
We can see Photoshop's current Foreground and Background colors in the two color swatches near the bottom of the Tools panel. The swatch in the upper left is the current Foreground color. If it's not set to black, press the letter D on your keyboard to quickly reset the Foreground and Background colors to their defaults. This will set the Foreground color to white and the Background color to black. Then, press the letter X on your keyboard to swap the colors, making the Foreground color black:

Step 13: Select The "Foreground to Transparent" Gradient
With the Foreground color set to black, go back up to the Options Bar along the top of the screen and click once again on the small arrow directly to the right of the gradient preview thumbnail:

This re-opens the Gradient Picker. This time, choose the Foreground to Transparent gradient by double-clicking on its thumbnail (second from the left, top row):

Step 14: Set The Gradient Style To "Linear"
Rather than drawing another radial gradient like we did for the rainbow, this time we'll need to draw a linear gradient. To switch from radial to linear, click on the Linear gradient style icon in the Options Bar:

Step 15: Draw A Gradient On The Layer Mask
With the Foreground to Transparent gradient selected, black as our Foreground color and the gradient style set to Linear, all we need to do to hide the part of the rainbow that's visible below the sky is draw a gradient from the horizon line up to the top of the rainbow.
I'll start by clicking anywhere just below the sky. Then, I'll press and hold my Shift key and drag straight up, almost to the very top of the rainbow. Holding the Shift key as you drag limits the angles in which you can drag, making it easier to move straight up vertically:

I'll release my mouse button, then the Shift key, so Photoshop can draw the gradient on the layer mask, and here's the result. The bottom part of the rainbow (the part that was extending into the ground) has disappeared completely from view. The rainbow then gradually comes into view and increases in brightness as we move from the horizon line up to the top of the rainbow:
If we look at the layer mask thumbnail in the Layers panel, we can see the gradient that we've drawn. The black area on the bottom is the area where the rainbow is now completely hidden. The white area at the very top is where the rainbow is 100% visible. The dark to light area in between is where the rainbow gradually comes into view:

Learn more: Understanding Layer Masks In Photoshop
Step 16: Hide Additional Areas Of The Rainbow (Optional)
You may be wondering why I chose the Foreground to Transparent gradient here rather than Photoshop's standard Black to White gradient. The reason is that the Foreground to Transparent gradient gives us the freedom to hide other parts of the rainbow as well, if we need to.
For example, if my image contained more clouds in the sky above the trees, and I wanted the rainbow to look like it's disappearing into the clouds, all I would need to do is draw another Foreground to Transparent gradient on the layer mask from the top of the rainbow downward:

When I release my mouse button, Photoshop draws the second gradient, and now the top of the rainbow disappears. Notice that the bottom is also still hidden. Drawing the second gradient did not overwrite the first one like it would have if I had drawn a Black to White gradient. Instead, the second gradient was simply added to the first:

We can see this more clearly if we look again at the layer mask thumbnail. The bottom is still filled with black, but now, so is the very top:

Of course, there are no clouds above the trees in this image, so I'll undo that second gradient by going up to the Edit menu and choosing Undo Gradient, or by pressing Ctrl+Z (Win) / Command+Z (Mac) on my keyboard:
We could also hide part of the rainbow from the side. I'll draw a Foreground to Transparent gradient on the layer mask from the right edge of the rainbow in towards the center:

I'll release my mouse button, and now the rainbow appears to fade away as it moves across the sky:

Again, this isn't really the effect I'm going for with this image. I'm just showing some examples here of why the Foreground to Transparent gradient can be a better choice over the standard Black to White gradient when adding a rainbow. I'll quickly undo my second gradient by pressing Ctrl+Z (Win) / Command+Z (Mac) on my keyboard.
Before And After
Finally, since we've drawn our rainbow on its own separate layer, we can easily do a "before and after" comparison. To view your original image without the rainbow, simply click the "Rainbow" layer's visibility icon (the little eyeball) in the Layers panel to temporarily turn the layer off:
With the layer turned off, the rainbow disappears:
Click the same visibility icon again (the empty square where the eyeball used to be) to turn the "Rainbow" layer back on and view your final result:
And there we have it! That's how to easily add a rainbow to an image using nothing more than a couple of gradients, a filter and a layer mask in Photoshop! View more photo effects tutorials.p>