Select and Mask People in Photoshop with AI
Learn how to quickly select a single person, multiple people or specific regions of a person using the Object Selection Tool's new AI-powered Select People feature in Photoshop.
Download the PDF: 2025 - Select and Mask People in Photoshop
The Object Selection Tool in Photoshop has a new Select People feature that uses AI to automatically detect and select people in your photos. It can also select individual parts or regions of a person (like their hair, clothing, or accessories), which means that you can quickly make local adjustments to a person or a specific area of a person without needing to select anything yourself.
In this tutorial, I show you how to select people with the Object Selection Tool and how to convert the selection to a layer mask so you can edit the area using an adjustment layer. I also show you a few ways to clean up any problems with the selections, and even how you might replace a problem area using Generative Fill.
Which Photoshop version do I need?
You'll need Photoshop 2025 or newer to use the Select People feature.
You can get Photoshop here or use the Creative Cloud Desktop app to make sure your copy is up to date.
Let's get started!
How to select people in Photoshop
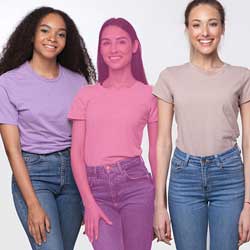
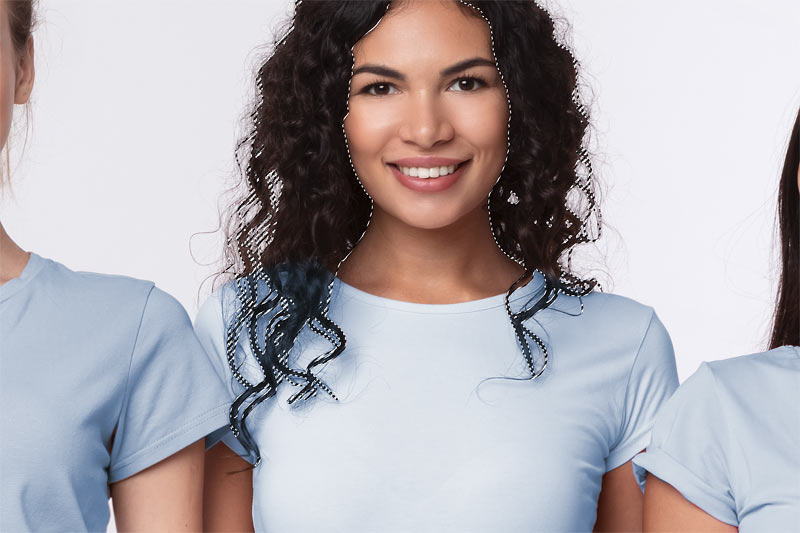
To cover the basics of how Select People works, I’ll start with this image of just one person.
But as we’ll see later, it works with images of two or more people as well.

Step 1: Choose the Object Selection Tool
With your image open in Photoshop, choose the Object Selection Tool from the toolbar.

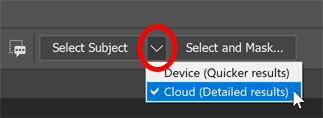
Step 2: Make sure Cloud is selected
Then before you go any further, click the arrow next to the Select Subject button in the Options Bar and make sure that Cloud is selected. This will give you better and more detailed results by processing the image on the cloud using Adobe’s servers rather than on your computer.
Step 3: Click the Select People button
Still in the Options Bar, click the new Select people button.

Viewing the people Photoshop detected
Photoshop will display a thumbnail for each person it detected. Since there is only one person in my photo, it detected that one person.

Hovering your mouse cursor over the thumbnail will highlight that person with a color overlay. By default the overlay is magenta but I’ll show you how to change it in a moment.
Note that the person is not selected yet, they’re just highlighted.

Viewing the detected regions of a person
If you click on the thumbnail, you’ll see a button at the top to select the entire person, which is one option.

But you’ll also see buttons for each of the individual regions or attributes of the person that Photoshop detected.
There are more than 20 attributes that Photoshop can detect but it will only show the ones that it found for this person in this image. If there were other people in this photo, they may have other attributes that are not listed here.

When you hover over a button, that region of the person is highlighted separately.
For example, if I hover over the Hair button, only the woman’s hair is highlighted. Again it’s not selected yet, it’s just highlighted.

Step 4: Choose the person or region you want to select
You can click on a button to choose an area you want to select. I’ll click on Facial skin.

And in the image, the woman’s facial skin is highlighted.

Notice that choosing Facial skin did not include the woman’s nose. But that’s okay because you can click on multiple buttons to choose more than one area.
So to add her nose, I’ll click on the Nose button. I’ll also click on the Ears button to choose all three regions. If you click on the wrong button, just click it again to deselect it.

All three of those regions are now highlighted.

Step 5: Create the selection
Finally, to create the selection, click the Apply button.

The overlay disappears and the selection is displayed with the usual marching ants outline.

Clearing the selection
I’m going to remove the selection outline so I can show you another way to work. To do that, I’ll go up to the Select menu in the Menu Bar and choose Deselect.

How to adjust the overlay
Before we continue, if you’re having trouble seeing the magenta overlay, click the gear icon in the Options Bar.
Then down in the Overlay Options, you can choose a different overlay color.
Or you can increase the opacity of the overlay. I’ll increase it to 50 percent so it’s easier to see. Then click anywhere outside the dialog box to close it.

The faster way to select people
We’ve seen that you can click the Select people button in the Options Bar to choose the person or regions you want to select. But you actually don’t need to use it.
Instead, with the Object Selection Tool active, simply move your mouse cursor over a person in the image to highlight the person or the different regions that Photoshop detected.
For example, if I hover my cursor over the woman’s clothes, Photoshop highlights only her clothes. This is exactly the same as if I had clicked the Select people button in the Options Bar, clicked on the woman’s thumbnail and then clicked the Upper Clothes button. There’s no difference in the result.

Or if you hover your cursor just outside the edge of the person, you’ll highlight the entire person.

To select the region you are hovering over, just click on it and the selection is created. I’ll click on the woman’s clothes.
Again we see the marching ants outline, this time around her outfit.

Cleaning up the selection with the Selection Brush Tool
As with any automated selection tool, even ones that use AI, the selections are not always perfect.
If I zoom in on the back of the woman’s outfit, we see that Photoshop included some of the white background, so I need to clean that up.

One of the easiest ways to clean up a selection is by using the Selection Brush Tool (Photoshop's newest selection tool). I’ll grab it from the toolbar.

The Selection Brush is great because it lets you simply paint over the areas you want to select, and it displays the selection as a magenta overlay so it’s easier to see than those marching ants. It’s still the same selection, just a different way of displaying it.
In this case, I want to use it to remove part of a selection. So in the Options Bar, I’ll switch the Mode from Add to Subtract.

Then to remove that bit of background from the selection, all I need to do is paint over it.
When you’re done, you can switch back to the marching ants view by choosing a different tool in the toolbar.

Changing the color using an adjustment layer
Now that the woman’s outfit is selected, I can easily change its color using a Hue/Saturation adjustment layer.
With the selection active, I’ll open the Adjustments panel. Then I’ll click on the Single adjustments option at the top and choose a Hue/Saturation adjustment layer.

In the Layers panel, Photoshop adds a Hue/Saturation adjustment layer above the image.
And because the selection was active when I added the adjustment layer, Photoshop automatically converted the selection into a layer mask, as we see in the layer mask thumbnail.
The white area in the mask is the woman’s outfit while the black area is everything else that was not selected.

With the layer mask in place, any adjustments I make with the Hue/Saturation adjustment layer will affect only the woman’s outfit. The rest of the image will remain the same.
So in the Properties panel, I’ll drag the Hue slider to the left to easily change the color of her outfit.
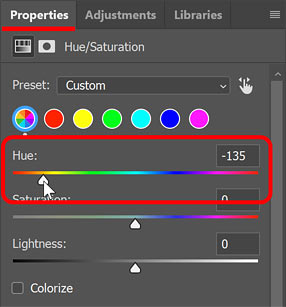
And now her outfit has changed from blue to green.

Selecting multiple people in a photo
We’ve seen that the Select People feature works great with a photo of just one person. But it can also detect multiple people in your photo and even the individual attributes of each person.
I’ll switch to this second image.

Once again I’ll grab the Object Selection Tool from the toolbar.
Then in the Options Bar, I’ll click the Select people button. And this time, Photoshop displays multiple thumbnails, one for each person.
Only three of the five thumbnails are visible initially, so I’ll click the icon on the right that says +2.
And now all five thumbnails are displayed.

You can hover your cursor over a thumbnail to see just that one person highlighted.

Or if you hover over the All People icon (the gray icon) on the left:
All of the people Photoshop detected in the image will be highlighted.

Selecting the same region(s) for multiple people at once
If you click on a person’s thumbnail, you’ll see buttons for all of the regions or attributes that Photoshop detected for that one person, so you can click on the ones you want to select.

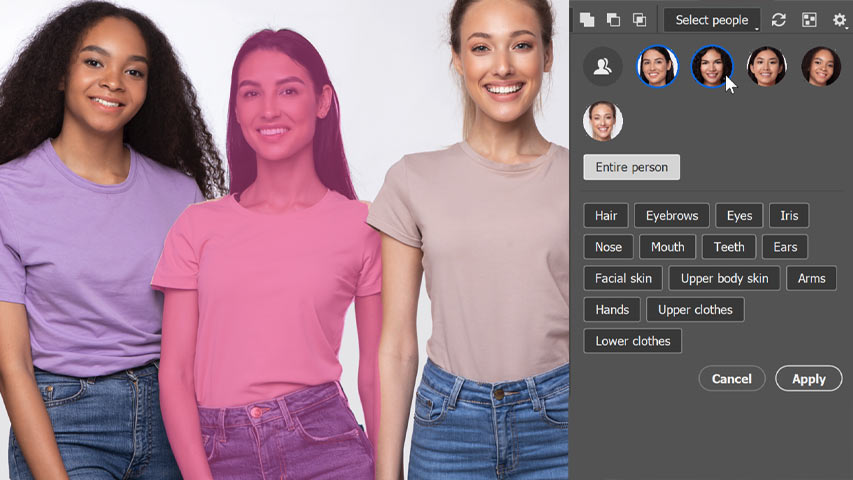
You can even click on more than one thumbnail to choose two or more people at a time. I’ll click on the thumbnails for the three women on the right. Selected thumbnails have a blue outline around them.
Then with all three women selected, if I choose a shared attribute like hair:

Notice that the hair on all three women on the right is highlighted. This makes it easy to select the same region for multiple people in your photo.

I’ll choose all of the people in the photo by clicking the All People icon in the upper left.
Then I’ll click the Upper clothes button to choose their t-shirts, and I’ll click Apply to create the selection.

Here we see the marching ants selection outline around all five of the t-shirts.
There are a few spots that Photoshop missed but overall it did a great job.

Editing the same region(s) for multiple people at once
So now I can change the color of all five t-shirts at once using a single Hue/Saturation adjustment layer.
I’ll open the Adjustments panel, choose Single adjustments at the top and choose Hue/Saturation.
In the Layers panel, the Hue/Saturation adjustment layer is added above the image and we see that Photoshop converted our selection into a layer mask. The white areas on the mask are the t-shirts and the black areas are everything else that was not selected.

To change the color of the t-shirts, I’ll go to the Properties panel. Since I want all five t-shirts to be the same color, I’ll click the Colorize button.

Then I’ll drag the Hue slider to the right to choose a shade of blue that matches their jeans.

And this looks pretty good so far.

Looking for problems with the layer mask
But if I zoom in on the t-shirt of the woman second from the right, we see some problems.
The Object Selection Tool missed a few spots, especially in her upper left shoulder, so the original t-shirt color is still showing through in those areas. And with lots of hair in these areas, fixing the problem could be a challenge.

Adding the missing areas to the layer mask
I’ll ignore the hair for now and just focus on the t-shirt. To add those missing areas to the layer mask, I need to paint over them with black on the mask.
So to do that, in the Layers panel, I’ll select the layer mask by clicking its thumbnail.

Then in the toolbar, I’ll select the Brush Tool.

I’ll make sure my Foreground color (the brush color) is set to white so I can add the missing areas to the layer mask.

Then I’ll simply paint over the missing areas of the t-shirt to add them to the mask and change their color.
Notice that along with the t-shirt, the hair has also turned blue in those areas, but I’ll fix that next.

Selecting the hair using the Object Selection Tool
To restore the original color of the hair in the areas where I painted, I need to remove the hair from the layer mask. Thankfully, hair is one of the regions we can select using the Object Selection Tool.
I’ll reselect the Object Selection Tool from the toolbar.
To highlight the hair, I’ll hover my mouse cursor over it.

Then I’ll click on the hair to select it, and we see the marching ants selection outline.
Since I want to hide the hair on the layer mask, I need to fill the selection with black.
So to do that, I’ll go up to the Edit menu and choose Fill.

In the dialog box, I’ll set Contents to Black and click OK.

And that looks much better. Most of the hair is back to its original color.

Replacing some of the hair using Generative Fill
But there are still a few problem spots where the original t-shirt color is obvious through the hair.

So one thing I could do here is simply replace those areas using AI. And the best tool for that is Generative Fill.
First I need to select the areas I want to replace. So in the toolbar, I’ll grab the Selection Brush Tool.
The Selection Brush works great with Generative Fill because it’s so easy to just paint over the areas you want to replace.
I’ll paint over the problem areas to create the selections.

Then in the Contextual Task Bar, I’ll click Generative Fill.

I could enter a prompt but I’ll just click Generate.

After waiting a few seconds, the selected areas are replaced with new AI-generated content. Problem solved.

And there we have it! Thanks to the Object Selection Tool’s new Select People feature, it’s easier than ever to select and edit a single person, multiple people or specific regions of a person with Photoshop.
Related tutorials:
- Using the Remove Tool with Generative AI
- Remove distracting people with AI in Camera Raw
- Remove wires and cables from photos with AI