Photoshop Brushes – Texture Options
So far in our look at Photoshop's powerful and amazing Brush Dynamics, we've seen how we can dynamically control the size, angle and roundness of our brushes as we paint using the options found in the Shape Dynamics section of the Brushes panel, and how we can scatter multiple copies of our brush tip along each stroke with the Scattering options. In this tutorial, we'll look at the Texture options, which give us the ability to add a texture to our brush, perfect for creating the illusion of painting on a textured surface like paper or canvas, or just for adding more interest to the shape of our brush tip!
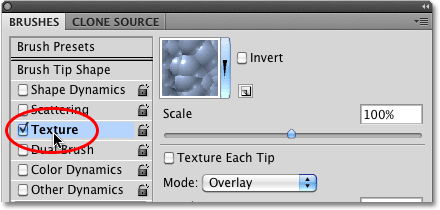
To access the Texture options, click directly on the word Texture on the left side of the Brushes panel. Just as with the Shape Dynamics and Scattering sections that we looked at previously, we need to click on the word itself to gain access to the options. Clicking inside the checkbox to the left of the name will turn the Texture options on but won't let us change any of them:

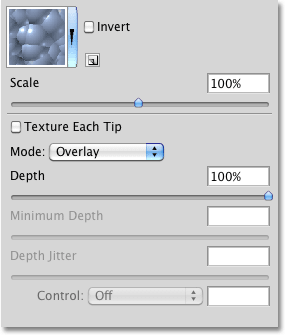
Once you've clicked on the word Texture, the Texture options will appear on the right side of the Brushes panel. By default, the bottom half of the options are grayed out and unavailable. We'll see how to enable them a bit later on:

Choosing A Texture
Even though Photoshop calls them Texture options, what you'll usually be working with here is patterns, and we can use any of the patterns that Photoshop installed for us, as well as any patterns we've created ourselves. To choose a pattern, click on the pattern preview thumbnail at the top of the list of options:

This opens the Pattern Picker, which shows small thumbnail previews of all the patterns that are currently loaded into Photoshop. By default, there isn't much to choose from. That's because all we see are the patterns that Photoshop initially loads for us, but there are other pattern sets available. To load any of the additional pattern sets that Photoshop comes with, click on the small triangle icon in the top right corner of the Pattern Picker:

A fly-out menu will appear. If you look near the bottom of the menu, you'll see a list of other pattern sets we can choose from. To load one of them, simply click on its name. I'm going to select the first one - Artistic Surfaces:

Photoshop will pop open a small dialog box asking if you want to replace the current patterns with the new ones. Click on Append to simply add the new patterns in with the existing ones:

The newly loaded patterns will appear in the Pattern Picker after the patterns that were already loaded previously. To select a pattern, click on its thumbnail. I'm going to select the Parchment pattern, but you can choose any one you like. If you have Tool Tips enabled in Photoshop's Preferences, the name of each pattern will appear as you hover your mouse cursor over the thumbnails. Once you've chosen a pattern, press Enter (Win) / Return (Mac) to close out of the Pattern Picker:

Even though I've selected a pattern, if I look down at the preview area along the bottom of the Brushes panel, I'm not seeing any changes to the appearance of my brush stroke (I'm still using the same standard round brush tip):

You may be seeing the same thing I'm seeing, or you may see your pattern clearly visible inside the brush stroke. The reason has to do with two main options that determine how our brush and our texture (pattern) interact with each other, which we'll look at next.
Mode
In the center of the Texture options is an option named Mode, which is short for Blend Mode (or Brush Mode, but I find it makes more sense to think of it as Blend Mode). This option is one of two main options (the other being Depth which we'll look at in a moment) that determine how the brush and the texture interact, or blend, with each other. If you click on the drop-down box to the right of the word Mode, you'll see a list of various blend modes we can choose from:

If you've been working with Photoshop for a while and using layer blend modes, most of the modes in the list, like Multiply, Overlay, Color Dodge and so on, will look familiar to you. Each of these modes will change how the texture appears inside the brush. The effect you get from each one will depend on the brush tip and texture you're using, so the easiest way to see what sort of results you'll get is by trying each mode out while keeping an eye on the preview of your brush stroke at the bottom of the Brushes panel.
The original mode I had selected was Color Burn, but as we saw in the preview area a moment ago, Color Burn completely blocked my texture from view. I'll select Multiply to see what effect I get:

If I look at the preview of my brush stroke, I see that my texture has suddenly appeared inside the shape of the stroke:

Let's try a different mode. I'll select Subtract this time:

With the Subtract mode selected, the texture is still visible inside the brush stroke, but it now appears much lighter:

Try each mode out with your brush and choose the one that gives you the results you're looking for.
Depth
The second main option that controls how our brush and texture interact is Depth, which is found directly below the Mode option we just looked at. Depth determines how visible the texture appears inside the shape of the brush. At a depth value of 0%, the texture is completely hidden from view and only the brush itself is visible. As we increase the depth value by dragging its slider towards the right, the texture becomes more and more visible until finally, at a depth value of 100%, the texture appears at full strength inside the brush. Keep an eye on the preview area at the bottom of the Brushes panel as you drag the Depth slider to see the effect it has:

Here's a simple brush stroke with Depth set to 0%. The texture is completely hidden:

The same brush stroke with Depth set to 50%. The texture is now partially visible (Mode is set to Multiply):

And here's the brush stroke with Depth set to 100%. The texture is now fully visible inside the brush (Mode set to Multiply):

Texture Each Tip
If you look closely at the brush strokes in the above examples, you'll notice that the texture (pattern) repeats over and over again inside the area I've painted. In other words, I'm simply painting the texture into the document. This is Photoshop's default behavior for the Texture dynamics, and it's exactly the behavior we want if we're trying to create the illusion that we're painting on some sort of textured surface like canvas.
Photoshop gives us another option, though, and that's to apply the texture directly to the brush tip itself, which means that the texture will be re-applied each time Photoshop stamps a new copy of the brush tip as we paint, giving us much more of a textured brush appearance and less of the repeating pattern we see by default.
To enable this feature, select the Texture Each Tip option directly above the Mode option:

By turning on the Texture Each Tip option, we enable the other options (Minimum Depth, Depth Jitter and Control) that were initially grayed out and unavailable:

Control
Just as we've seen with the Shape Dynamics and Scattering sections, Photoshop gives us various ways to dynamically control the depth value of the texture as we paint, all of which are found in the Control drop-down list at the bottom of the Texture options:

By now, if you've been following along from the beginning of this series, these options should look familiar to us. Fade will gradually reduce the visibility of the texture inside the brush stroke over the number of steps we specify (25 is the default number of steps). Pen Pressure allows us to control the depth by adjusting the amount of pressure we apply to the tablet with the pen, and Pen Tilt changes the depth value as we tilt the pen forward and back. Here's a brush stroke with Control set to Pen Pressure. I've increased the spacing between the individual brush tips to make it easier to see the changes in the depth value (Mode is set to Subtract this time):

Minimum Depth
If you want the texture to be visible to some degree at all times, use the Minimum Depth option to control the lowest depth value that Photoshop will use. Drag the slider left or right to adjust the minimum value. I'm going to set my minimum depth to 50%:

Here's the same brush stroke as before (with Control set to Pen Pressure), but with the Minimum Depth value now set to 50%, the depth never drops to the point where the texture is no longer visible:

Jitter
Finally, we can let Photoshop randomly change the depth value for us as we paint using the Jitter option. Drag the Jitter slider towards the right to increase the amount of randomness that Photoshop will apply to the depth:

As always, we can use Jitter by itself to add nothing but randomness to the depth value, or we can combine it with any of the Control options to add a little randomness while we dynamically control the depth value with pen pressure or any of the other options. Here, I've set Jitter to 100% and turned the Control option to Off, letting Photoshop randomly choose the depth value of each new brush tip. I've also set the Minimum Depth value to 0%, giving Photoshop a complete range of depth values to choose from:

Invert and Scale
There's two additional options found at the top of the Texture dynamics section. Invert will swap the original brightness values of your texture, making dark areas light and light areas dark. I don't find much use for this option but it's there if you need it. Use the Scale slider to change the size of the texture as it appears inside your brush. Keep in mind, though, that textures (and patterns) are pixel-based and follow the same general rules for resizing as images. Making the texture smaller is usually okay, but scaling it much beyond it's default size of 100% can make it appear soft and dull:
