Crop and Resize Photos to Match Frame Sizes with Photoshop
Learn how to easily crop and resize an image to fit in any frame size you need using the Crop Tool in Photoshop! For Photoshop CC and CS6.
When resizing an image for print, a problem we often face is that the aspect ratio of our image is different from the aspect ratio of the frame we want to place the image into. Since we can't change the frame size, we need a way to change the aspect ratio of the image. In this lesson, I'll show you how easy it is to both change the aspect ratio and resize your image for the highest print quality using Photoshop's Crop Tool! Let's see how it works.
I'll be using Photoshop CC here but you can also follow along with Photoshop CS6.
Let's get started!
Image size vs frame size
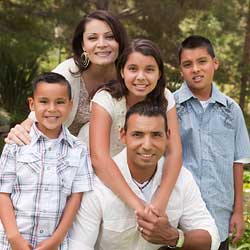
First, let's quickly look at the problem. Here's an image I've opened in Photoshop that I downloaded from Adobe Stock:

Let's say I want to print this image so that it will fit inside a standard 8" by 10" frame. Normally, we resize images in Photoshop using the Image Size dialog box. To open it, I'll go up to the Image menu in the Menu Bar and I'll choose Image Size:

In Photoshop CC, the Image Size dialog box features a new preview window on the left, along with the image size options on the right:

Why the usual way to resize an image won't work
But here's the problem. Remember that I want to fit this image into an 8" by 10" frame. But since the current aspect ratio of my image is not 8 x 10, the Image Size dialog box won't let me resize it to the 8" by 10" frame size that I need. If I try setting the Width to 8 Inches, the Height value is wrong:

And if I change the Height to 8 inches, then the Width value is wrong. And the same thing will happen if I try setting the Width or Height to 10 Inches. The other value will always be wrong, and it's because the aspect ratios of my image and of the frame are different:

Now I could unlink the Width and Height values by clicking the link icon between them, and this would let me change the Width and Height independently. So if I want to keep the image in landscape orientation, where the width is larger than the height, I could enter 10 Inches for the Width and 8 Inches for the Height:

But as we can see in the preview window, this squishes the image horizontally, which isn't what I want to do:

As long as the image and the frame I want to display it in are using different aspect ratios, then the standard way of resizing images using the Image Size dialog box isn't going to work. So I'll click the Cancel button to close the dialog box without making any changes:

How to crop and resize the image with the Crop Tool
What we need is a way to crop our image to the same aspect ratio as the frame before resizing it. And we can do that using the Crop Tool. In fact, the Crop Tool lets us crop the image and resize it for print all in one shot!
Step 1: Select the Crop Tool
First, I'll select the Crop Tool from the Toolbar:

Photoshop places the crop border and handles around the image:

Step 2: Choose "W x H x Resolution" from the Aspect Ratio menu
Now if I just wanted to crop the image to the new aspect ratio, without caring about the actual print size, I could do that by entering the new ratio into the Width and Height fields in the Options Bar. Since I want to crop it as an 8 x 10, and in landscape orientation with the width larger than the height, I'll enter 10 for the Width and 8 for the Height. Notice that I'm not entering a specific measurement type, like inches or pixels. I'm only entering the aspect ratio itself:

Photoshop automatically resizes the crop border to match the new ratio:

But in this case, changing the aspect ratio isn't the only thing I want to do. I actually want to resize the image so that it will print at exactly 10 inches wide and 8 inches tall. To do that, I'll click on the Aspect Ratio option in the Options Bar:

And from the menu, I'll choose W x H x Resolution (Width x Height x Resolution):

Step 3: Enter the new Width and Height, in inches
Then, I'll re-enter the same aspect ratio as before. But this time, I'll also include the measurement type. So instead of just entering 10 for the Width, I'll enter 10 in, for inches. And for the Height, I'll enter 8 in, again for inches:

Step 4: Set the Resolution to 300 pixels/inch
Notice that we also have a third box now, and this third one is for the Resolution value. Since I'll want the image to print at the highest quality, I'll enter the industry standard resolution of 300 pixels/inch:

Step 5: Reposition the crop border around your subject
Then, I'll drag the image to the right to reposition the family inside the crop boundary:

Step 6: Click the checkmark
And finally, to commit the crop and resize the image, I'll click the checkmark in the Options Bar:

To fit the cropped image on the screen, I'll go up to the View menu and I'll choose Fit on Screen:

And here's our image at its new aspect ratio:

How to check that the print and frame sizes match
Let's finish off by checking to make sure that the image will now print at the frame size we need. I'll re-open the Image Size dialog box by going up to the Image menu and choosing Image Size:
And sure enough, if I change the measurement type for the Width and Height to Inches, we see that the image will now print at exactly 10 inches wide and 8 inches tall, at a resolution of 300 pixels/inch, which means it will now fit perfectly and look great in an 8" by 10" frame:

And there we have it! In the next lesson, I show you how the Crop Tool's Content-Aware feature can add more room to your photos by automatically filling empty space with more photo!
You can jump to any of the other lessons in this Cropping Images in Photoshop series. Or visit our Photoshop Basics section for more topics!