
Photoshop’s Remove Tool Now Removes Related Elements
Photoshop’s Remove Tool now removes shadows, reflections and all traces of the object in one step! Learn how to use the new Related Elements option and get the best results.
Download the PDF: Remove Related Elements with the Remove Tool
Photoshop’s Remove Tool is amazing at removing unwanted objects from an image. But it often leaves behind traces of the object, like shadows or reflections. Then we have to paint over those areas separately to clean them up.
That’s where the Remove Tool’s new Related Elements feature comes in. With Related Elements turned on, Photoshop looks at the object you paint over and searches the image for anything related to it. Not just shadows and reflections, but also footprints, smoke, steam, water ripples, lens flare, and more. Then it removes the object, and all traces of it, in one shot. (Adobe first previewed this feature as Trace Erase back in 2025.)
In this tutorial, I’ll show you where to find Related Elements, how to use it with the Remove Tool, how many generative credits it costs, and a pro tip for getting the best results. We’ll end with a few quick examples of Related Elements in action.
Which Photoshop version do I need?
Related Elements is available now in the Photoshop beta (as of October 2026), but not yet in the official Photoshop release.
If your Creative Cloud subscription includes Photoshop, you can download the Photoshop beta using the Creative Cloud Desktop app.
Let's get started!
How to use Related Elements with the Remove Tool
With this first image, I’ll use the Remove Tool with Related Elements to remove the hiker from the scene. I’ll cover everything you need to know to use Related Elements before we look at other examples.
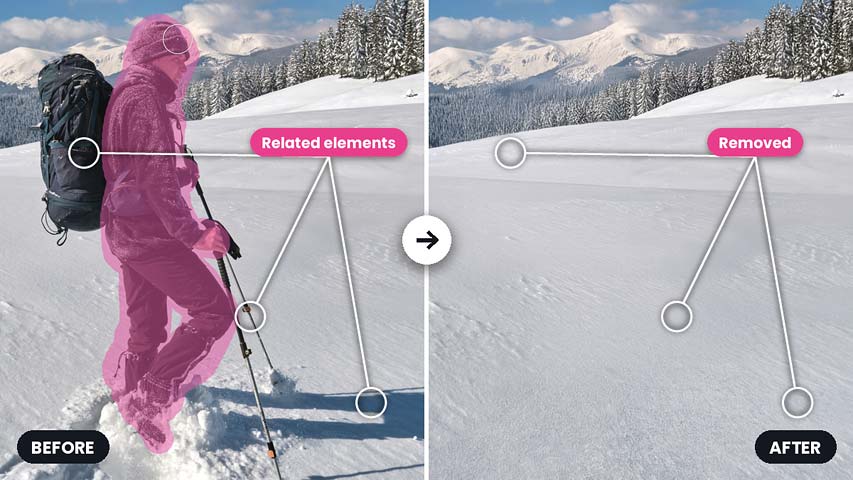
Notice all of the elements related to the hiker (his shadow, footprints, the clumps of snow under his feet, and the ski poles), none of which would be there without the hiker, so they’ll also need to be removed.

In the Layers panel, my image opens on the Background layer, currently the only layer in the Photoshop document.
Normally we would add a new layer above the image to keep our edits non-destructive. But when using Related Elements, Photoshop will automatically add the new layer for us.

Step 1: Select the Remove Tool
I’ll start by selecting the Remove Tool from Photoshop’s toolbar.
By default it’s hiding behind the Spot Healing Brush, so you may need to click and hold on the Spot Healing Brush, then select the Remove Tool from the menu.

Step 2: Set the Mode to Auto or Generative AI on
In the Options Bar, set the Remove Tool’s Mode to either Auto or Generative AI on.
Don’t choose Generative AI off. Related Elements will be grayed out because it needs generative AI to work. You’ll also need an active internet connection since Related Elements runs in the cloud.

Step 3: Choose Related Elements
Click the box next to the word Remove, either in the Options Bar or the Contextual Task Bar. Then change it from Selected area only to Related Elements.
If you only want to remove the object you paint over and not include its related elements, choose Selected area only instead. That’s how the Remove Tool worked previously.

Step 4: Choose your standard Remove Tool options
In the Options Bar, Adobe replaced the familiar checkboxes with icons for the Sample All Layers, Remove After Each Stroke, and Create New Layer options.
I’ll leave all three options turned off. When using Related Elements, Photoshop automatically creates a new layer.

Step 5: Paint over the person or object you want to remove
Paint with the Remove Tool over the person or object you want to remove. Use the left and right bracket keys ( [ and ] ) on your keyboard to resize the brush as needed.
Paint only over the person or object. Photoshop will detect the related elements on its own.
Here I’ve painted over the hiker, but not anything related to him. I even ignored his backpack just to see if Photoshop would remove it.

Step 6: Click the checkmark or the Remove button
Since Remove After Each Stroke was turned off, I need to click the Remove button in the Contextual Task Bar (or the checkmark in the Options Bar).

Photoshop takes a few moments to analyze the image looking for elements related to the object we painted over.
When it’s done, the object and its related elements disappear, replaced with new AI-generated content.
Even though I only painted over the hiker, all traces of him have vanished, including his shadow, footprints, ski poles, and yes even the backpack, as if he was never there.

In the Layers panel, Photoshop adds the edits on their own Remove tool edits layer above the image, which keeps them non-destructive.

Step 7: Click Enhance or Done
Photoshop’s generative AI results are often lower resolution than the original image, causing details to look soft. With larger images, the difference can be obvious.
That’s why Adobe added an optional step called Enhance, which uses a customized upscaler to sharpen the results.
To use it, click the Enhance button in the Contextual Task Bar (or the Options Bar). To skip Enhance, click the Done button.
Note that Enhance costs additional generative credits, on top of the credits used for the Related Elements feature. More on that in a moment.

How many generative credits does Related Elements use?
While the Remove Tool itself does not use credits, using Related Elements will cost 10 generative credits.
The optional Enhance step costs an additional 10 credits.
Comparing the Remove Tool result with and without Related Elements
To see how much of a difference Related Elements makes, I went back and painted over the hiker again, but this time with the Remove Tool set to Selected area only (which does not use credits).

The Remove Tool did remove the hiker, but it did not remove any of the related elements. Oddly, the floating backpack now has an arm connected to the ski poles, as if the backpack is going for a hike.
I would need to paint over all of the related elements manually, most likely in several passes, to remove them.

For comparison, here again is the result using Related Elements.
Pro tip: Using Related Elements with a layer mask
The biggest issue with Related Elements, and most of Photoshop’s current generative AI features, is the lower resolution compared to the original image. But Related Elements makes it worse by regenerating the entire image, not just the areas that were replaced.
In this close-up of the trees in the background, notice how soft the details look after running Related Elements (right) compared to the original (left), even though the trees were not part of the edit.

So here’s a pro tip: Use a layer mask to show only the areas you removed, allowing the original image to show through everywhere else. The following steps show you how.
Step 1: Select the Remove tool edits layer
In the Layers panel, make sure the Remove tool edits layer is selected.

Step 2: Add a black-filled layer mask
Hold the Alt (Windows) / Option (Mac) key on your keyboard and click the Add Layer Mask icon.

Photoshop adds a layer mask, filled with black, to the edits layer.

The Remove tool edits layer is hidden from view, revealing the original image.

Step 3: Select the Brush Tool
Choose the Brush Tool from the toolbar.

Step 4: Set the Foreground color to white
Make sure your brush color (the Foreground color) is set to white. If it’s black, press D on your keyboard to set it to the default color (white).
The current Foreground and Background colors are shown in the toolbar. The Foreground color is the upper left swatch.

Step 5: Choose a soft round brush
Right-click anywhere on the image to open the Brush Presets.
Twirl open General Brushes. Then choose the Soft Round brush.
Press Enter (Windows) / Return (Mac) to close the Brush Presets.

Step 6: Paint over the object and related elements to hide them
Use the left and right bracket keys ( [ and ] ) on your keyboard to resize your brush.
Then paint over the person or object, and the related elements, to hide them from view.

To see exactly where you painted, hold Alt (Win) / Option (Mac) on your keyboard and click the layer mask thumbnail in the Layers panel.

Photoshop displays the layer mask itself in the document. The white areas are where you painted to reveal the Remove Tool edits. The black areas are where the original image is visible.
Switch from the layer mask view back to the image view by again holding Alt (Win) / Option (Mac) and clicking the layer mask thumbnail.

More ways to use the Remove Tool with Related Elements
Here are a few more uses for the Remove Tool’s new Related Elements feature. Since we’ve already covered how to use it, I’ll go through these quickly.
Example #1: Removing lens flare
Related Elements can remove lens flare from an image just by removing the light source (in this case, the sun through the trees).

I’ll simply paint over the sun using the Remove Tool set to Related Elements.

Photoshop analyzes the object I painted over, realizes it’s a light source, identifies other areas affected by the light source, and removes both the sun and the lens flare at the same time.

Example #2: Removing an object’s reflection
The Remove Tool (with Related Elements) is great at removing reflections along with the object itself.
To convincingly remove the lamp in this image, both the lamp’s reflection in the glass and the light reflecting off the table also need to be removed.

I’ll paint over the lamp with the Remove Tool set to Related Elements. I’m including the power cord as well, but nothing else.

Photoshop removes the lamp and its reflections. It even alters the lighting by removing the lamp’s warm glow.

Example #3: Removing steam or smoke
In this final example, I’ll use the Remove Tool with Related Elements to remove the cup and saucer in the foreground. But the steam rising from the cup also needs to disappear, along with the shadow below the saucer and the faint reflection of the main cup in the cup behind it.

I’ll paint with the Remove Tool over just the cup and saucer, leaving Photoshop to identify the related elements.

Photoshop did an outstanding job. Along with the cup and saucer, it successfully identified the rising steam, the shadow on the table, and even the reflection in the remaining cup. It removed everything and replaced the areas with AI-generated content.

Summary
The Remove Tool’s new Related Elements option is one of Adobe’s most practical and promising generative AI features so far. Simply paint over an object with the Remove Tool and Photoshop finds and removes all traces of it from the image. Related Elements is available now in the Photoshop beta and costs 10 generative credits (plus an additional 10 credits for the optional Enhance step).
If you enjoy my Photoshop tutorials, you can download them as PDFs!
Related tutorials: