
How to Upscale AI Images with Photoshop’s Generative Upscale
Learn how to upscale, sharpen, and add creative detail to low-resolution AI images with Photoshop’s new Generative Upscale feature and its Topaz Bloom and Topaz Gigapixel partner models.
Download the PDF: How to Upscale AI Images with Generative Upscale
AI image generation is fun, creative, practical—and, depending on who you ask, the end of civilization as we know it. For me, it’s a great way to test ideas, explore new themes, and create something specific for a design or composition. And now that Photoshop’s new Harmonize feature makes blending images easier than ever, AI lets me stay in the flow and work faster instead of spending hours searching for the right photo.
But no matter which AI image generator you use—Adobe Firefly, Nano Banana, FLUX, Midjourney, or anything else— they all share the same two problems: low resolution and low detail. Most AI images max out at around 1024x1024 pixels, which makes them fine for quick mockups but useless for print or professional work. And because AI tends to focus on composition, smaller textures and details often get lost or blurred out.
That’s where Photoshop’s new Generative Upscale feature—and its Topaz Bloom partner model—come in.
Generative Upscale doesn’t just make the image larger; it rebuilds it, using AI to create new, believable detail that wasn’t in the original. And Topaz Bloom takes this even further. It’s a creative upscaler, designed for upscaling AI-generated art, as opposed to a realistic upscaler like Topaz Gigapixel which is better for real photos. Bloom continues the image where the original AI generator left off, adding fine textures, natural surface detail, and visual depth that make the image look finished.
In this tutorial, I’ll walk you through where to find Generative Upscale in Photoshop, how to make sure you’re using Topaz Bloom when upscaling AI images, and how Bloom’s Creativity slider affects the results. I’ll even show you a trick for upscaling the final Bloom version beyond its resolution limit.
I covered how to upscale real photos with Generative Upscale in a separate tutorial if you’d like to check that out.
Which Photoshop version do I need?
Generative Upscale is a new feature in Photoshop 2026.
You can get Photoshop here or use the Creative Cloud Desktop app to make sure that your copy is up to date.
Step 1: Open your AI image in Photoshop
Open an AI image that needs upscaling and extra detail.
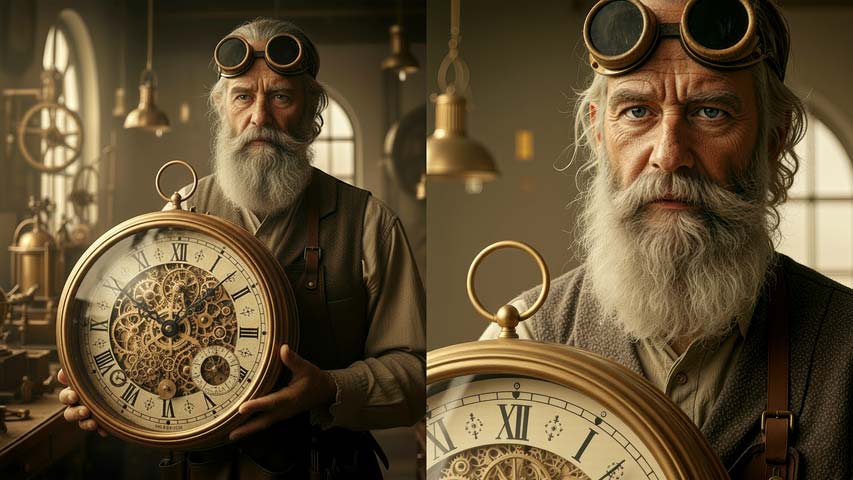
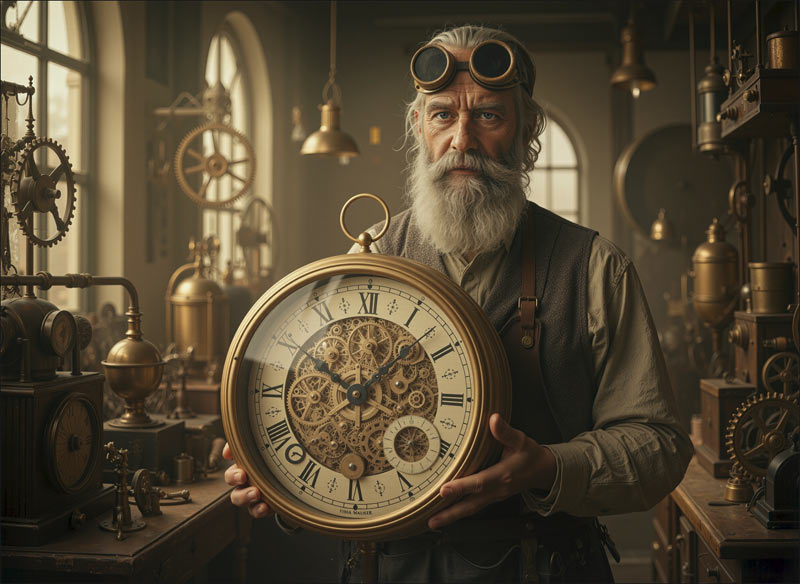
For this tutorial, I’ll use this image of a steampunk inventor, created with Firefly on the web using Google’s Nano Banana partner model. The image already has a surprising amount of detail, but Generative Upscale and Topaz Bloom can take it even further.

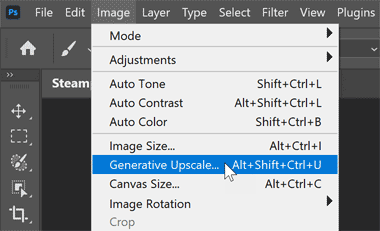
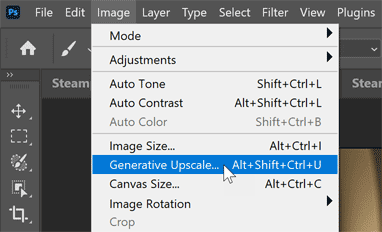
Step 2: Open Generative Upscale
You’ll find Generative Upscale by going to the Image menu in the Menu Bar and choosing Generative Upscale.
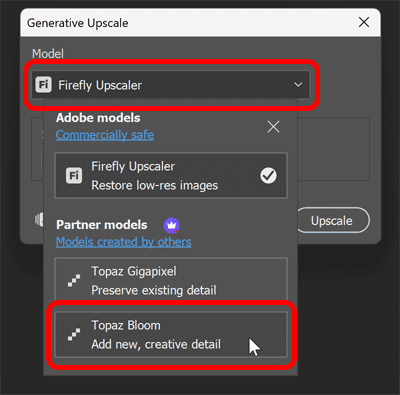
Step 3: Choose the Topaz Bloom partner model
Generative Upscale includes three AI upscaling models. The first two — Firefly Upscaler and Topaz Gigapixel — are realistic upscalers, best for enhancing real photos because they add subtle detail while preserving the look of the original image.
For AI-generated images, though, preserving the original look isn’t the goal — we want to add new detail. That’s where the third model, Topaz Bloom, comes in.
By default, Firefly Upscaler is selected. Click it, then choose Topaz Bloom from the list.
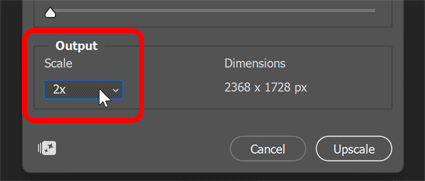
Step 4: Choose an upscale amount
No matter which AI model you choose, Generative Upscale gives you the same two options for the upscale amount: 2x or 4x.
However, each model has its own resolution limit. Firefly Upscaler can enlarge an image up to 6144x6144 pixels, and Topaz Gigapixel can reach roughly 56 MP (around 8000 pixels on the longest side).
Topaz Bloom, on the other hand, tops out at 9 MP (roughly 3000x3000 pixels). That’s because Bloom isn’t just upscaling—it’s generating new detail, which requires more processing. Depending on the size of your original image, that means a 2x upscale may be your only option.
For example, my image is 1184x864 pixels. If I choose a 4x scale, Photoshop warns me that the output exceeds Bloom’s 9 MP limit.
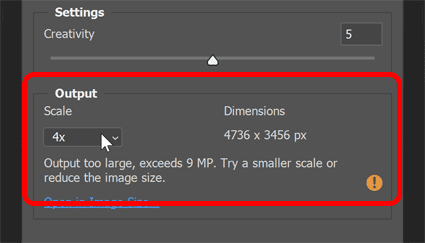
So in most cases when using Topaz Bloom, Generative Upscale will limit you to 2x. That’s fine—you can always use one of the other models, like Topaz Gigapixel, to upscale Bloom’s result even further when you’re done (as we’ll see later). I’ll choose 2x.
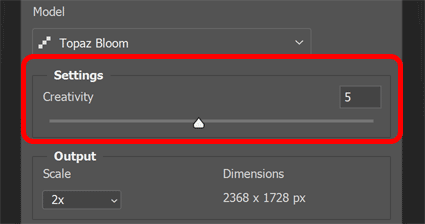
Step 5: Choose a Creativity amount
The Creativity slider in Generative Upscale controls how much freedom Topaz Bloom has to invent new detail.
At lower settings (0 to 3), Bloom enhances the image conservatively—sharpening edges and adding subtle texture while keeping the look consistent.
Medium settings (around 4 to 7) offer the best balance for most AI-generated images: you’ll see richer textures, finer details, and more defined surfaces without things getting too wild.
Higher creativity settings (8 to 10) let Bloom really show off what it can do, generating more imaginative textures but at the risk of introducing weird artifacts.
It can be tempting to crank the Creativity slider all the way to 10, and if you have the generative credits to spare (35 credits per upscale), you could experiment with all 11 settings (from 0 to 10). But the default value of 5 is usually the sweet spot—it keeps the original style intact while letting Bloom add the extra texture and fine detail the image was missing.
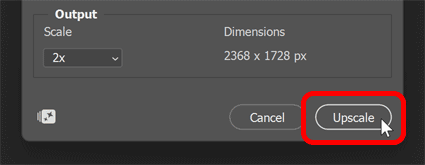
Step 6: Click Upscale
When you’re ready, click Upscale.
Step 7: Compare the Topaz Bloom upscale with the original AI image
Bloom will take a few minutes to upscale your image. The result opens in a separate document so the original remains unchanged.
We’ll take a closer look at the result in a moment.
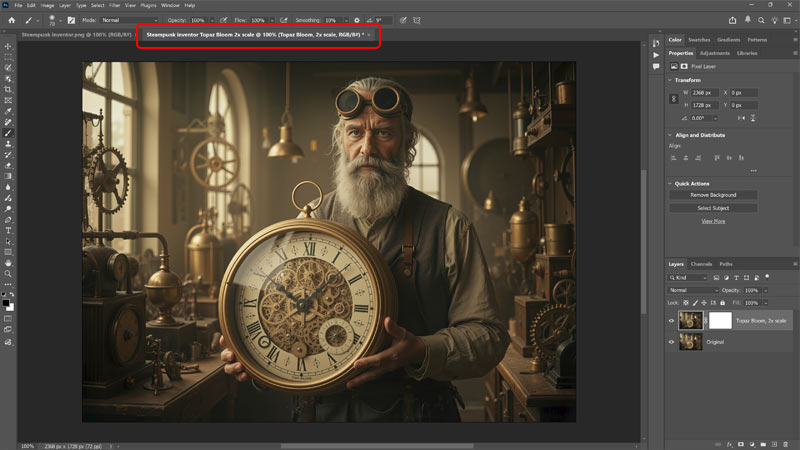
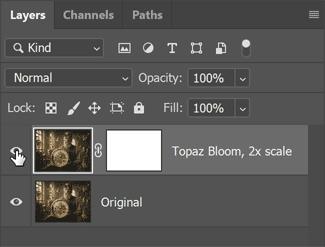
The new document contains two layers. The top layer is the version upscaled and enhanced with Topaz Bloom. The bottom layer is the image upscaled without Bloom (using Photoshop’s standard upscaling).
Toggle the top layer on and off in the Layers panel to compare the results.
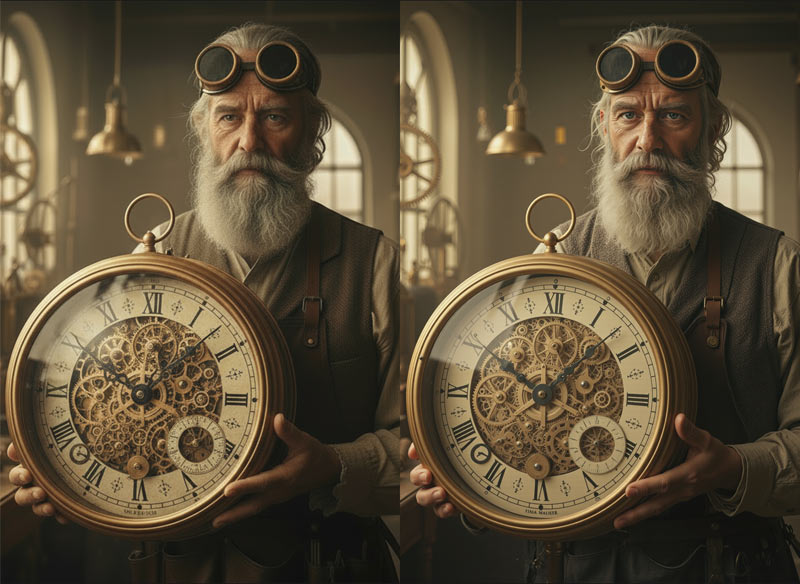
Here’s the original image, upscaled by 2x but without Topaz Bloom.

And below is the 2x upscale with Topaz Bloom. At first glance the difference is subtle—but look closer and you’ll see that Bloom added fine, convincing detail throughout the image.
The individual strands in the man’s hair and beard are sharper and more defined. The gears inside the clock are much more detailed, and the Roman numerals on its face are clearer. The weave and folds in his clothing and apron show stronger definition, while the pipes, hanging lamps, and brass cylinders in the background appear cleaner and less hazy.
The original AI image from Nano Banana was already impressive, but Topaz Bloom pushed it further—adding richness and texture that make the scene feel more lifelike and complete.
A closer look at the Topaz Bloom difference
Here’s a side-by-side comparison of the man upscaled without Topaz Bloom (left) and with Topaz Bloom (right).
Even his hands look sharper and more defined in the Bloom version.
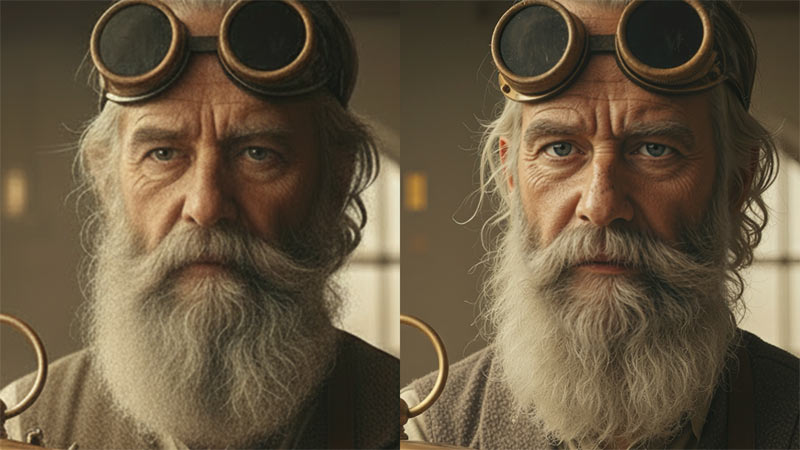
And here is another comparison, zoomed in on the man’s face. Again, the original version is on the left and the Bloom version is on the right.
Notice how the appearance of the man’s face has changed between the original image and the Bloom version. This is a normal part of how Bloom works—because it’s a creative upscaler, it has the freedom to reinterpret detail rather than simply sharpening what’s already there.
This is also why Topaz Bloom is not the best choice for upscaling real photos. If this were an actual portrait, you’d want to use Firefly Upscaler or Topaz Gigapixel instead, since both are realistic upscalers designed to preserve the person’s natural appearance.
Bonus: Upscaling the Topaz Bloom result with Gigapixel
After running Generative Upscale with Topaz Bloom, your AI image is now upscaled with richer details. If the new size is large enough for your needs, you could stop here.
But what if you need the image even larger?
In that case, we can use Generative Upscale again, this time choosing Topaz Gigapixel as the model. Gigapixel doesn’t add creative detail like Bloom. Instead, it sharpens, refines and preserves all the new detail that Bloom generated.
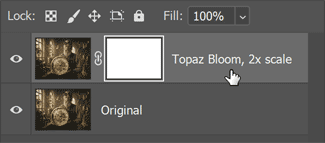
Step 1: Select the Topaz Bloom upscale
First, select the Topaz Bloom upscaled version of the image in the Layers panel.
Step 2: Choose Generative Upscale
Then go back to the Image menu and choose Generative Upscale again.
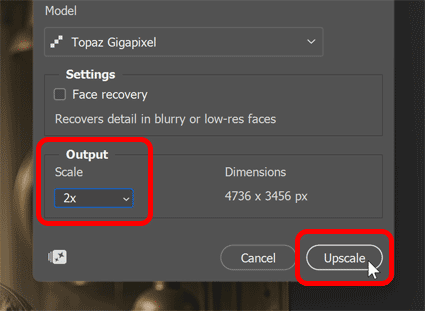
Step 3: Choose Topaz Gigapixel as the upscale model
Choose the Topaz Gigapixel model. You could choose Firefly Upscaler but Gigapixel gives you noticeably sharper results.
Step 4: Choose a scale amount and click Upscale
Your Bloom result is probably too large for a 4x upscale, even with Gigapixel’s 56 MP limit. But you can still choose 2x.
In my case, this will upscale the Bloom result to 4736x3456 px — a huge jump from the original 1184×864 px size when we started.
Then click Upscale.
In this comparison, the Gigapixel result (right) is noticeably sharper and cleaner than the initial Bloom result (left).
The man’s hair shows extremely fine detail, the textures in his clothing are more defined, the clock gears are crisper, and the Roman numerals are clearer. Even the tiny scratches and dust particles on his goggles are more visible.
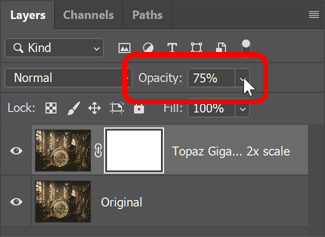
Step 5: Lower the layer opacity (optional)
If the Gigapixel result looks too sharp, simply lower the layer’s Opacity in the Layers panel to soften it.
Summary
And there we have it. With Generative Upscale and the Topaz Bloom partner model, Photoshop makes it easy to turn low-resolution AI images into sharper, more detailed versions. Bloom adds the creative texture and fine detail most AI images are missing. And if you need an even larger result, run your Bloom version through Generative Upscale’s Topaz Gigapixel model for a clean, high-resolution finish.
I hope this tutorial was helpful. Don't forget — all of my Photoshop tutorials are available to download as PDFs!
Related tutorials:
- How to use Generative Upscale in Photoshop 2026
- Blend anything with Harmonize in Photoshop 2026
- How to check your Generative Credits in Photoshop