
Create Simple 3D Text In Photoshop
In this Photoshop text effects tutorial, we'll learn how to create simple 3D text:
Let's get started!
Step 1: Create a New Document
To begin, let's create a brand new Photoshop document. Go up to the File menu at the top of the screen and choose New, or for a quicker way, press the keyboard shortcut Ctrl+N (Win) / Command+N (Mac). Whichever way you choose, Photoshop pops up the New Document dialog box. Enter the size you need for your document. For this tutorial, I'm going to enter a Width of 6 inches, a Height of 4 inches, and a Resolution of 300 pixels/inch, which is a standard resolution for professional quality printing. I'm also going to set my Background Contents to White, which will set the background color of my new document to white. When you're done, click OK in the top right corner of the dialog box to exit out of it. Your new Photoshop document will appear on the screen.
Step 2: Select The Type Tool From Photoshop's Tools Palette
To add text to the document, we'll need to use Photoshop's Type Tool. Select it from the Tools palette, or press the letter T on your keyboard to select it with the shortcut:
Step 3: Choose A Font From The Options Bar
Next, we need to choose a font. With the Type Tool selected, you'll notice that the Options Bar at the top of the screen has changed to show the options for the Type Tool. Choose whichever font you'd like to use from the list of fonts that you currently have available on your computer. This 3D effect works best with fonts that have big, thick letters. I'm going to choose Impact. You can also choose a size for your text if you like, but it's not really necessary at this point since we can easily change the size of the text later, as we'll see. For now, all we need is the font:

Step 4: Choose A Color For Your Text
Next, we need to choose a color for our text. If you look further to the right in the Options Bar, you'll see a color swatch. The color swatch shows the current text color. To change the color, simply click on the color swatch:

This will bring up Photoshop's Color Picker. Choose whichever color you'd like to use for your text. I'm going to select a bright shade of red. When you're done, click OK in the top right corner of the Color Picker to exit out of it:
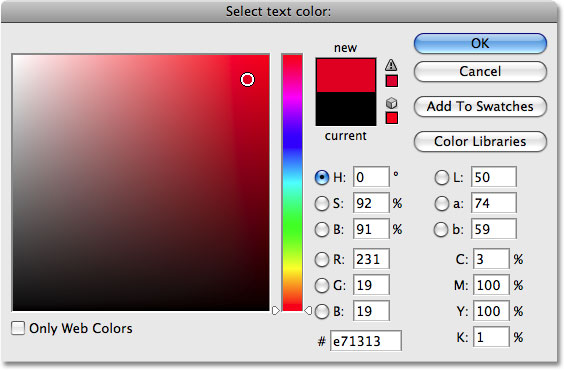
The color swatch in the Options Bar will change to show the color you've selected.
Step 5: Add Your Text To The Document
With our font and text color selected, click inside the document and add your text. I'm going to type "PHOTOSHOP", all in capital letters to enhance the effect. Don't worry if the text appears too large or too small for now. We can fix that in a moment:
When you're done typing, click on the checkmark in the Options Bar to accept the text and exit out of text editing mode:

If we look at our Layers palette, we can see that Photoshop has conveniently placed our text on its own layer above the Background layer. This is what will allow us to work with the text independently from the white background behind it:
Step 6: Resize The Type If Needed
If your find that your text is too small (or too large), we can easily fix that using Photoshop's Free Transform command. First, make sure your text layer is selected in the Layers palette (selected layers are highlighted in blue). Then go up to the Edit menu at the top of the screen and choose Free Transform. You can also select the Free Transform command with the keyboard shortcut Ctrl+T (Win) / Command+T (Mac):
You'll see the Free Transform box and handles appear around your text in the document. To resize the text, hold down your Shift key, then click any of the corner handles (the little squares) and drag the corner inward to make the text smaller or outward to make it larger. Holding the Shift key down as you drag constrains the aspect ratio so you don't accidentally distort the shape of the text as you're resizing it. I'm going to make my text just a little bit bigger by dragging the handle in the bottom right corner outward. You can also move the text if you need to by clicking anywhere inside of the Free Transform box and dragging the text to a new location inside the document:
When you're done, press Enter (Win) / Return (Mac) to accept the change and exit out of the Free Transform command.
Step 7: Convert The Text To A Shape
To create our 3D effect, we need to alter the perspective of our text. There's only one problem though. Photoshop doesn't allow us to alter the perspective of text (see how that can be a problem?). To show you what I mean, make sure you still have the text layer selected, then go up to the Edit menu at the top of the screen and select Transform from the list. A secondary menu will appear showing all the various ways we can transform the contents of the layer we currently have selected. Notice how the Distort and Perspective options are grayed out? That means they're currently unavailable to us, and that's because Photoshop can't perform either of these two types of transformations on text.
The solution is to convert our text layer into what's called a shape layer. By converting the text to a shape, we'll be able to change the perspective of it and create our effect. The only downside to converting text to a shape is that the type will no longer be editable. In this case though, since we have no need to edit our text, we don't need to worry about it.
With the text layer still selected, go up to the Layer menu at the top of the screen, choose Type, and then choose Convert to Shape:
If we look in the Layers palette, we can see that the text layer now looks completely different, and that's because it's no longer a text layer. Photoshop has converted it to a shape layer, which means we're now free to apply a Perspective transformation to it and create our 3D text effect:
Step 8: Change The Perspective
Go back up to the Edit menu. You'll see that the Transform option we looked at a moment ago has been replaced with a new option named Transform Path. Again, that's because we're dealing now with a shape. Choose Transform Path from the list. When the secondary menu appears, you'll see that both the Distort and Perspective options are now available. Choose Perspective from the list:
The same box and handles that we saw earlier when we selected the Free Transform command will appear around the text (shape). The difference is, we're now working in Perspective mode. To change the perspective of the text and give it a three dimensional look, simply click on the handle in the bottom right corner and drag it straight down. As you drag, the height of the right side of the text will increase from its center, while the left side will remain unchanged:
When you're happy with the perspective shift, press Enter (Win) / Return (Mac) to accept the transformation. Your text should now look something like this:
Step 9: Create Multiple Copies Of The Shape Layer, Each One Moved Slightly Further To The Right
This next step is the fun part. We're going to very quickly create multiple copies of our shape layer, each one moved one pixel further to the right from the previous one. This will give our letters some depth. First, select the Move Tool from the Tools palette, or just press the letter V on your keyboard to select it with the shortcut. This trick only works with the Move Tool selected:
With the Move Tool selected and the shape layer selected in the Layers palette, hold down your Alt (Win) / Option (Mac) key and press the right arrow key on your keyboard. Then press it again. Then again. And again. Notice what's happening? Each time you press the right arrow key with the Alt / Option key held down, you're creating a new copy of the shape layer and you're moving the new copy one pixel over to the right. Holding down Alt / Option tells Photoshop to create a new copy of the shape each time rather than simply moving the existing shape. The more times you press the right arrow key, the more copies of the layer you'll create, and the more depth we give to our letters.
Keep pressing the right arrow key until you're happy with the results. In my case, I pressed the arrow key a total of 68 times, creating 68 copies of my shape, each one moved one pixel further to the right. The number of times you press the arrow key will depend on the resolution of the document you're working with. When you're done, your text should look something like this:

Step 10: Move The Original Shape Layer To The Top Of The Layer Stack In The Layers Palette
Each time we created a new copy of our shape, we created a new shape layer in the Layers palette, and Photoshop placed each new layer directly above the previous layer. In my case, my Layers palette now contains 68 copies of my original shape layer. The original shape layer is sitting above the Background layer, with all the copies piled on top of it. You can tell it's the original because it's the only shape layer that doesn't contain the word "copy" in its name.
We need to move that original layer to the very top of the pile, and there's an easy way to do it. First, click on the original layer in the Layers palette to select it. Then, press Ctrl+Shift+] (Win) / Command+Shift+] (Mac). That's the right bracket key ("]") in case you're wondering. This convenient shortcut will instantly move the currently selected layer directly to the top of the layer stack:
Step 11: Merge All The Copies Together
With our original layer now at the very top of the layer stack, we need to merge all of those copies of the shape layer down to one layer. Click on the layer directly below the original layer in the Layers palette (in other words, the second layer from the top). Then use the scroll bar on the right of the Layers palette to scroll down to the layer directly above the Background layer. Don't just click on it though to select it because that will deselect the layer you just selected at the top. Instead, hold down the Shift key on the keyboard and then click on the layer to select it. This will select both layers at the same time, along with every layer in between them. All of these layers will appear highlighted in blue in the Layers palette.
With all of our copied layers now selected, go up to the Layer menu at the top of the screen and choose Merge Layers down near the bottom of the list. Or for a faster way, press the keyboard shortcut Ctrl+E (Win) / Command+E (Mac):

Photoshop will merge all of the selected layers into a single layer. If we look in our Layers palette, we can see that we now have only three layers. The Background layer is on the bottom, the original shape layer is on the top, and in between them is our newly merged layer:
Step 12: Add A Black-To-White Gradient To The Merged Layer
To give our letters a truly 3D appearance, let's complete things by adding a simple lighting effect. Or at least, something that looks like a lighting effect. Click on the merged layer in the Layers palette to select it if it's not selected already. Then click on the Layer Styles icon at the bottom of the Layers palette. A list of all the available layer styles will appear. Click on Gradient Overlay to select it:
This will bring up Photoshop's Layer Style dialog box set to the Gradient Overlay options in the middle column. We want to use a black to white gradient for our fake lighting effect. If you already have the black to white gradient selected, you can skip this next step. If you have some other gradient selected, click on the gradient preview area in the middle of the options:
This brings up the Gradient Picker, showing us all the available gradients we can choose from. The one we want is the Black, White gradient, third from the left, top row. If you have Tool Tips enabled in Photoshop's Preferences, you'll see the name of the gradient appear when you hover over the thumbnail. Click on it to select it, then click OK in the top right corner to accept it:
Back in the main Gradient Overlay options, you'll see the gradient preview area now showing the black to white gradient (if it wasn't already). Below it are a couple of important options. Make sure the Style option is set to Linear and the gradient Angle is set to 90°:
Click OK when you're done to exit out of the Layer Style dialog box, and we're done! Photoshop applies the black to white gradient to the merged layer, creating a shadow effect on the letters and completing our simple 3D text effect:
Where to go next...
And there we have it! Check out our Text Effects or Photo Effects sections for more Photoshop effects tutorials!